Showing posts with label Quilt In A Day. Show all posts

Monday, June 23, 2014

Catching Up On June - Part 1: A Win!

With June rapidly coming to a close, I've been busy with a lot of non-quilty things but have also managed to squeeze in some quilty things too.  It's important to keep my nose to the grindstone because the quarter will be closing soon for the 2nd Quarter Finish-A-Long.  I will be scrambling this week to get a few more things done on my list.

The next few posts will update what I have been working on since my last post and in the case of today what has happened since then.  So without further ado:  

 Remember this quilt?

Fabric Gal by Eleanor Burns for Quilt In A Day

Made for this challenge?

http://vroomansquilts.blogspot.com/p/lets-book-it.html


Well, not only did I get a finished quilt out of participating, but I won the "Let's Book It!" challenge for May!  Which means I also got this:


Which I can add to these:


Thanks again Sharon!!

Thursday, May 22, 2014

The Fabric Gal Finale!

**Note:  Previously Published 5/22/14, Post Edited 5/30/14**
 
I woke up last Thursday to this beautiful sight.....


....it was what was left from "The Night Before" (which of course means this popped in my head)......


I had been making my first attempts at quilting using my new ruler foot (that's the "Frame Set" in the picture, purchased from here)...


...and rulers (reviewed by Amy here and purchased from here)....


.....to do these straight line seams (well, relatively straight anyway).
 

Now it should be noted that when I "quilt whispered" this quilt I wanted to empahsize the diagonal progressions of the opposing sets of same color blocks.  But I didn't want to just stitch along the seams.  Then I realized that if I outlined the pairs of (same color) light squares by FMQing with the ruler and then created "shadow" squares on the background triangles, I would get the same impact but done a different way.

However, once I had done a few (well, a lot of them), I realized that because the squares I quilted connected,  I could have much more easily and faster achieved the same effect by straight line quilting with the walking foot between the seam lines.  Oh well, I still like how it looks and I got alot of practice using the ruler which was far easier to use than I expected. 

I added quilting in the borders using the curved ruler......


...and then bound it (in the same border fabric) and made a label area for another finish!


So now my bed can finally go from Winter........
Brrr! quilt finished in 2014.

....to Spring!

This also means I have a finished NewFO and Book It Project as well as another notch on the 2nd Quarter Finish A-Long list! 

http://catpatches.blogspot.com/p/newfo-challenge.html

http://vroomansquilts.blogspot.com/p/lets-book-it.htmlhttp://www.the-littlest-thistle.com/p/finish-along-2014.html
 
 
Edited 5/30/14 to Add:
 
I am also linking up with Amy at Amy's Free Motion Quilting Adventures for Week 4 of her Free Motion Monday posts on using Rulers. She also has more posts on different free motion techniques that you can check out by going here.

So you know I'm "Happy" (here's why)!

Monday, May 5, 2014

Fabric Gal is a Flimsie!


Currently 60" x 68".  Now it's on to "quilt whispering" and then quilting!

Thursday, May 1, 2014

NewFo, Let's Book It and FAL Progress For April


April is now over and Spring has finally sprung!  Having finished a few overdue projects in the past few months, I was also itching to start something new.  So this is what I started:


I'm hoping for a quick turnaround on this because I want to display it on my bed for Spring.  Starting something new means I have another chance to join in again on Barbara's NewFO Challenge over at her blog Cat Patches.

http://catpatches.blogspot.com/p/newfo-challenge.html

I've done a few NewFos before but this time my NewFO is also a great "three-fer" finishing opportunity (and finishing is what I'm trying hard to be about these days).  So in addition to being a NewFO, it also gets to be a part of the monthly "Let's Book It Challenge" being hosted by Sharon over at Vrooman's Quilts.

http://www.vroomansquilts.blogspot.com/p/lets-book-it.html

For that challenge, you choose a book or magazine project that's been on your "To Do" list and work on it or better yet, try to get 'er done!  If that's not enough of an incentive, when you link up you earn a chance to win a beautiful barn quilt block charm to add to a Barn pin charm holder!

Since this is also a project I've wanted to make for a long time, I had also included it in my list for my participation in the second quarter of the 2014 Finish A-long which is being hosted this year by Katy Cameron of The Littlest Thistle.

http://www.the-littlest-thistle.com/p/finish-along-2014.html

For the FAL, I actually need to finish the quilt but I've got until June to do that.

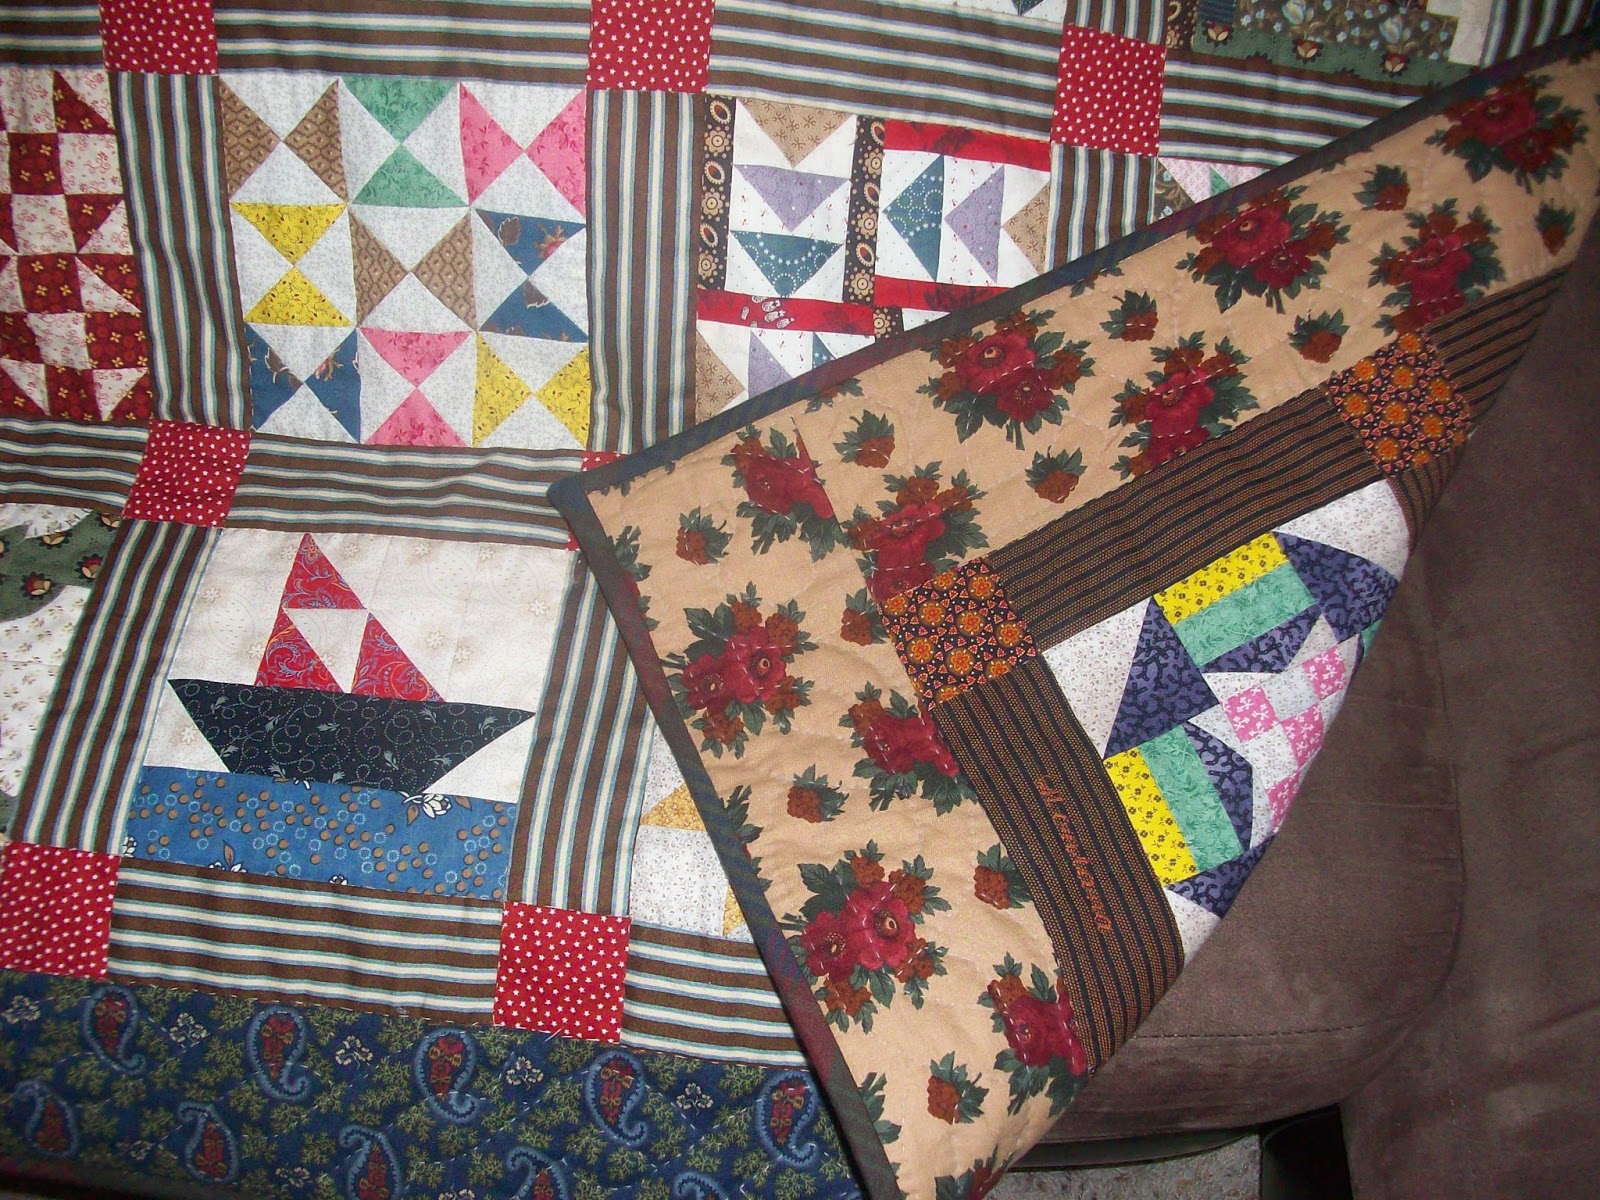
So exactly what is it that's been cooking on the quilt stove for all of this?  My project for these missions is Eleanor's Burn's "Fabric Gal" quilt from the book "Quilt In a Day: Still Strippin After 25 Years".


I first saw this quilt being made on an episode of Eleanor's QID TV series for the book back when Quilters TV was still operating as a free video website (it seems they have now moved to You Tube with a limited number of videos).  At the time I could also watch it using my Quilter's Club of America subscription.  As the quilt fates would have it, not long after seeing the episode, I also came across a sale on either the Nancy's Notions the website or in her mail catalog for some fat quarter "mystery packs".  I loved the colors of the fabrics in the picture of the packs and ordered two.

It turns out the fabrics were all from Nancy Halvorsen's Benartex Fabric line  "Angels Among Us".  The packs offered almost all that I needed to do this project.  I needed two values of each of four colors (one medium and one light) and wanted some variety in the prints used so I wound up needing an additional medium blue.  That was solved by my stash.  Prior to this I had ordered fabrics from the Connecting Threads County Essentials-Fall line to use as additions to both my Vintage Treasures quilt (seen here) and my Double Wedding Ring project (last progress seen here).  So the blue on the far right is from that line.


The challenge was then to find a background and border fabric to pull them all together.  Enter one of my LQSs Hartsdale Fabrics.  They are always there for me with the filler, foundations, backing, embellishments or thread I need for projects, especially those times when I really need to see and feel the fabric up close to make my choices.  That's where I found two wonderful fabrics for the border and the block backgrounds.  The bonus was that the border fabric was on the sale rack at the store (I love when that happens)!  The striped fabric will be the backing and was found at what used to be one of my favorite internet sources, Aunt Bee's Fabric Stash, which regretfully has since gone out of business.


I've had all of these fabrics bundled away together since 2008 waiting for an opportunity to make the quilt.  My plan was to return to the video and follow the instructions for making it.  But once again the Quilt Muses intervened in my favor.  Last year, I was at the local Joann's store and they had a "clearance books" basket at the register.  Lo and behold this book was in the basket for the fabulously low, low price of $3.95!!!  I couldn't believe my luck!


At that price I couldn't pass up adding it to the library.  This couldn't have come at a better time since I had dropped my QCA membership and Quilters TV doesn't have any QID videos on their YouTube channel.  As reported previously on my FAL list, these were all the starting strips cut for the project:


I had planned to use the piecing of these as the "leader enders" for another big project that was supposed to be my primary focus this month but instead I worked on finishing up another FAL project and piecing the parts for this.  Unfortunately I underestimated how far the fabrics would go so it won't be quite as large as originally hoped.  I even had to make up two blocks from some of the other fabrics in the mystery pack set which hopefully won't be too evident in the finished layout!  As can be seen in the opening picture, parts for all the blocks are done so I only need to sew the blocks and then the rows together, make up a couple of borders and then hopefully can get it quickly layered and quilted up before the end of May.  But for NewFO and Book It this is more than enough of a start to link up!

So go see what everyone else has newly blooming on their quilty WIP list over at Cat Patches and Vrooman's Quilts

Friday, January 18, 2013

First 2013 Finish

Happy dance, happy dance!  The Underground Railroad and Pioneer Sampler wall hanging is finally complete!  I put on the last of the binding on Wednesday and ran out and bought the rod to hang it as well.  Now heeerr's the samplers!
 
Pioneer Side

 UGRR Side


And yes, it is reversible!


So a little (o.k., a lot of) background:  these samplers are from the books of the same name published by Eleanor Burns of Quilt In A Day fame.  The Pioneer Sampler was the first QIAD TV series I ever saw back in 2003 (my second year of quilting).  I fell in love with Eleanor's techniques and loved the shaded colors of her quilt not realizing then that it was to be "my style".  That same year I heard mention that the UGRR book was also going to be released and vowed to eventually get it too. 

And the episodes can still be seen on QNNTV.com.

After seeing the UGRR series when it came on TV and once I had both books, I realized an important history lesson.  Although I had always known about both of these two movements in U.S. history, I had never really taken note of the specific time period they occurred in.  By the time I got the UGRR book in 2005, Civil War Reproduction fabrics were all the rage.  I was surprised to realize that all of these social movements were happening around the same time!  Needless to say I immediately decided that both of these samplers had to be made in the CW palette and began collecting stash. 

But I also felt that these two needed to be part of the same quilt since to me they represented two sides of the same coin:  a difficult and hazardous flight to a new place for a new and better life.  As intense as we feel our own time is, imagine living through an age where the political upheaval of the War was going on along side the fight over slavery and the migration of thousands across country to establish new homesteads, towns, cities and states.  The idea to make this a reversible quilt was furthered when I read an article in a back issue of Quilter's Newsletter Magazine.  In the November, 1996 issue (#287), Elizabeth Akana gave instructions in a "Quilters Workshop" article for making a rod pocket between the layers of a two-sided quilt (“Invisible Sleeve” with Kaye Jesse).

Like most projects this one progressed in dribs and drabs.  I started piecing the blocks in 2010.  Wanting a wall hanging, I planned to make both with  6" finished blocks.  Easy enough for the UGRR since that book provided instructions for both 6" and 12" blocks.  But the Pioneer book only provided 12" blocks so that meant I had to redraft them myself to the smaller size as I went along.  I got them done but didn't put the tops together until 2011.  

At that time, to even out the tops so they could be made back-to-back (the Pioneer sampler is only 12 blocks while the UGRR has 15) I added text blocks with information about each that I printed on muslin that I tea-dyed and prepped with Bubble Jet Set (the UGRR text was provided in the book and the Pioneer text was information I had collected from reading while making the project.  You can see close-ups of the text in this post).  They got layered because I hoped to push myself to finish the project by joining Myra's PHD Challenge that year.  I was disappointed when I didn't get them finished but appreciated that I managed to get them that far and was determined they would not languish forever. It also helped that Myra extended the Challenge into the new year!

By this time I decided that I wanted to hand quilt the two pieces.  But admittedly daunted by that prospect (well, that and I had a lot of other projects on my plate), I let it sit until December when I started on the hand quilting in the hopes of putting this one to bed as my last finish for 2012.  Didn't happen but once it was underway there was no chance of letting it flounder any longer.  After quilting in the ditch around the blocks, sashing and sashing squares (and finding that rather difficult to do with all the seams), I was not sure I wanted to quilt the blocks themselves.  I felt the power in the samplers were in the blocks and their story and since this was not a show quilt, it wouldn't suffer from the lack of extra quilting.  Not to mention it would save me about another two months of work! 

But once the centers were quilted, I felt the borders still needed something so I set out to find a stitch pattern -- nothing too complex -- to finish them off.  I found two great but simple cable designs in the book "Quilting With Style" by prolific hand quilters Gwen Marston and Joe Cunningham

You can see the stitching better from the back.
Since the borders had no seams, they were far easier to quilt (a note to myself for future hand quilting endeavors) and the stitching finished off the borders perfectly.  

By now I really wanted this up on the wall!  I was willing to bind it, live with it for a while and (heretical for me) be willing to go back and remove the binding and quilt them more at a later date if it really, really, REALLY bothered me. After tack stitching the wrong sides of the two quilts together, it was on to the binding.  And THAT almost didn't happen when I couldn't find the fabric I had planned to use for them, then found it but realized it wasn't going to work after all!  But scraps to the rescue!  Like many, I keep the leftover lengths of binding from my projects.  It just so happened that this plaid binding....


....leftover from making this quilt in 2008....


....turned out to have the perfect coloring to be a good finish for this project as well.  Bonus:  it was already cut!  This was a brushed cotton fabric and although I used the "fuzzy" side on the original quilt (which was made with brushed cottons and flannel), for this quilt I used the flat cotton side which is more in line with the fabrics used in these quilts. Although I usually add my bindings completely by machine, I finished this one by hand to insure that it was presentable on both sides.  It took a little finagling to cover the join where the two quilts form the sleeve but it got done and I even figured out how to add a label!


So the first finish for 2013 is in the can and I hope it won't be the last!

Sunday, April 18, 2010

My Quilting Bucket List

I love that all quilters tend to do and think about the same things even when we don't know each other. Last year, I read posts by Pam at the "Knitnoid" blog (note: the link is for her old blog on Blogger, her new blog is on Wordpress) and Jen at "A Quilting Jewel" about what quilts or techniques they have on that "list of quilts I want to/always wanted to make".  Most of the quilts on their lists were also on mine.  Now, we are not talking about the "latest love" projects -- these are the quilts you feel you must make to "really be considered a quilter".  

Of course, as we progress as quilters, things get added to the list as we become more confident about what we actually can accomplish.  After reading those posts I did a quick review of the quilts I've said I wanted to make since I started quilting and was surprised to find that many have already been done.  So here is a pictorial review of the Bucket List items I've already accomplished:

Irish Chain


This quilt is Eleanor Burn's "Quilt In A Day" version called "Bits 'N Pieces".  I finished this in 2008 and it was also my first bed sized quilt.  

I've always been attracted to the Irish Chain design and have seen many variations involving using two to four different blocks (one version called for some of the squares to be appliqued on!) to achieve the chain design.  I was attracted to this particular version because it only required one block (!) and the block was completely strip pieced which made them easy to construct.  

I really like this design and hope to make another one in a three color format with a seminole border, a design I saw in an old issue of QUILT Magazine.

Amish Quilt and Trip Around the World 

Sorry For Picture Quality:  For Some Reason This Picture Got Stretched Out in the Upload

Like many people, Amish quilts astounded me when I first heard about/saw them.  They seemed so simple yet were so graphic.  Also one of the things I've learned about my own quilt color preferences:  since I started quilting I've always been attracted to "shaded" color tones (colors mixed with black) so the darker palettes of Amish quilts also were a big draw for me.  My first in depth introduction to Amish quilts was Rachel Pellman's book "The World of Amish Quilts".  The "Trip Around The World" quilts in that book (especially the cover quilt) were beautiful in the way the colors in some of them radiated. 

Another reason I began quilting was when watching the old "Simply Quilts" episodes on HGTV, I learned from the beginning that there were shortcuts galore to achieving many "old-time" block patterns and I was always fascinated by that.  When I realized that "Trip" quilts could be strip pieced, it immediately became one of the must do's.  I also love when one project can check off two things on the Bucket List.  This was made in 2006.

Log Cabin (Courthouse Steps Variation) and Miniature Quilts

Once again an old picture that got messed up in the Upload.


Although I like all the variations of Log Cabins and do hope to make a few, doing a log cabin was not a must do until I saw a quilt done in this "Courthouse Steps" Log Cabin variation.  I was intrigued about how the little lantern like shapes were formed and when I found out (careful placement of colors in adjacent log cabin blocks), I really wanted to make one.  

I finally did so after my mother died and I took possession of a Featherweight machine that had been her boyfriend's (a tailor) who had died two years before her (and unfortunately I never got to have a conversation with her before she died about why she had it since she did not sew).  I had always dreamed of creating a sewing themed display in my quilt space and I was able to do so when I got the machine.  When I put the display together, I immediately realized that the machine would look even better with a quilt displayed on it (the old iron belonged to my great-grandmother).  

After long debates about what would look good hanging on it when only about half the quilt would show, I saw an antique doll quilt made in this style hung from a shelf the way I planned to display a quilt from the machine.  BINGO!  When I measured the machine, I determined that I only needed a quilt about 12" square for this.  So this also became my first miniature quilt even though making one was not, per se, a must do for me.  This was made in 2006.

Strippy and Flying Geese Quilts


The details on this one were covered in this recent post so a picture here will have to be worth a thousand words!  This was another "two for one" on the Bucket List count down.

Bargello

Once again, sorry for picture quality, these are pictures of pictures taken BD, before digital 

This little project was made in 2004 as a gift for a friend.  It comes from Kim Ritter's "Quick Quilting" book.  I do hope to do a larger bargello project in the future and recently bought this book when Connecting Threads had a sale earlier this year.  But this gave me a nice taste of it and come to think of it, it was my first experience quilting clamshells.

Feathered Star


This was made in 2003.  I saw Marsha McClosky on "Simply Quilts" and she demonstrated the Radiant Star block.  It looked to me to be one of those blocks that looked a lot harder than it was to make.  

This is the "Joining Star" from her book "Feathered Star Quilts" a book that was really tough to get.  This was one of the easier blocks in the book (they are rated one, two and three stars for difficulty) and I was nervous about making it until putting it together.  Accurate cutting is the key -- if you cut right, the construction is a breeze.  

I originally made this to be a one-block wall hanging and hung it to go above a bookcase but then I wound up putting a chair where the bookcase was supposed to be so I added the bead fringe to fill in the blank space that was the difference in the heights of the two furniture pieces.  This was also a chance to try the "focus fabric color scheme" theory about choosing quilt colors, something that was a big concern for me back then.  All the colors in the center were picked out from the fabric in the prairie point border (and making those was also a first!).  

I hope to make a whole quilt of Feathered Stars and just this week purchased a set of Marti Michel's templates that were on sale at Keepsake Quilting (less than half price!) and also hope to get Marsha's new ruler in the future as well.

Still To Do......

So those are the Bucket List quilts I have done or at least "tasted".  But there are still some I haven't tackled (or at least finished) yet:
  • Double Wedding Ring (in progress and blogged about here)
  • DONE! String Quilt (also in progress and blogged about in the same post as the DWR above) Finished two Bonnie Hunter quilts here and here.  
  • DONE! Lone Star Quilt (I have fabric already purchased for two different versions and had considered doing one for the Liberated Amish Challenge but I don't think that will didn't happen.  Started Finished a one block wall hanging in 2022 2024 
  • DONE!  Dresden Plate quilt (already have fabric for one to be done in Civil War Repros was completed in 2013)
  • A "complex" Applique Quilt (I've done a few simple appliques but a really complex one is still in the "dreaming of" stage)
  • A Baltimore Album quilt (currently in the "collecting ideas and designs" stage)
  • ....and the mother of them all -- to do a white whole cloth quilt to be quilted BY HAND!  I do have a quilt-as-you-go hand quilting project in process but and I think doing the wholecloth is still many years away was started in 2019.
So there you have it, my Bucket List.  So of course, I ask you, what's on your list?

Saturday, April 17, 2010

The Flannel Series Continued

Last week I finished my second finish for 2010 and the latest quilt in the "Flannel Series", so as promised in my last post, I wanted to give the details for both projects.  First up is the finished quilt pictured in that post.


It's called "Flying For Cover". I learned about it when Keepsake Quilting sent me an email last October about projects using flannel.  This was one of two quilts offered as a kits. I thought it was a gorgeous quilt, loved the fact that it was in flannel and probably most important, would fulfill two "Bucket List" desires.  You know, the Bucket List -- the list of quilts you want to make before you "kick the bucket"!  

While I plan to do another post about that later, I will say that the two quilts this satisfied for me was doing a strippy quilt and doing a quilt with (a lot of) Flying Geese.  I wasn't able to purchase the actual kit for this though -- at the time I wanted it Keepsake had it on back order for quite awhile.  I was able to find the sashing and border fabrics ("Two In The Bush" by Bonnie Sullivan for Maywood Studios) at EQuilter.com and the flannel tone-on-tones at Fabric.com and then bought the pattern at Keepsake (which was also sold separately from the kit but also can be purchased from the pattern designer's website).  With everything gathered, I was able to put together my own "kit".  Later, the backing fabric came from AAA Quilters Supply another favorite Internet vendor.

Most of the time when I make a quilt, I am also looking to try new techniques.  In this case doing the Flying Geese allowed me to finally get a chance to use what I call "Eleanor Burn's Two Squares" method of making them.  I saw her demonstrate this when she did the "Pioneer Sampler" and the "Underground Railroad Sampler" on her Quilt In A Day TV shows.  If you've never seen her technique check out Mary's post on this blog or go to the Quilt In A Day channel on Quilters TV.com and watch any of the Pioneer Sampler episodes or any other episodes using the "Triangle Pieced Rectangle" method. 

Although the finished units can be squared up with a regular ruler, I knew if I ever did a project with a lot of flying geese, using hers would be easier but I hated the fact that you needed a different ruler (sold separately) for each different size geese (actually each ruler makes two sizes).  I resisted buying them until I was able to get her Mini Ruler set on sale. Unfortunately the mini set didn't make the size needed for this pattern so I wound up also buying the Jumbo set.  Once I started making them, I was hooked (it's such an efficient method) and then wanted all the rulers which I wound up buying before I finished this project!  Prior to this my favorite method was the "five squares" method demonstrated here but now this is my favorite.

Another technique I got to try was Sharon Schamber's hand basting technique.  You can watch videos of it here and here.  It was really easy to do although I disagree with her that it's any faster than pin basting.  She says you can baste any size quilt like using this method.  However, you should take note that to do a large quilt like a queen or king size will require a couple of long tables to hold the whole top stretched out end to end.  However for this lap size quilt, my cutting table accommodated it just fine.


This method worked really well, in the end I had no puckers on the back and as she notes in her demo it was very easy to remove the basting stitches as I quilted. While I won't give up pin basting (I baste on my cutting table so physically it is not hard), I definitely would use this technique again as well.

The finished quilt was quilted in a clamshell pattern.  I got that idea from the pattern designer Janet Locey of Henscratch Quilting. In the picture of the quilt on her website, that was what she used and I felt it was doable.  While I have always quilted my own quilts, I am not always confident about doing it before I start.  I started out with the plan to use templates printed on sticky-backed full sheet labels as instructed in the book "One Line At A Time" by Charlotte Warr Anderson, one of the many quilt stitch books I invested in last year.  But after doing two rows across the quilt I felt confident enough to finish the rest of the quilt freehand.  I can't say the clamshells were all even but in the end, the texture on the quilt looked real good.

In the next post I'll detail the latest installment of the Flannel Series.