Showing posts with label 2017 Finishes. Show all posts

Monday, December 18, 2017

A Christmas Deadline: The Western Kringle Quilt -- Pt 5: Right Down To the Wire For A Finish!

FINALLY, the Western Gift Quilt Is Finished!
(56" x 84)
 
Front

Back with label area

A close up of some of the pictures in the quilt

I put in the last stitches this morning after a too long weekend of working on it.   This was my adaptation of the "Changing Lanes" quilt from Deanne Moore's book "Fabric Play - Change the Fabric, Change the Quilt".  I made it as a Christmas Kringle gift for my mother-in-law's husband who is a big fan of westerns.  I had started on it back in November (which you can read about here) but this post is all about the final throws of the finishing!  If you're interested in some process posting then read on......

Did you ever have one of those projects that every time you get something done on it, it just never seems to be finished?  This was one of those although when I started out I thought this was going to be an easy project!  In its defense, I only have myself to blame for complicating it.  The issues with the photo transfers (which are detailed in this post) started it all.  Then the choices made for finishing it (or more correctly, the difficulty of MAKING those choices) added extra effort, time and intricacies. 
 
In the end this was very simply quilted but it took me a while to decide to go that route.  There are so many creative options for quilting a quilt now that sometimes it can be hard to just get out of your way on deciding how to do it.  I decided to start out by ditch stitching all the seams and then see if I was inspired to do anything else.  About that...

An "after the fact" simulation
Reminder #1:  Since I've been using my old Euro-Pro machine, I had forgotten how hard it is to package a quilt in a small harp space.   It's fine if you are doing free motion or are using a walking foot for border to border straight stitching.  When you have to turn the quilt to change direction in the middle of the quilt in order to stitch the little seams around the pictures -- it's time to choose another stitching design (or should have been)!
 
 Reminder #2:  After the New Year, I really need to take my Janome in for repair! 

 
 After spending Saturday morning and evening doing all the ditch stitching (DH didn't get in from work until late so we had to make a planned grocery shopping trip in the afternoon), I felt the quilt needed more quilting but wasn't sure, given the time crunch, just what to do.  While I did plan to outline the figures in the photo transfer squares, what to do in the other areas?  Stipple?  Cross hatch?  More vertical lines?  Watch TV with DH and wait for inspiration to hit?  Ok, I can tell you that last one is not a good choice when a deadline looms but it was all I could muster that night.
 
Very early Sunday morning, I went with DH and one of my sons to see the new Star Wars movie (my other son was invited to a free screening of the movie being hosted by his girlfriend's school later that same day).  We enjoyed it and after we got back it was time to get back into "finish this quilt stat!" mode.  In the end, I finally decided to do just a few long crosshatches across each "block" (each rectangular four piece strip set unit) from corner to corner opposite the photo transfers.  I also decided to stitch down the center of the outer border sashings. 
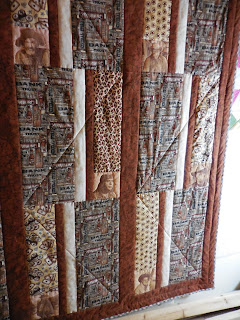
 
When done, while I still thought it a little too under quilted overall I very much liked the effect of the giant zig zags across the top and how that somewhat mirrored the similar layout of the offset dark brown and cream strips in adjacent blocks (the "Changing Lanes" of the pattern).
 
Of course deciding how to quilt it also prompted a lot of back and forth about what thread to use to do the quilting.  I admit I prefer to avoid a lot of thread changes whenever possible.  I was able to settle on a dark tan/olive Aurifil #2370 for the top (spool laying down in the photo below) after considering various browns, tans, creams and even monofilament.  Fortunately #2370 also worked well in the bobbin for the print I was using across most of the back.  I did debate about doing a different thread in the border but in the end, felt the stitching would look more balanced over all if I kept with the same thread across the whole top. 
 

50wt Aurifil thread is so fine that even when it contrasts it doesn't scream for attention against the fabric.
 
I still needed to detail stitch the photo transfers but decided instead to first trim up the quilt and attach the binding.  I had chosen a plaid for that and went the usual route of cutting it on the bias for that edging.


I also opted to glue baste the binding in the hopes of making the stitching go faster.  It did but the need to press the edge to secure the glue means a very flat binding when done.  Again not my preference but in the service of time, necessary.


I was tired by that point so left the outlining of the photo transfers until today.  Again there was the thread issue.  Again I auditioned a number of colors but decided on Smoke monofilament as the best option for all twelve of the pictures on the top.  For the back, I did opt for thread changes this time around:  for eight of the pictures, the bobbin thread would land on the light backing print so I stuck with using #2370 in the bobbin for those.  For the three pictures when the bobbin thread would land on the brown barbed wire print, I wound part of a bobbin of brown thread for those (Connecting Threads Essential in "Cinnamon", 2nd from the left in the previous thread picture).  I had one picture that was on top of the "show down" panel motif on the back.  For that one, I chose to go with monofilament thread both top and bobbin so as not to have a very visible weird head outline on the stomach of the gunman in the panel image.   
 
I have to say throughout all of this, I did have some issues working with using the monofilament.  I've always set my monofilament thread off the machine, usually on a thread stand. My Janome has a thread stand attachment and I used to use one of those cast iron stands with my Euro-Pro.  However the thread pole for the cast iron stand got lost or misplaced back when we moved in 2011 and I haven't been able to find it or a replacement for  it yet. 


However, my Euro-Pro also still had on it what I had used prior to getting a thread stand:

 
 I learned about using monofilament thread from Harriet Hargrave's book "Heirloom Machine Quilting" back when it was the "Bible of Machine Quilting". 


Back then she taught that the circular base of a simple safety pin taped to the top of your machine could serve as a "make do" thread guide.  Fortunately it worked!
 
Note:  Lori Kennedy, a Craftsy machine quilting teacher and quilt book author  recently hosted an interesting "Open Forum" on her blog "The Inbox Jaunt" about using monofilament thread.  Read her thoughts on the subject and those of her readers (including yours truly) in the comments of the post.
 
However, the needle threader on my Euro-Pro is also out of alignment (hmmm, guess it needs to go in for service too!) so needless to say it was a tricky prospect to try to thread the machine needle by hand with the "invisible" thread.  Uggh, so close to the  end....the solution was my sewing table light placed low and behind the machine so it shone through the eye of the needle from the back making it easy to see right where to put the thread.  Problem solved!  I'm glad I took the time to outline the figures in the images -- they really popped in their respective squares once that was done.


The good news was that I managed to get all the pictures outlined before I had to leave to go to our community garden (I and a few other members are attempting some season extension projects). 

As I said at the top of the post, the morning quilting session was FINALLY the last of it for this project!  On my way back from the garden, I picked up some Priority Mail boxes from the post office so I can pack up this quilt and send it along with....


...the cookies I bake each Christmas for my MIL and her sister.  These will go to the post office tomorrow morning and hopefully will make it to North Carolina by this weekend!  Boy do I look forward to getting back to the mystery piecing now!!

Thursday, November 30, 2017

Oh Wait! I Forgot One Finish!

Before I get to the other big project (in addition to the mystery quilts) that I have to (continue to) work on (hint: Christmas related), I wanted to take a moment to show the only quilty thing I got done in October.  One of the reasons I haven't blogged in so long was that the last two months have been busy months.  October started off with some non-quilty things like:

DH was on vacation for two weeks during which we had scheduled to build a protective structure for the community garden bed we share with another member:


....and a trip to see the Chihuly exhibit at the New York (Bronx) Botanical Gardens just before it ended:


Later on, I managed to squeeze in a little quilting.


This is the neck roll cover I made.  Ever since I began regularly using quilts on our bed, I've had a neck roll pillow form that I made from a pattern in a book.

I made mine a little longer.

As I've accumulated bed quilts, I try to see to it that I have a coordinating cover for the neck roll.  The first time I decided to make the neck roll, it was to coordinate with a patchwork and applique quilt that I didn't make:  before I was confident enough to make a bed sized quilt, I bought one and made this simple, one fabric cover for the neck roll.


Then I made my first bed sized quilt in 2008 (Bits 'N Pieces, on the left) and made another cover to go with it.  Fortunately for me it also coordinated with the Vintage Treasures quilt I made a few years later.


When I finished my Brrr! quilt in 2013 (on the right in the picture below) I made a coordinating neck roll cover for it and then realized that it also worked well with the flannel Triangle Trips quilt I had finished back in 2010.


However, when Fall rolled around this year, the quilt I put on my bed was one I got from my mother's house after she passed away in 2004. 


She had bought the quilt in 2002 not too long after I started quilting.  When I saw it, I immediately recognized it as a patchwork quilt.  When I asked her why she had chosen that particular design, she just said that she "liked the colors".  I never knew her to own or use a patchwork quilt prior to that.  When she passed, it was among the things I made sure to take from her apartment.  So when I put it on the bed this year and realized that none of my other neck roll covers worked with it, I immediately decided that a "quickie" project was in order.

Of course "quickie projects" are never as quick as you think they will be!  My first thought was that I really liked the colors in a fabric I had used on the ends of a set of Fall pillow cases I had made to go with the Triangle Trips quilt (and I have also used these cases with my Mom's quilt in the past).


The fabric is Marcus Brothers "American Plains Large Floral" and was leftover from the backing of my "Red Harvest" One-Fabric (lap) Quilt.


I actually don't have that quilt any more --- I gifted it to my husband's Aunt when she visited us last summer along with my Mother-In-Law.  I lucked up when I searched through my stuff and found I still had an 11" WOF strip of it left!  However, the print is directional along the lengthwise grain so what I had was not quite enough to go around the neck roll.  So then I decided I might insert a section of pieced blocks to fill it out.  It just so happens that right then I was looking at a back issue (October 2009) of Fons & Porter's Love of Quilting magazine and saw this ad:

 
BINGO!  Some Maple Leaf blocks would work well to fill in the shape.  I figured out they needed to be three inches (finished) and then pulled fall colored fabrics for them and pieced them up.  Then it was a debate about what fabric to use to surround the ends of the blocks and the roll.  I auditioned two fabrics and had to choose if I should do this with the same fabric:

 
...or this?


I definitely liked the contrast offered by the second fabric.  Next was how to finish the inside of the ends.  That first neck roll I made was all one fabric so the ends were just the same fabric folded to the inside.  However for each subsequent roll, I've used a contrasting fabric lining in the ends and this one was no exception but it took a bit to decide what fabric to use.  I finally went with a gold fabric in a color similar to the "Plains Floral" but in a smaller scale print. 


There is also the matter of the other embellishment for the roll ends:  the ties.   For the very first roll I made, I just used some ribbon secured to the roll to tie the ends shut.  All the later rolls have either fabric turned-tube ties or ties made by folding the fabrics edges in twice and stitched along the edge as above. 

Since my other roll covers were made from one piece of fabric, I didn't need to line the inside center of the roll.   This time, since there were pieced blocks, I lined the center with muslin to protect the seams of the blocks when I'd pull the neck roll form through.


And that was that!


BTW, the set of accent pillowcases I'm using this time around are made from the leftover backing fabric from the Bits 'N Pieces quilt.  Now as for what I did for all of November (before Bonnie's mystery started), tune in for the next post!

Tuesday, September 5, 2017

It took until the holiday weekend to get back on track...

With September now firmly in place, it's time to get my bearings.  In my last post in early August, I was all fired up and ready to get down to the nitty gritty of quilting my latest two projects and then.....NOTHING!  I had stitching plans for both but then got overwhelmed when it was time to actually sit down and stitch.  For the "Abundance" table runner (quilt design by Gudrun Erla from a Connecting Threads kit), the plan was to fuse down the leaves and since the body of the runner was already quilted (done quilt-as-you-go),  it was going to be a simple matter of choosing a thread to zig-zag around the leaves, then bind and finish it.


The problem was that after I got all the leaves fused on, I was really struck by the beauty of the design and suddenly the plans for a simple zig-zag edging didn't seem like enough.  I began to question the original plan of choosing just one color thread for them all and once I started considering doing thread changes, I began to see the possibilities for quilting more detail like veins in the leaves and maybe even doing some wood grain stitching on the "tree trunks".  However, going for more detail also meant committing to more time working on what was supposed to be a "quick-and-finished-this-week" project.  Needless to say I wound up going back and forth on this to the point that I didn't sew at all.

This puts me in a new and interesting phase in my quilting: early on I was determined to machine stitch my quilts but terrified to actually quilt them (aka "mess them up") so would often take weeks (months, years) to get up the courage to tackle them.  Now I'm more confident in my ability to stitch them but get bogged down on achieving "just the right balance" of quilting detail.  I love the end look of custom quilting but am aware of how much time (and sometimes extensive thread changes) it takes to execute.  Since my projects generally don't start out with the intention of being "show quilts", I usually want to try to default as much as possible to the use of one thread and simple continuous stitch designs.  However, once you get that "big" quilting idea in your mind's eye, it's hard to settle for less.

So I thought that instead I'd move on to quilting the other lap quilt I had also been working on but that didn't happen either.  I got bogged down again trying to decide how I wanted to quilt that quilt too!  By then two weeks had passed and every day I'd say, "I should quilt" and every day I didn't.  Instead I tried reviewing my stitch pattern books and then all the Craftsy classes I've signed up for over the years and waited (hoped?) for inspiration to strike.

Also during this time, my old iron started "peeing" every time I used it but fortunately on my last trip to the warehouse club they had an iron on sale for $20 so I got it.  Well a new iron also highlighted how bad my ironing board cover looked....

Picture from last year

....so I kept busy by making a new one: 


How lucky is it that I had purchased this blue Alexander Henry print on sale probably two years ago, and it just happens to be the perfect coordinate for my new iron! 

I also busied myself with die cutting additional applique motifs out of the scraps of all the batik bits that already had fusible attached.  Hopefully these can become or add to something one day.


Fortunately, I finally got some really good news when Craftsy sent out an email two weeks ago offering free views of one lesson from each of two of their classes:  Christa Watson's "Quilter's Path: Plan It, Stitch It" and  Helen Godden's "Escape the Ditch:  Empower Your Quilting".  Both pointed to motifs that helped me get over myself and finally jumpstart the quilting of both of the stalled projects!  For this one, Christa reminded me again about the idea of doing a "wood grain" motif which sent me back to viewing how Angela Walters did it in her "Machine Quilting Negative Space" class and that gave me the push to go back to the runner. 

So during the last two weeks of August, over the course of five (not continuous) days I pushed through to get the stitching done.  I detailed stitched the "tree trunks" and then the leaves in batches corresponding to the (bunch of) necessary thread changes.


I was using a medium dark brown bobbin thread which coordinated with the back.  It worked fine through the first two rounds but then one day it seemed like I just couldn't get the tension right -- there were a lot of "pokies" and thread breakage.  I had to walk away from the stitching for a day or two and when I regrouped I found that raising the feed dogs back up while lowering the stitch length to zero seemed to solve the problem and it was another two (again, not continuous) days to finish up the leaves.

I thought I was done and ready to move on to binding but then it still didn't seem quilted "enough".  So I decided to stitch in the background as well, completing that on Sunday and then bound it on Monday.


Before doing the background stitching I had another brainstorm to take some of the extra leaves I had cut and fuse them onto the back to use to write in my label information.  For those I used the colored threads on the back but a neutral thread on the front which created "shadow" leaves in the center front.


9/7/17 Edited To Add:  I was finally able to get a good shot of the "shadow" leaves on the front.


In the end, I'm happy to finally get the runner I now call "Autumn Leaf Dance" done.  It's not bad and while I like the background stitch motif, in hindsight I feel it's now quilted too densely.  So "Note To Self":  always sketch out your potential stitch designs!!  If I were to do it again, I'd use the same motif but execute it on a larger more open scale.  However, finished is better than perfect and every project is a practice for the next.  Moving on!

Friday, July 21, 2017

The Golfing Gift Quilt is A Finish!


Here it finally is in all its finished glory!  This is "Jon's Gone Golfing With the Mets!" finishing up at approximately 54" x 65" using the "Gone Golfing" pattern by Rochelle Martin of Cottage Quilt Designs.  And just in time too, we'll be heading out to see the recipients (plural, the mug rug I made for his wife is here) this weekend.  If you'd like to read some process posting, please continue.....

This project started out with the "A Hole In One" fabric line from Clothworks.  I knew my friend's husband is a golf fan but he's also a NY Mets baseball fan and for a long time I debated about which of his interests to use to inspire a quilt.  This fabric line was perfect because it channeled the theme of the first and the colors of the second.

 
Add some MLB fleece for the back to add the actual baseball theme to the mix and I was on my way!


Once I had the fabrics, I still needed a design to apply them to and when I saw the "Gone Golfing" pattern, I could immediately see the golf fabrics applied to it so now it was a "PIGS" (Project In a Grocery Sack) in a poke! 
It also helped that I was already familiar with this designer having made another one of her patterns three years ago (see it here).  Since using all the fabrics in the line didn't work for the pattern design, I had to add a few others to bring it all together....


 .....including key tone-on-tones from my "Freckles" (by Northcott) stash.


Construction-wise this one was all about strip piecing and fusible applique.  I had to change the pattern's borders to accommodate the amount of fabric I had.  I had purchased the "Hole" fabrics as four fat quarter sets because at the time that was the only available source for the white background print.
 

I had worked on this project pretty intensively during Judy Laquidara's Quilt-A-Thons in January and February hoping to get it done for the recipient's birthday but I only got as far as getting the top done then.  (Unfortunately, Judy has since decided to discontinue the QATs and blogging about quilting although you can still visit her for her gardening, recipes and chicken tales.)  Then this "simmered" for a long few months while I decided how to quilt it.  Originally my plan was to just grid quilt it through the squares with a walking foot.  But when I started sketching out some curved quilting, I liked how it looked and realized that it sort of mimicked the topography diagrams of golf course holes. 


I admit I also thought the curves would be faster to stitch because they could be done free-motion so would stitch out more continuously over the surface but in the end I don't think that was true.  When the center stitching was completed, I stitched-in-the-ditch around all the borders then debated what to do for the wider green and blue borders.  For the green, the solution was to make the pattern's applique letter templates smaller, print them on freezer paper and use them to spell out the names of famous golfers past and present.  If you're watching the (British) Open Championship this weekend, some of these names will look familiar!


Since the templates were freezer paper, they were reusable multiple times.  I did make multiple copies of some letters that were used more than once in a name or so that I could set up more than one name at a time (A, E, I, L, O, S, T).  One letter doubled for another (M was also W).  Since this pattern only had some of the letters I needed, I had to use some from the author's other pattern (A, C, H, L, M, N, O, S) and like I did for the previous project, make up a few that I needed that weren't available from either pattern (G, K, Y).    

Note:  A very handy tool when figuring out how to re-size pattern elements is a Proportional Scale by C-Thru Ruler Co. (now part of Westcott Corp.).  It is available from quilt shops (where I purchased mine years ago), art or office supply stores and even Walmart (although for once, their price is pretty expensive!).  Just turn the inner dial to match up the original size to the new desired size and it will tell you the adjustment percentage. 


In the past I have cut my own freezer paper sheets from the rolls purchased at the supermarket and that works fine for templates you will trace by hand.  However, when you need to put sheets through the printer, it is hard to get the rolled sheets to lay flat (even after pressing them or sitting them under heavy books for days -- ask me how I know!) so I'm loving the prepared freezer paper sheets I purchased from Martingale Publishing for that.


At first I free-motion stitched around the templates using a darning foot but found that it would often get caught under the freezer paper edges if they pulled up.  Something that I haven't use in years came to the rescue for that:


The wide plastic base on the "Big Foot" machine quilting foot kept the freezer paper in place as I quilted around it and that helped a lot to speed the stitching.

For the last wide blue border I decided to just mimic/echo the small orange border and went back to the walking foot for that.   At first I used painters tape (1" wide) as a guide....


...until I remembered that my walking foot has a guide bar!  So much easier and time saved not having to reposition (or even use) the tape!


I was a little scared about all the quilting because I have never quilted on fleece (or Minky) before but it was no problem at all.  I had no tucks and I've got to admit, I love the additional texture the quilting added to the plushness of the fleece.  I will also say that just like having a busy backing print, plush fleece will hide a lot of stitching sins too!
  

Back when I went to layer the quilt, I found out that the ends of the fleece I purchased were cut very wonky and because my border changes meant that the quilt finished a little larger than patterned, I was a bit short of fleece on the bottom of one side.  Note to self for the future:  buy an extra half yard of fleece so you can even the ends once at home and be mindful of how design changes will affect the overall size of your quilt as you are altering them. 

I decided that the solution was to piece in a label area on the short side.  Whatever fabric used had to be light or bright enough to write on.  In the context of the ball team's color scheme, the best color for that was orange.  Fortunately I happened to have the perfect "Freckles" color for that too!  I started collecting "Freckles" prints after getting some as part of a quilt kit years ago (that was for this quilt).   This particular orange was one I picked up on the "half yard sale shelf" that a local quilt shop (that has since closed) used to have.  At the time I really thought this line of TOTs was really versatile and a few years ago when I heard the line was being discontinued I stocked up on as many colors as I could get.  Since the cotton "Freckles" fabric was lighter in weight than the surrounding fleece, I also basted it together with an additional layer of batting so that area would have the same loft as the fleece around it. 


I originally planned to stitch the center of the quilt with white thread but felt it contrasted too much with the darker green and blue fabrics.  An odd choice of color turned out to be the best thing for overall "subtle contrast" for quilting all of the center -- a light green from Aurifil (#5014) which has been sitting on my sewing table since I used it for the bobbin thread on a Quilt-As-You-Go calendar quilt project I started a long time ago.  I also used this thread to SID around the borders.  For the top stitching in the last blue border and for the bobbin thread for the fleece backing I used Christa Watson's favorite "near black", the dark grey Aurifil #4241 which I finally got a few spools of.  For the label area, I used another unexpected choice, Connecting Threads "Cherry" (red) in the bobbin. 


 I stitched a basting line in the ditch around the label area so I would know where to make the bobbin changes for it when I was stitching in the front .   


Final debate was the binding but with little fabric left there wasn't much of a debate.  It was either the blue plaid or the orange plaid.  The orange was a little too bold for the front although I liked the way it looked with the fleece in the back.  If I wasn't so anxious (and time crunched!) to get this done, I might have opted to do a two color binding.  So I went with the blue although not on the bias as I normally like to do with plaids -- there's already enough pattern going on in this quilt and the print set on the diagonal seemed a bit too much at the end.


So I'm glad this one is finally finished and I can move on to other things!