Friday, December 15, 2017

A Christmas Deadline: The Western Kringle Quilt -- Pt 4: Crunch Time!

While today is the day Bonnie issues the next set of instructions for the "Ringo Lake" mystery quilt (and I will be picking those up!), my sewing focus today will be on finally moving toward finishing up the Christmas gift quilt I've also been working on.  When I last left off, I needed to get some additional MODA Aged Muslin for the photo transfers for this project.  Fortunately the Fat Quarter Shop came to the rescue!


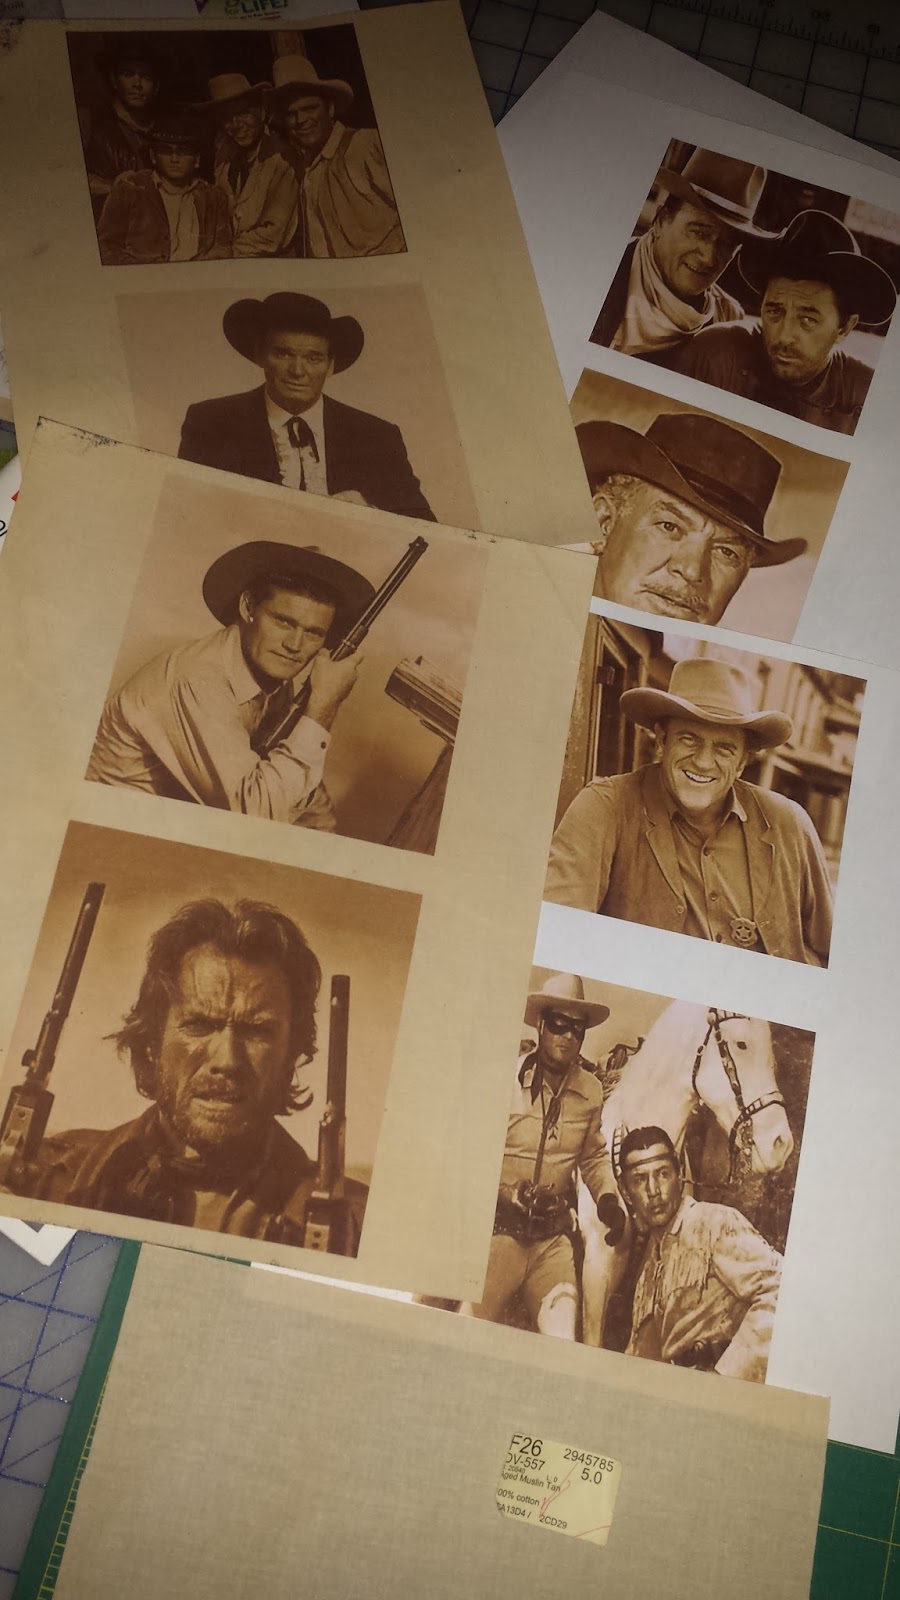
On the left in the photo above is the new fabric in "Beige".  The swatch on it (and a very close match) is the "Tan" I originally used which was a project leftover from four years ago.  Next to it is the "Cream" I also ordered from FQS as a hedge on getting as close to my original fabric as possible.  On the right is the replacement "Tan" that I had previously ordered based on the name but when it came, realized the color wasn't what I needed.  No problem though, it'll work just fine with my Civil War repro stash!!

I cut sheets of the new fabric and prepped them for printing the replacement photos.  There were still some issues.  While I have done a lot of photo transfer in the past, I have used all but two of them in wallhangings so have never bothered to rinse them afterwards to further set the ink or check to see if it bleeds out.  Since this quilt is likely to be washed, this time I wanted to take that extra step and try using the bottle of Bubble Jet Rinse I had on hand.  While the first set of photos weathered the rinse step well, this new batch was mixed. 

First of all, before the replacement fabric came, I was able to print one replacement picture on a small piece of the old fabric that I still had.  The instructions on the Bubble Jet Set bottle said you could rinse them 30 minutes after printing:


NOT!  When I rinsed it that soon, ALL the color washed right back out of the photo!  This was a concern because at this point once the new fabric came in, I wanted to be able to print and process them as soon as possible.  So I figured that after printing I'd better let them sit for at least a day before rinsing.  I did do that with mixed results:


I found that for pictures with a lot of exposed background, the yellow ink came out of the background leaving them tinted lightly pink although the figures in the pictures retained the sepia (yellowed brown) tones.  The photos that had survived the first printing had sat for three days before I rinsed them which resulted in no loss of color.  I felt I didn't have that kind of time now but then still wasted a few days debating back and forth whether to try the printing again.  Now really out of time, I ultimately decided that I'd have to settle for using most of what I had.  In one case, I opted to use one of the original photos that I had printed too large (bottom row, second photo from the left).  It had a lot of background around the figure so I just cropped it tight eliminating most of the background details in order to retain the better colored shot.

Not as good composition-wise but better color-wise!
That done I was finally able to add the missing pictures to their strips, complete all the strip sets and piece the top together which itself was as easy as originally expected.


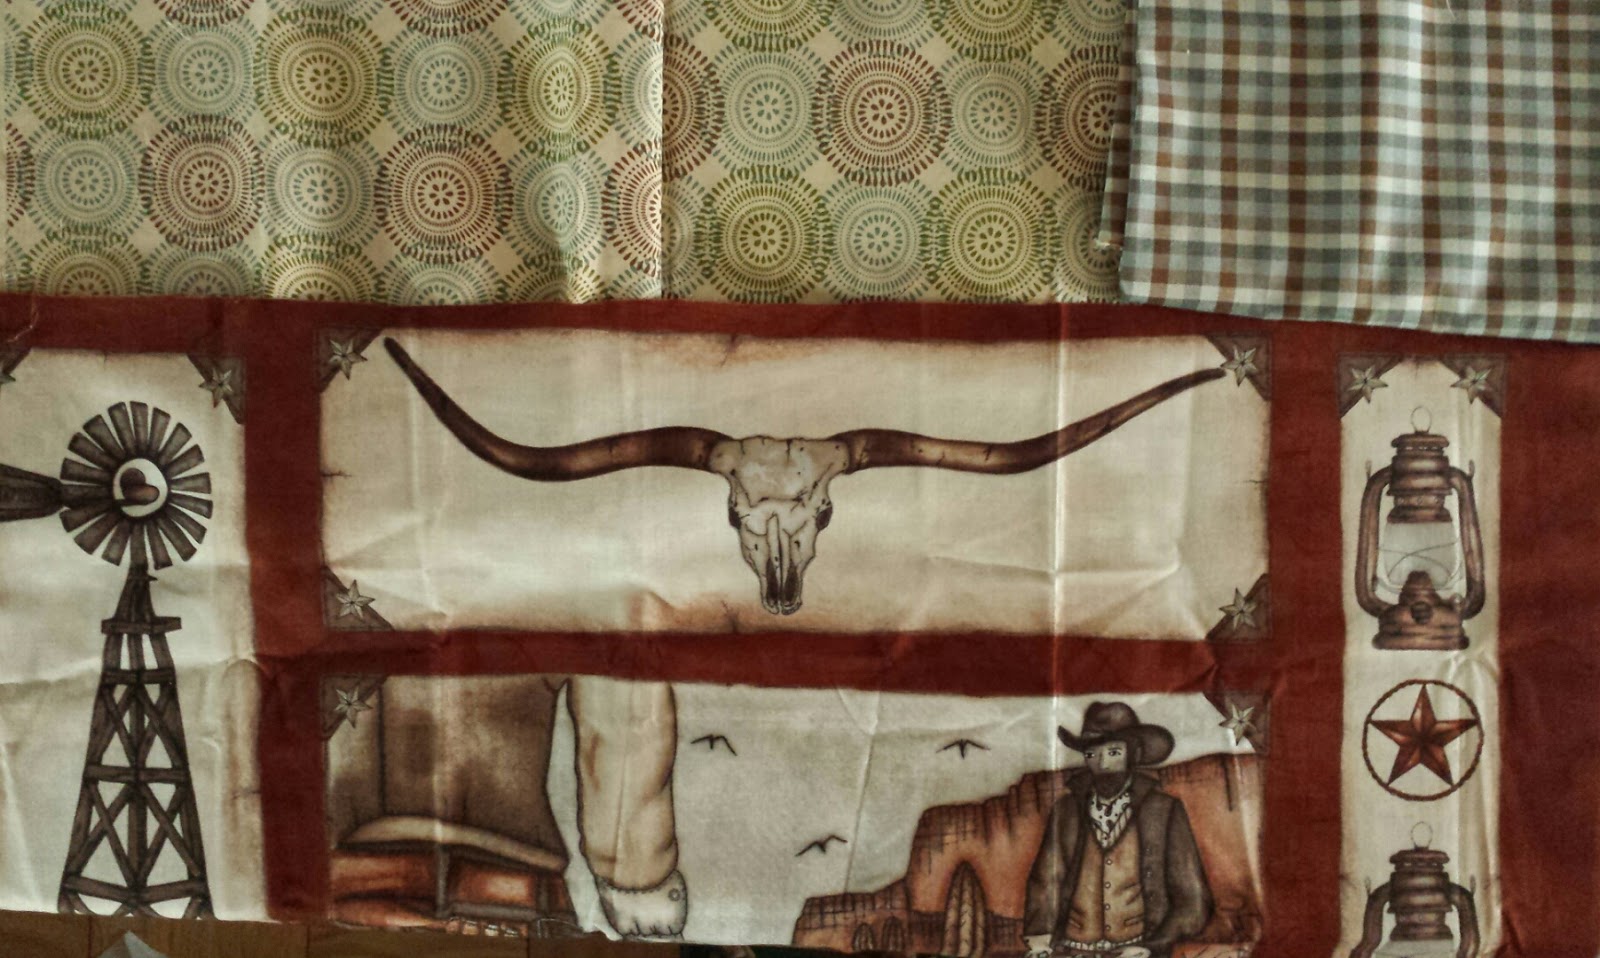
Then it was on to making the back.  Whoo, this was another slog!  I had originally thought the backing fabric I had in stash would be enough for most of the back but now realize that after completing the top I should have compared measurements since it was definitely not enough by itself.  Fortunately, I had also bought the panel fabric with plans to use just two of the largest motifs in it to create a label area. 


As it turns out I wound up not only using more motifs to help fill out the back but also using a lot of the other leftover project fabrics as well (and thankfully I did have enough to go around).  It took me a whole day to figure out how to extend certain pieces and slot everything to bring it to size.

And a space added to write the label information in when this is done!
On the plus side, putting all of that together has also allowed me to get a little Provence/Ringo mystery leader/ender sewing done as well:


With the top and back now ready, it was on to the batting.  After measuring the top, I saw I needed a twin size batt.  It turns out I only had one in stash - a polyester  - so set it out on my sewing chair over night to let the wrinkles "relax" out of it.


So today I'm working on layering and basting so soon it will be on to the quilting. 


Let's hope I can get this done by the end of the weekend so I can get this in the mail just in the nick of time!

Monday, December 11, 2017

On Ringo Lake Update: Part 2 Done, Part 3 (Barely) Started


Whew!  It took me until today to get Part 2 all done!  Just in time for this week's link-up.


I did pick up the Part 3 instructions but have only just started on what I expect to be a lot of cutting and piecing.


I don't expect to get this part finished by the end of the week  since I have to also work on finishing up the other quilt that I'm making for a family member's Christmas gift. 

Some interesting observations from the linkups:

*  Have you seen some of the gorgeous alternative color ways that people have chosen?  I really need to push myself to try that in a future mystery or even in one of Bonnie's regular projects.

*  If you've checked out some of the previous link up posts, have you seen the interesting ways people arranged their nine-patch and FG units from Parts 1 and 2?  I already like how some of them are put together.  Now I can't wait to see Bonnie's final layout -- maybe I'll wind up wanting to try one of the alternate layouts instead?

* So many people are finding this a great opportunity to perfect their piecing techniques or learn new ones.  Bonnie's instructions for the mystery totally support this.  Just another reason why she is as popular as a teacher and for her workshops as she is as a designer!

Oh and another goodie has come in to add to the fun of this mystery:


I finally got a copy of Bonnie's latest book!  I've been waiting to get this one for a while and cannot think of a better time to surround myself with all things Bonnie!   It'll be fun to read through this one after a day of mystery parts stitching. 

Monday, December 4, 2017

Just a Quick En Provence Update

Last time I posted about this, I had this many blocks up on the Design Wall:


Now there are this many up:


I'm hoping to be able to get these in the leader/ender queue soon but working on them may get bumped for my priority project, the Western Kringle quilt.   However, now that they're literally "in my sight", I think they'll nag at me until I get them done.

On Ringo Lake Update: Part 1 Finished, On to Part 2!

Woo hoo!  I'm very pleased to say that I got Part 1 of Bonnie Hunter's latest mystery "On Ringo Lake" completed with time to spare (meaning on Thursday)!


I'm back today to link up with the skinny on Part 2 which dropped on Friday.  Future parts will drop every Friday until just after the New Year.  I'm hoping I can keep up which is especially challenging for me since I am also working on finishing up last year's "En Provence" mystery at the same time! 

Last week we got to dive into the turquoise, browns and neutrals for a little nine patch fun.  So what did Bonnie have in store for us this week?  We get to play with the other focus color -- the corals!  Also we get to make my favorite quilt block/unit:  Flying Geese!!


In her instructions, Bonnie has given a number of different ways to make the flying geese including using just squares and rectangles (sew and flip) or by cutting the necessary triangle shapes using either the Simple Folded Corner Ruler or her new Essential Triangle Tool both of which are available for sale on her website

However, she has also encouraged us to make them with the methods we are familiar with that will give us accurate size units.  Given how many we have to make, I prefer to use a method that makes more than one geese unit at a time.  For that, many people love the "No Waste" method.  If you Google it, you'll see many tutorials for that technique like this one from Fons & Porter. 

For many years my personal go-to method has been what Eleanor Burn's (of Quilt In A Day) originally called the "Triangle Pieced Rectangle" method.  I call it the "Two Squares Method" because like the "No Waste" method you make four geese at a time but you only have to cut two squares instead of five.  You can see Kimberly Jolly of the Fat Quarter Shop doing a demonstration of this method using Eleanor's Flying Geese ruler here.


There are different rulers to make different size geese so if you want to use the Quilt In A Day rulers make sure you get the ruler that makes the size you need.  Quilt In A Day also has a relatively new "all in one" geese trimming ruler called "Calling All Geese" which I've only managed to resist buying because I already have all the old rulers.  However, you can (and I did for some of these) also trim up the final units using a regular ruler which Eleanor demonstrated in her "Pioneer Sampler Series".  That series was the first time I saw her on TV and was when I first learned about the technique.  I do admit though, using her rulers can make the trimming a little simpler because with the markings on them, you don't have to think as much about what the correct measurements are to square them up.


I'm about 2/3 done with them so far.  I'll continue working on my geese all week and hopefully I can finish up in time to pick up the next part.  Head over to Bonnie's to see how everyone else did on the latest part of the "On Ringo Lake" mystery!

Sunday, December 3, 2017

A Christmas Deadline: The Western Kringle Quilt -- Pt 3: Getting Started and Here I Stand

As detailed in my last post, I had gotten all of the fabric for this project over the summer but wasn't able to get started on it until the Fall.  When I finally got started on this in early November, it seemed like it was going to be a very simple quilt to make so I was hoping to get it completely finished by the beginning of December.

First up was dealing with the pictures.  I have done a number of photo transfer projects since I started quilting.  I have used it both for elements in the quilt top and for labels (two examples of that can be seen here and here).  For this project, I wanted to use a base fabric that was close to the background color of all the "toss" prints.  Fortunately, project leftovers came to the rescue for that!  I had some leftover Moda Aged Muslin (upper right in the photo below) that I had used for backing my Civil War Legacy quilt.


I cut the fabric into slightly larger than letter size rectangles (to allow for shrinkage) and prepared it with Bubble Jet Set which allows it to accept the printer ink for the photo transfers:

 
...then it has to dry (it doesn't take very long).


After the fabric dries, it is ironed onto freezer paper so it will be able to be put through my printer.

While waiting for the fabric to dry, I searched for pictures of iconic Western characters/actors and downloaded them to my computer.  I used Picasa 3 to alter the pictures.  Although it's no longer supported by Google for use in Blogger, I still have the Picasa program on my computer and sometimes use it to organize my picture files.  In Picasa, I was able to color all the pictures in "Sepia" tones (to coordinate with the fabric prints) and applied a photo effect to them called "1960".  Then I loaded the altered photos into a word processing program and set them up to print two to a page. 


Initially I had some issues getting the images sized right (I needed them to finish at 4-1/2")  and also quickly found out that printing in Sepia takes ALOT of yellow ink and mine started running out as I got to the last few pages of pictures so the color on some were streaky.  I got more ink and eventually figured out how to get the pictures to print exactly the size I needed them.  Unfortunately,  I didn't have enough of the muslin left to redo all the pictures I needed to correct.  Also, after conferring with DH, I decided to go with a different picture of Clint Eastwood (I'll be using one from "The Good, The Bad and The Ugly" instead). 

So I've had to order more Aged Muslin.  I had looked around at the online offerings of some shops local to me but no one had Aged Muslin listed in their stock.  In the past, if I need what is considered "Civil War Reproduction" fabric, I do better finding it online.  I had originally ordered what I had from Fabric.com but that was four years ago and they no longer carry it.  At the time that I ordered from them, the color I got from them was called "Tan" and I went by that when I re-ordered from someplace else.  However, what I received was much darker.


I believe the issue has to do with a change in the color designations and dye lots.  Most of what I saw online in various places that was called "Tan" was much darker than what I had started with.  Also complicating things is now Moda has another lined of colored muslins called "New Age Muslins".  So I've done a second order, this time going by the look of the color on screen which in itself can be a bit of a crap shoot.  I've ordered two colors,  "Cream" and "Beige" that onscreen look closer to what I had and I hope that one of them will work.

While I wait for the new fabric to arrive, I've cut out the pictures that printed okay and sewed them to their respective strips and strip sets and have sewn together strips for vertical sashings and the top and bottom borders.


This past week, I used the break from working on the gift project to work on Bonnie Hunter's new mystery quilt and to continue work on last year's while waiting for the new fabric to come.  Since I'm now past my original finish deadline (but now very glad I started as early as I did), once the new fabric arrives, it'll be back to work on this project as my priority.  I'd like to be able to get this in the mail by the early postal service holiday shipping deadline which is December 14.  We'll see if that happens!

Saturday, December 2, 2017

A Christmas Deadline: The Western Kringle Quilt -- Pt 2: Getting the Fabric

When I last left off, I had picked out my quilt design and had seen some fabrics on sale perfect for it that were being offered in a big AQS fabric clearance sale.  I figured out how much I needed and put in my order.  Yeah, about that:


This is what I ordered and as you can see, by the time I did so, three of the six fabrics I wanted (the ones with the big X's through them) had sold out!  It turned out not to be a big problem to resolve what I couldn't get:  the Western fabrics were all manufactured by Blank Quilting and were part of their "Western Album (I and II)" lines.  I was able to find them at Thimbelina's although I had to substitute two of the fabrics (the Pistol and Picket Fence prints) for other prints in the line (Sheriff Stars and Swirled Barbed Wire). 

Even better, I was also able to get a panel print (in the bottom of the photo below) that I can fussy cut motifs from to make a label for the back (must keep up with my Quilt Alliance pledge!).


Another boon was some sale fabric that I had purchased back in January.  I got it in one colorway for another project and also decided to buy this olive/blue/brown colorway just because I liked it.  I remembered it and when I put it with the fabrics for this project, I realized it was perfect for a backing.  I was also glad that I did get the Peppered Cotton plaid in my AQS order for the binding.  I've been stashing Peppy Cory's Peppered Cottons so hope that I might have a little leftover after this to put in that stash.

The last thing needed to complete the design was a very light print.  This was another luck up:  Erica's was having a "Make Your Own Sale" sale and I was able to get both the fabric and something else very much needed in general and for this project:


I finally got the new Creative Grids "Stripology Ruler" by Gudrun Erla.  This was not a "Gadget Fanatic" purchase -- I NEEDED this one because this happened a while ago to my June Tailor "Shape Cut Plus" ruler:


I used my Shape Cut constantly and loved it.  For me, next to a Rotary Cutter, it's one of the quilt tools I must have if stranded on a desert island (hopefully, also with a few storage tubs of stash!).  I admit I had seen reviews of the "Stripology Ruler" and had liked a few of its features so was very interested in trying it out  "some day".  So I was only partially heartbroken when my Shape Cut met its demise!

So good, now I had all the fabric I need and a new ruler to cut it with.  It was time to start the project!

Friday, December 1, 2017

A Christmas Deadline: The Western Kringle Quilt -- Pt 1: Choosing the Pattern

So in addition to working on not one but two Bonnie Hunter mysteries, I'll also be trying to finish up another big project that I had started sewing up in early November.  

Every year my husband's family does a gift Kringle and a name is drawn for each person so that everyone only has to buy a gift for one family member.  This year I was told early on that my giftee would be my Mother-In-Law's husband.  When my DH visited them a few years back (they live in NC), he found out that her husband was a big fan of Westerns -- both movies and TV shows.  When he watched TV, if he wasn't watching a sports game, he was watching a Western!  From that point on, I said if I ever needed to make a quilt for him, it would definitely be with a Western theme.

Normally, I don't get the giftee information until a few weeks before Christmas but since they told me early in the year this time, I had enough time to plan to make a quilt for him.  Over the years, whenever I was shopping (or just browsing sales) for fabrics, I would see if there were any Western themed fabrics that interested me or that immediately inspired a quilt design.  I always say that the Quilt Muses look out for me because back in June, AQS had a big clearance sale and lo and behold, they had a few Western theme prints among their offerings!  I liked what they had and appreciated that the fabrics were already coordinated.  So in order to decide how much to buy, I had to go looking for a pattern.

Keeping the fabric colors, values and print scales in mind, I skimmed through some of my quilt books and I came across this quilt:


It was a Mystery Sampler (the theme of the year for me it seems!) from M'Liss Rae Hawley's book "Fat Quarter Quilts".  I've owned this book since I started quilting but have never had the opportunity to make a quilt from it.  This one particularly caught my eye for three reasons:  the color and scale of the fabrics used in it were similar to the ones I was considering (saves me a lot of design decision time), it already had a Western theme ("Jed the Lone Star Roper" made by Vicki DeGraaf, 1998) and it featured fussy cuts of cowboy heads which dovetailed with another idea I had:  to include photo transfer pictures of Western movie and TV characters/stars in whatever design I did.  The fact that this design already slotted the perfect locations for that was a plus!  

However, I quickly realized that I liked more of the fabrics being offered than could reasonably work together in this design.  So I went looking around for something that could better accommodate all the fabrics AQS had and I found this:


from here:


This is Deanne Moore's book "Fabric Play" and it is another book that I've long wanted to make a quilt from.  Deanne is also the designer behind the pattern line "Creative Sewlutions" and I have a kit for her "BoxTrot" pattern that's currently a "Hussy" (HSY - Haven't Started Yet).  The book's premise is all in the title: "Change the Fabric, Change the Quilt".  For example, here's how this quilt is made up in two different colorways in the book :

For more on the book, see this Martingale blog post about it.
For me, I could immediately see using all of the AQS fabrics in this by substituting the similarly colored fabrics where the design used a constant fabric.  I could also see adding the pictures I wanted to the bottom of some of the fabric strips.  Sold!  Well, not yet, now that I had a useable design, I needed to order the fabric.  More on that in the next post.