While today is the day Bonnie issues the
next set of instructions for the "Ringo Lake" mystery quilt (and I
will be picking those up!), my sewing focus today will be on finally moving toward finishing up the Christmas gift quilt I've also been working on. When
I last left off, I needed to get some additional MODA Aged Muslin for the photo transfers for this project. Fortunately the Fat Quarter Shop came to the rescue!
On the left in the photo above is the new fabric in "Beige". The swatch on it (and a very close match) is the "Tan" I originally used which was a project leftover from four years ago. Next to it is the "Cream" I also ordered from FQS as a hedge on getting as close to my original fabric as possible. On the right is the replacement "Tan" that I had previously ordered based on the
name but when it came, realized the
color wasn't what I needed. No problem though, it'll work just fine with my Civil War repro stash!!
I cut sheets of the new fabric and prepped them for printing the replacement photos. There were still some issues. While I have done a lot of photo transfer in the past, I have used all but two of them in wallhangings so have never bothered to rinse them afterwards to further set the ink or check to see if it bleeds out. Since this quilt is likely to be washed, this time I wanted to take that extra step and try using the bottle of
Bubble Jet Rinse I had on hand. While the first set of photos weathered the rinse step well, this new batch was mixed.
First of all, before the replacement fabric came, I was able to print one replacement picture on a small piece of the old fabric that I still had. The instructions on the Bubble Jet Set bottle said you could rinse them 30 minutes after printing:
NOT! When I rinsed it that soon, ALL the color washed right back out of the photo! This was a concern because at this point once the new fabric came in, I wanted to be able to print and process them as soon as possible. So I figured that after printing I'd better let them sit for at least a day before rinsing. I did do that with mixed results:

I found that for pictures with a lot of exposed background, the yellow ink came out of the background leaving them tinted lightly pink although the figures in the pictures retained the sepia (yellowed brown) tones. The photos that had survived the first printing had sat for three days before I rinsed them which resulted in no loss of color. I felt I didn't have that kind of time now but then still wasted a few days debating back and forth whether to try the printing again. Now really out of time, I ultimately decided that I'd have to settle for using most of what I had. In one case, I opted to use one of the original photos that I had printed too large (bottom row, second photo from the left). It had a lot of background around the figure so I just cropped it tight eliminating most of the background details in order to retain the better colored shot.
 |
| Not as good composition-wise but better color-wise! |
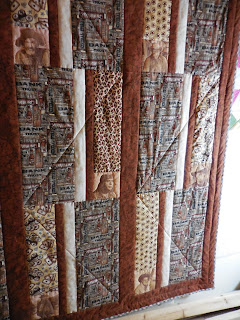
That done I was finally able to add the missing pictures to their strips, complete all the strip sets and piece the top together which itself was as easy as originally expected.
Then it was on to making the back. Whoo, this was another slog! I had originally thought the backing fabric I had in stash would be enough for most of the back but now realize that after completing the top I should have compared measurements since it was definitely
not enough by itself. Fortunately, I had also bought the panel fabric with plans to use just two of the largest motifs in it to create a label area.
As it turns out I wound up not only using more motifs to help fill out the back but also using a lot of the other leftover project fabrics as well (and thankfully I did have enough to go around). It took me a whole day to figure out how to extend certain pieces and slot everything to bring it to size.
 |
| And a space added to write the label information in when this is done! |
On the plus side, putting all of that together has also allowed me to get a little Provence/Ringo mystery
leader/ender sewing done as well:
With the top and back now ready, it was on to the batting. After measuring the top, I saw I needed a twin size batt. It turns out I only had one in stash - a polyester - so set it out on my sewing chair over night to let the wrinkles "relax" out of it.
So today I'm working on layering and basting so soon it will be on to the quilting.
Let's hope I can get this done by the end of the weekend so I can get this in the mail just in the nick of time!


