Monday, November 27, 2023

Moving It Forward Monday: A Quilt Label and Cross Stitch


Continuing work on my "Roll, Roll, Cotton Boll" project during this year's Quiltville mystery season:  Having finished the top on Friday, I now need to make up the backing so I can then move on to the layering step. 
 
Finished Mystery Top

Backing Fabrics

However backing a quilt also means thinking about a label for it.  Early in this project, I had come across the perfect thematic design for that from an old Georgia Bonesteel "Lap Quilting" episode.  

Given the theme of the mystery quilt, this seemed like the perfect block for the label.

To make it up, that means I need to do applique.  I had considered doing this using the needle turn method but not wanting to turn the label into too much of an additional project (and spend too long a time on it),  I decided to default to easier methods.  

In the beginning, one of the things that got me interested in quilting was learning that most quilting methods could be done completely by machine.  I eventually learned that this was true even for applique.  My first introduction to that was from this book: 


Later on I learned about Beth Ferrier (on Simply Quilts, back in the day) and her methods for machine applique which called for using freezer paper templates and glue basting the turned edges:


I combined her methods with using C&T's "Wash Away Applique Sheets" (developed with Beth's technique in mind) which meant not having to remove the paper after the glue basting:


  After choosing the fabrics and figuring out the image parts....


I prepped the pieces to be sewn onto the the label background


I will say that I hadn't realized just how hard doing all of those points and curves would be to prep given the smaller size of the block I was using.  In the end,  my "Boll" doesn't look just like Georgia's but for a label, it's good enough:


So the backing is now done, next will be layering and further quilting stitch pattern considerations!

Also in the "Continuing Work" category:  I have put more stitches in my "Give Thanks" cross stitch project (last seen at the end of this post).

First reported on here.

I had hoped to get this done to hang up for Thanksgiving but am now continuing to work on it until it's finished.  This way, it will be immediately ready for display next year.   So a little hand work finished off the Thanksgiving holiday weekend --- or was it to rest up for today's Cyber Monday shopping?  You decide, LOL!

Friday, November 24, 2023

The Start of This Year's Quiltville Mystery Season!

All the Quiltville fans like me were tuned in to Bonnie Hunter's Quiltville site today because....

...Part 1 of the new "Indigo Way" mystery has dropped!  Bonnie says this year's mystery was influenced by her experiences traveling in Vietnam.  I was soooo tempted to do this one because the colorway is Indigo Blue, Red and Neutrals, a color scheme I love to work in.   If you are starting on the mystery now, you are making Half Square Triangles for this part.  Bonnie gives you instructions for rotary cutting them either the traditional way or using her "Essential Triangle Tool".  I see that if I make this one in the future, I have a die to cut them the size needed.  That would also take care of removing the "dog ears" from the finished HSTs like she suggests. 

If you are not doing the mystery now, the good news is that you can pick up the instructions now and file them away for when you are ready to make it.  I've made many a Quiltville design long after the mystery premiered so now or later, it will still be a gem!  

Also note: Bonnie is giving a 30% discount on her digital patterns.  She says this is the last sale of the year on her site so if you've coveted any of her patterns, go to the post and pick up the discount code and instructions for use!   If you would like to get the "Essential Triangle Tool" she is also giving a discount on "Notions and Tools" purchases too.

As for me, in my last post I talked about how I plan to spend this year's mystery season taking the tops for the previous mysteries that I have pieced and get them to finished quilts.  However, I still had one more top to complete: "Roll, Roll, Cotton Boll".  Earlier this week I trimmed, stay stitched and measured the top and then started work on sewing up the pieced outer borders:

By Wednesday I had finished piecing all the borders.  Part of that meant also making corner units out of the extra side border parts although I had some extra strip pieced units I had put aside for this purpose as well.


I had tried comparing the finished borders and the top measurements to determine how wide to cut the inner border but it was hard to get an accurate read on it so I just cut them the width Bonnie suggested and figured I could cut them down if needed.  


The good news there was that the size she gave for cutting them was the same size strips that Fabric Cafe calls for their "3 Yard Quilt Economy Binding" and one of those was the last quilt top I pieced.  So I already had my Stripology ruler marked with GE Designs Ruler Stickers for the "shift cutting" I needed to do to get the width of strips I needed.  BTW, Bonnie also has these stickers in her "Notions & Tools" section so they are on sale if you need some!

After applying the inner borders, I actually wound up extending the top border and one side border by a pieced strip, taking a border piece off the bottom border and the last side border needed no adjustment at all!  The good news is that in the end, it all worked out and the borders are all on and now this old mystery top is also complete!  

The backing fabric is also already in house.  Aren't these just perfect for this?

I lucked up on them all the way back in 2019 and even better they were on sale.  In addition to making up the backing, there is also one other thing I have to do.  Literally, the same week I purchased the backing fabric, I happened to catch an episode of Georgia Bonesteel's "Lap Quilting" show from 1987 on You Tube.  She was talking about her "Cotton Boll Quilt" in the episode and this flashed on the screen:

Oh boy!  I was thrilled because my first thought was "Quilt Label"!!  I traced the image off of the screen to copy the applique design.  

So now I have to audition fabrics for it so I can stitch it up.  BTW, in a recent Pat Sloan video she mentioned that Georgia Bonesteel will be doing the December Birthday Block of the Month for the Quilt Alliance.  If you are a member (and you should be), you will be able to revisit Georgia's work and her many years of influence in the quilt industry.  

I had been wondering which of the mystery tops I'd work on first.  It looks like I will continue with "Cotton Boll" until it's a complete finish.  With its Red, White and Pink color scheme, it goes with the Christmas decorating I will do this year -- a rehash of last year's Red and White scheme.  So when this is done, it can be my holiday bed quilt!  Works for me!!  

Monday, November 20, 2023

Moving It Forward Monday: Preparing For the Quiltville Mystery Season

It's almost here!!  The first clue for Bonnie Hunter's latest mystery quilt "Indigo Way" will drop this Friday.  For this year's mystery season, I'll just be gathering the clues for the new mystery because I want to spend the season working on all the mystery tops I already have finished.  The goal is to move them all into the "fully finished" category (sorry, that's the cross stitch talking!).  

I have four mystery tops and their backings already prepared:

Clockwise from top left:  En Provence, On Ringo Lake, Old Tobacco Road
and Double Delight

All I have left to add to that list is "Roll, Roll, Cotton Boll".  This project has had a looong journey that started all the way back in 2018.

I scavenged fabric from the remains of other projects to make up all the parts for the blocks for it from December 2018 to June, 2020.

At this point, the String blocks on the left were still "in progress".

All the parts in the upper right in the picture above were sewn together into blocks back in March of this year.

During the holiday season last year, I worked on the string pieced units (using strings collected from projects and cuts offs over the years).  I finished up the String blocks for this project in February this year. 


I was finally able to lay out all the blocks on my design wall in July but didn't get to sew all the blocks together to finish the center of the top until the end of October.

Since September, I added the triangles on the ends for the outer border units as "leader/enders" and just finished those up this month.  

So now it was time to trim up the edges of the center in prep for adding the next inner border which will be green.


Bonnie gives a size to cut the inner border strips but she also suggests that the border can also function as a "spacing border".  So I may find I need to adjust the width of my inner border to fit what I need to bridge the sides of the center with the length of the pieced outer border strips. 

After trimming and stay stitching the edges, I've measured the length and width through the center as I do when I measure out my borders.  However, following Bonnie's advice, before cutting the inner border, I am focusing first on sewing up those outer borders, both to make sure the number of pieces she gave for that works and then to see if the inner border width in the pattern will work with them or need to be adjusted.

Well, this is going to take a while, LOL!  Good thing I've got until the end of the week!

Friday, November 17, 2023

Finished Or Not Friday: Two Fall Finishes

 This week I have a pair of finishes to add to the viewing queue at Quilty Girl Alycia's for: 

First up is a wall hanging that was supposed to have been a "quick make" for decorating last year.  As always, better late than never!  

This is my interpretation of Pat Sloan's "Thankful" quilt (scroll down to #85 on her 2022 gallery section) that you can find in her book "Holiday Hoopla" which was published by the dearly departed and missed Martingale and Company.   

When Pat showed her quilt last year when her book quilts were returned to her by the publisher,  my Fall Fabrics stash had been on my mind.  I had recently gone through it looking for things for two other projects that I wanted to do at the time.  When I saw her quilt, I knew I had enough in house to make it and still not deplete that stash of fabrics so I could also do the other projects as well.  

As I said, I figured it would be quick to make so got right to it.  I did finish the center of the top in a short time but debated about adding additional borders to make it larger.  

Then I moved on to working on holiday quilts and figured with the top mostly done, this would be a quick finish this year.  After I settled the border debate (adding one inch finished borders), then I couldn't decide how to quilt it.  

Pat (or Pat's long-armer) had done straight horizontal and vertical cross hatching on hers but I had initially envisioned Feather Wreaths in the setting triangles.  I tried sketching those out but it wasn't clicking and I wasn't sure what to do for the trees along with that.  Cross hatching kept popping up as the best option and then I got a brainstorm:  I've always wanted to try free-motion curved cross hatching with a ruler.  I sketched that out and decided it was the way to go!  

I combined that with diagonal cross hatching on the trees and now this one is finally up for display! 

The second one is another top from last year that is just now getting the finishing treatment.  This was a Fall-themed "3 Yard Quilt" kit that I picked up during the "All Carolinas Shop Hop" last year.  

3 Yard Quilt kit, backing and thread.

My MIL lives in North Carolina and I learned about the Hop that premiered in 2021 while visiting her.  We usually plan at least one of my husband's vacations each year to coincide with the Hop since my MIL is also a quilter so it adds to the "mini quilt retreat" I have with her when we visit.  

This is the second of the three kits I have purchased (one each year) from the Quilt Lizzy shop in Wake Forest, NC.  They always have a great selection of beautifully coordinated kits and just like when you purchase them from Fabric Cafe, you can pick up a free pattern to go with it.  I had seen a pretty Fall-themed kit in one of the Fabric Cafe videos shortly before the Hop and was thrilled when Quilt Lizzy had just what I was looking for!  Even better, I got the backing as a freebie from my MIL who had picked the fabric up from her guild's "fabric exchange" table.  I made up the top around this same time last year.

When I returned to it this year and even though this is one of the simpler Fabric Cafe designs,  once again I was not sure how to quilt it.  Again, cross hatching was the first idea and seemed fine for the Checkerboard rows but I wondered if I should do something "a little more" for the Pumpkin fabric rows.  When deciding on the quilting, it's always a matter of trying to balance the desired design with your skills and the time you have to work on it.  I really wanted to do something that would be relatively quick.  

Eventually I realized that maybe along the lines of cross hatching, I could use the Checkerboard piecing as the "dot to dot" starting point for a very simple "Zig Zag" motif!  I loved the idea since I could just do that right across the width of the top so wouldn't have to quilt the borders separately.  

I stitched the lines on my DSM with a walking foot and did have to do some marking of the "pivot points" in the Pumpkin sections in order to keep the pattern spacing even.  All in all, it only took about four hours to stitch up the whole thing.  Perfect and now also finished!

Front

Back

With these two done, now I can start putting out the rest of the Fall quilts!  Additionally, I am also still working on a Thanksgiving-themed cross stitch piece that I want to hang on the wall next to the "Thankful" quilt.


 This has been a daily stitch for the last week.  I am not sure I'll get it finished before Thanksgiving but my goal is to continue working on it and "fully finish" it this year so it is ready to be promptly hung up next year.  So I am thankful for my fabric stash and thankful for my crafts!

Edited 11/20/23 To Add:
And thankful to now have a cozy Fall stitching spot!

Let's also be thankful for Alycia continuing to host these "Finished Or Not Fridays" so we get to see what bountiful creative pieces crafters from all over the world enjoy making!  

Monday, November 6, 2023

The First Moving It Forward Monday For November

 Ahhh, another month has started and we are moving quickly towards the end of the year.  So it's time to see what I have going on for this month and what I hope to get done before it ends.

Quilting

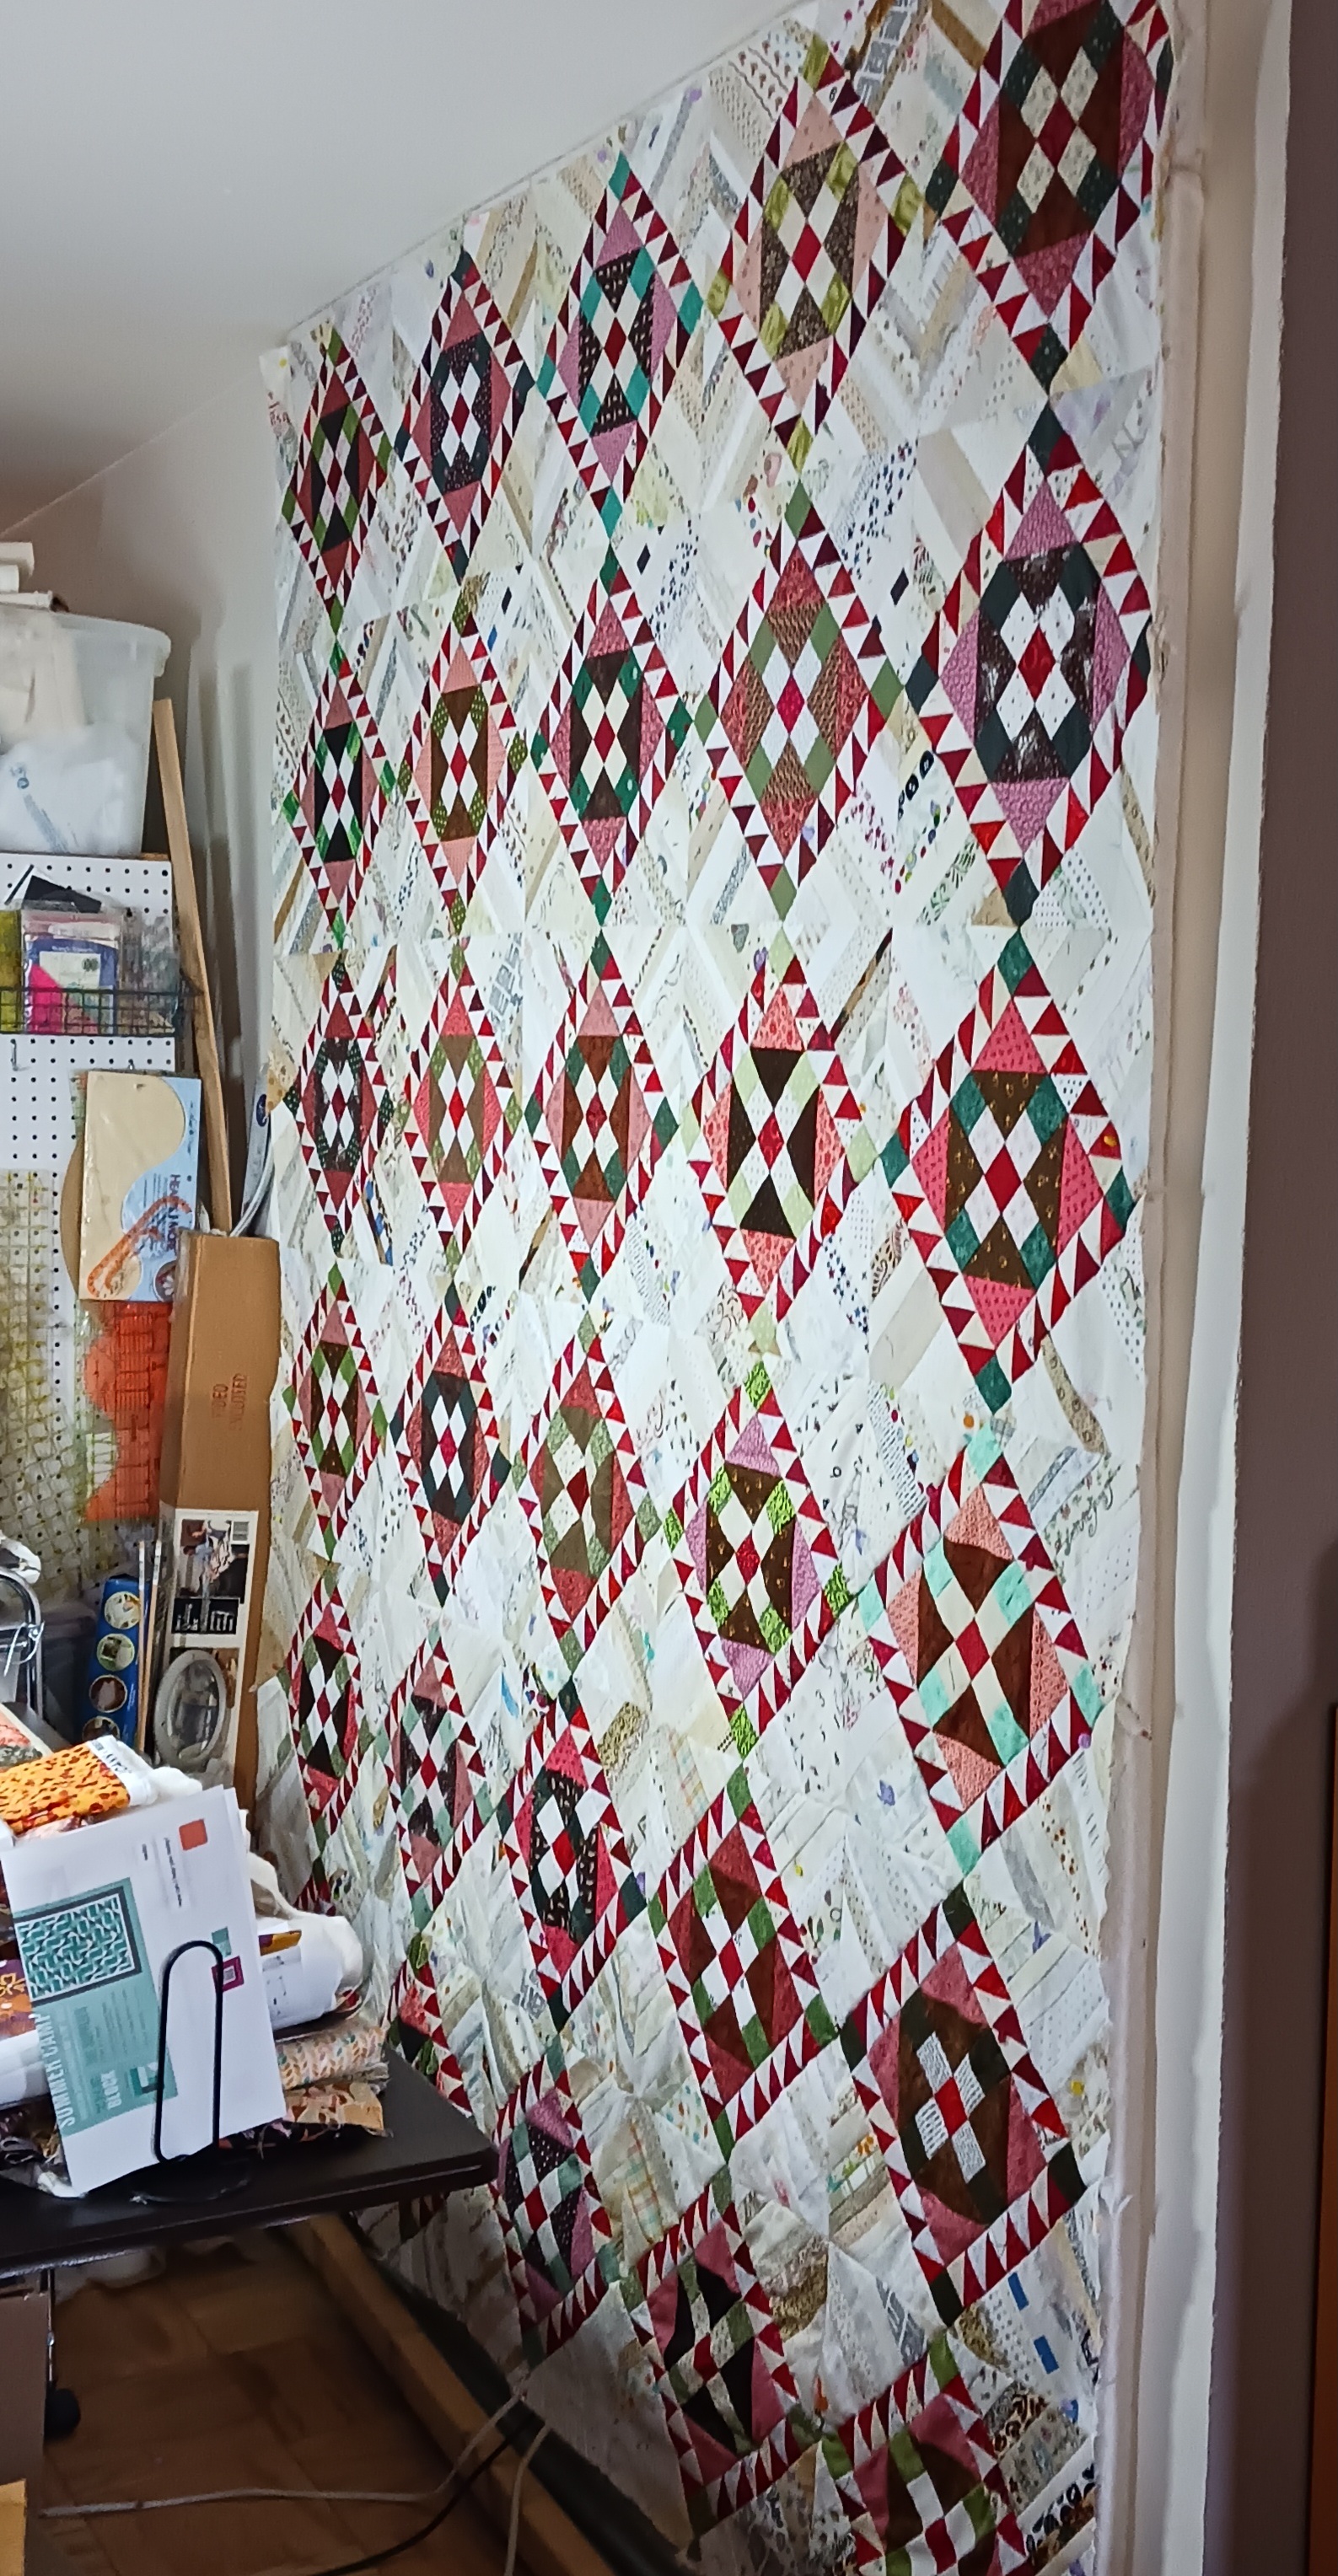
On the quilting front there are a few things that I hope to push to completion by the end of the month.  For starters, I haven't even begun to decorate for the Fall.  Part of the reason is that I really want to finish this "Thankful" wall hanging to start that off.  

As I reported in my last post, I had taken the center of the top which was finished last year with me on our recent vacation.  I had managed to put the borders on while away and now that we're back, wanted to really try to move it forward.  

Today I made the backing for it.  I had a nice piece of fabric but it needed additional strips at the top and bottom to bring it to size and allow for extra for the quilting take up.  I did that and added in a light piece into the bottom strip (the background fabric used in the blocks on the front) for a label area.  

I also gave some thought to how I wanted to quilt it.  I think I want to try curved cross hatching in the setting triangles since I've never done that before.   Next up will be layering it and then hopefully I will get this quilted in the next week or so.

A Bunch of "3 Yard Quilts"

Also while away, I had started work on a Fabric Cafe 3 Yard Quilt that started with fabric I had leftover from a previous project.  I had originally thought I was going to make this in their usual lap size.  However, after realizing I had quite a bit of the "focus fabric",  I decided to enlarge it to Twin size.  I had finished piecing the blocks by the end of October and in the first few days of November, got the top all sewn together.

This is the "Heartland" quilt from the "Pretty Darn Quick" book.

I already have the backing for this but don't think I'll quilt it just yet.  I also have another 3 Yard Quilt top that was made while I was away but it too will have to wait its turn for quilting.  The reason for that is that I have yet another 3 Yard Quilt that would be great to finish for Fall decorating this year.

This one is their "Checkmate" design (link is to the printed pattern but it's also available in digital form).  I had purchased this as a kit when I Shop Hopped with my MIL in 2022.  I finished the top that year but it has just sat since then.  I've gone back and forth about how to quilt it:  a simple straight-line cross hatch or something special?  While I'm still trying to decide and since I already also have the backing prepared for it, this is the next one I'll baste and then it too will be ready for quilting and display for this season.

The Quiltville Mystery Season Is Almost Here!

Any Bonnie Hunter fans out there?  If so, you know her annual "mystery season" is coming up!  Bonnie has already released the introductory post for this year's mystery named "Indigo Way" which was inspired by her travels to Vietnam.  

As always, I will be excited  to see each clue drop and see if other quilters have changed the colors used and what their progress is each week.  As tempted as I am to do this one (as it's in one of my favorite color schemes: Red, White and Indigo Blue), I had already planned this year to finally get all of my accumulated mystery tops quilted.  

Clockwise from top left:  En Provence, On Ringo Lake, Old Tobacco Road and Double Delight

I have four so far so I know that is a big task but it needs to be done.  Since the holiday season last year, I have also been trying to focus on completing the fifth one:  Bonnie's "Roll, Roll, Cotton Boll".  It has moved along in dribs and drabs since I started it in 2018 and I am pleased to say that right before October ended I had leader/endered (yes, official quilting term) the blocks and rows to complete the center of it.

Also over the past few months, I've also completed the pieced units that will make up the outer border.

Those now have to be sewn together to be added to the center along with a green inner border which I also have the fabric for.  Last thing will be to make the backing.  The fabric is also already in house for that so hopefully by the end of the mystery season, this too will be ready to be quilted. 

As of right now, the (very ambitious) plan is to spend each week of the mystery working on finishing one of the quilts.  It would be exciting for me to get them all done by January when the mystery season ends.  So this month, I have until the mystery starts on Black Friday to get myself prepared.  After that, we'll see if I can stick to that plan!

Cross Stitch

When I started cross stitching, I had said that I didn't expect/want it to become the obsession that Quilting is for me.  Yeah, that is quickly falling by the wayside, LOL!  Much like with quilting, you see something, say "Ohhhh..." and before you know it, another WIP is in the works!  

That happened to me twice in October and both are the fault influence of Helen D's Flosstubes (love 'ya Helen!!)!  Helen lives in Maine and I have already stitched one of her designs as a memento of our trip to Acadia National Park in Maine although it still needs to be "fully finished".  While I was at my MIL's last month, I  watched one of Helen's videos where she showed this Halloween piece:

I really, really liked it but figured I didn't want to go shopping for the fabric to make it right now.  Yeah, right, never tempt the Crafting Muses like that!  So of course, I'm Shop Hopping (in a quilt store mind you) with my MIL and I see this in one of our stops:

Found @ The Broken Needle

Immediately, I thought of Helen's piece!  Okay the fabric is a little darker but I was intrigued by the idea of adjusting the called for threads to make it work.  Fortunately, at that point we still had another Shop Hop stop to make and since buying cross stitch stuff was not the priority on this trip, I decided to pass on it in favor of the other purchases I was making at that shop and to save some money for the next Shop Hop stop.  

Well, I didn't spend as much as I thought I would at that next (and last) stop sooooo.....of course it was back to the previous shop for the cross stitch fabric!!  Since we were returning home pretty close to Halloween, I knew I wouldn't have time to fully kit up and start this one.  Now that the fabric is in stash, it can wait it out until next year.  I already have another Halloween piece partially kitted up (and come to think of it, that too was influenced by one of Helen's finishes!) so those two will be set up for working on in time for that holiday next year.

However that is not the end of the Cross stitch journey.  I had noted in my last post that I had worked on my "Open Your Heart" piece on the drive home from our trip.  I hadn't gotten much done on it from the previous time I worked on it in July and didn't get all that much done in the car either.  But once back home, I was able to go back to stitching on it daily in the evenings.  I'm pleased to say that as of last night, another page of it is now done!

I've finished page Six (the right side) after starting the design on page Five (the left side).  I did that because these sections of the design have the most color changes in them.  Next I will move onto page Four which will fill in the rest of the left side and complete the bottom half of the whole design.  

However, that is not what I will be working on for cross stitch for November.  That project will be this one:

Which can be seen in this video.

Yes, I'm starting yet another cross stitch project!  Okay, but this one has a quilt angle.  When I finish quilting the "Thankful" wall hanging that I talked about at the start of this post, it will replace the wall hanging currently here:

In the past when I have hung quilts in this space, I have had partner pieces hanging on the adjacent wall to the right of there.

I actually have one for that RWB Log Cabin quilt but it still needs to be quilted (the story of my life).  I would definitely like to do the same for "Thankful" but in a timely manner this time.  I had considered doing another quilted wall hanging but when I once again watched a Helen D. Flosstube and she showed the "Give Thanks" piece it was "Ooooh, I love that and check out that circular frame!".  After stitching the cross stitch piece, Helen had gotten the frame from her mother who had gotten it in a box of frames given to her by a friend.  I had also seen another absolutely stunning circular piece Helen had done for Halloween this year (which is actually by the same designer as the Thanksgiving piece).  She framed it in what had formerly been a mirror frame!

Helen shows how she did the framing process in this video.

When I started this new hobby, I found myself as intrigued by the ways the stitched pieces are finished for display as much as I am by the stitched designs themselves!  I did some research and while I couldn't find the frame she had used for the Thanksgiving piece, I did find an Etsy shop that sells wooden frames that can hold an embroidery hoop as the "backing" for the stitched piece in the frame.

I fully intended to go that route.  After purchasing the pattern*, I found that I already had a fabric for this project having purchased it as part of a discounted pack of fabric when I was sourcing supplies for the cross stitch workshop I led in the summer.  I also already had nine of the thirteen colors of floss needed for it in four other "Haven't Started Yet" projects I have kitted up.  

Prior to embarking on a trip to the local Michael's for the rest of the floss and the embroidery hoop, I looked up "circular frames" to see if  they had any in stock I might like.  There were frames listed but most were either not the size I needed or were a little more than I wanted to spend for a piece to be displayed only once a year.  However, I also saw these:

Grapevine wreaths!  Oooh, how cool and seasonally appropriate it would be if they had one the size of the finished piece that I could frame it with!  At the store I did find one so at least for now, I plan to use this for the framing.

*Note:  As of the time I post this, the link to the pattern is for a "combo deal" for the "Give Thanks" and the companion "Autumn, Please" pattern.  However, both patterns can also be purchased separately. 

So I will stop work on "Open Your Heart" once again in favor of trying to get this one stitched up and "fully finished" in time for Thanksgiving display.  As always, so much to do, so little time!