Showing posts with label New Equipment. Show all posts

Monday, January 1, 2024

7 Days of New Years - Day 7: And Now A New Year Begins!

So my "7 Days" marathon has come to an end.  Much like all of 2023, it went faster than I expected.   I was glad for the things that did get done ("Tobacco Road" is well underway!!) and just a little bummed on the things I couldn't get to (the "Thanksgiving" cross stitch finish is still a ways away😔).  All in all though, it was great to really focus on some things and I am more than ready to ring in the New Year with another set of projects!

One of the things I didn't get to tackle before the end of the year was one more thing on my 2023 UFO Challenge list.  My "Roll, Roll, Cotton Boll" quilt was the only thing I managed to get completely done on that list although the good news is that I also got a few things moved forward.  The last project I had hoped to try to tackle was the number American Patchwork and Quilting magazine had picked for December: 

That task was just to set up my Hand Quilted Wholecloth project.  Since it only meant pulling it out and getting it onto a new frame, I thought that would be easy to get to.  However, the weekend and it being a holiday one at that, got in the way.  So the first day of the New Year is as good as any to get it in place!  Like "Cotton Boll", the wholecloth project is a blast from the past that I started on back in 2018.  I ran into problems stitching it on my original circular hoop.

This was taken around the time I started the project.

I am not yet adept at hand quilting so can only stitch in one direction.  The problem I had with this frame was that it was hard to turn the bulk of a queen size quilt around in order to stitch on it the way I am able.  Doing so often left the bulk of the quilt all twisted around the base. 

So I went on the search for an alternative.  Greatly influenced by the beautiful hand quilting being done by Karen over at her Quilts...Ect/Karen's Quilting blog, I really wanted to get a frame that for future quilts that I might want to hand quilt,  I wouldn't have to baste them in advance.  In 2019, I was lucky enough to find a used Grace Frame at a great price:

I also loved the idea that the width of this frame could be telescoped out to whatever size needed and that it could be stored folded down either while standing or laid flat for storing under a couch or bed.  The separate rods it has to hold the quilt top and backing were just what I wanted even if I wouldn't use that feature for this project since it is already basted for trapunto work.  

Unfortunately, I thought I would be able to sit it in my living room with full width of the quilt open but realized a little too late that I don't really have the space to do that easily for the duration of the project (measure twice, quilt once)!  Additionally, it also still meant only stitching from one side of it. 

So I continued to look around and eventually I saw another option:  a Q-Snap quilt frame (also used)!  

The good news here is that it has legs that can be tilted on both sides of the square base which makes it possible to turn it around when I need to change the stitch direction.  Well at least I hope so --- I haven't tried it up until now so we'll see this year if it works.  Today was a chance to take a crack at it!  

It was easy to assemble and on the plus side, a larger stitching surface than I expected.  One issue is that it is also taller than I thought it would be.  In order to use it from my "stitching chair" I will need to add a couple of the couch cushions to set myself high enough to stitch at it comfortably.


On the other hand, my sewing table is next to here and the drafting chair I use for it is tall enough for the frame.  I can also turn it in that direction and stitch using that chair although maybe not as comfortably as I might like.  So I'll have to see how this goes. 

In 2022, I had waited until APQ called the UFO Challenge number for January and I had slotted the wholecloth project in that spot with the intention of starting on it and then working on it for the whole year.  However, that didn't happen as I never got to the wholecloth that month and didn't pick it up after the month it was introduced passed.  For 2023, because I had already been working on the string blocks for "Cotton Boll" at the end of 2022, I put that as my January pick for 2023 (and at least that one did get done).  

So I am trying that strategy again for 2024.  This year APQ is not picking the numbers but has given quilters an "evergreen" list sheet (there is no year pre-printed on it) and a page of numbers to cut out and use to pick their own.  I also decided to set up two separate lists this year:  one for projects that still need piecing and one for the "To Be Quilted" projects.  

My lists are already set up and I pulled the first two numbers for the year.  I've already assigned the wholecloth  to the "To Be Quilted" list and put my "Scrappy Figs BOM" on the "To Be Pieced" list as I had hoped to also work on that during the "7 Days" quilt-a-thon.  Since I want to finish both the blocks and the top for that,  I have also already put "Figs" on the "To Be Quilted" list as the February pick so I can continue to work on it and just finish it.  

I have the project from the improv workshop I took back in October as the February "Piecing" pick and my Double Wedding Ring project is the March pick as I want to finish mine as a precursor to working on one as a gift for someone.  The rest of the projects on both lists will be picked as I pull the numbers in the subsequent months.

So starts the New Year!  I hope mine is as productive as last year's and that everyone will have a lot of beautiful things to show us in 2024!!

Thursday, August 31, 2023

August Recap

It was another busy month and once again not with all the things originally planned.  There was a lot of cross stitch, a little quilting and a new addition to my quilting arsenal!

Cross Stitch

I had signed up to participate in the Colorado Stitcher's Cross Stitch Summer Camp.  She holds these in June, July and August with a themed prompt for each month.  I was already doing something else for June and didn't have anything for the July prompt as well as having quilty plans for that month.  However August was up for grabs as she had always made the prompt "Try Something New" for that month.  Since I am still a relatively new CSer, pretty much anything I do is new-to-me!

I had two potential options for that one.  The first was this Halloween kit I had picked up on eBay:

I had chosen this one as my first "Halloween Stitch" (it seems that CSers are big on stitching Halloween projects) and also as my first "beaded embellishment" stitch.  This "kit" consisted of the pattern and the beads so I was going to have to source the fabric.  I liked the color of the "called for" fabric in the pattern picture but not so much that it was for a 32 count Belfast Linen.  I was already working really slowly on a project stitched on an Evenweave from "Stitch June" so wasn't sure I wanted to commit to that.  However, I really wanted to try to see some fabric in person.  

A couple of "near me" shops I Googled turned out to be needlepoint shops not needlework shops and I learned that there is a big difference in what is carried in each.  I wasn't sure about ordering online since the color I was trying to match was not one that I have any immediate plans to use again in the future and most of the ones I saw that had potential called for ordering a fairly large piece.  Additionally, you know how it is when you order something online:  I didn't want to order and if the color that arrived didn't work, have to make additional orders until I got something I liked.  Unlike with quilting, I am not trying to build a cross stitch fabric stash!

As such, I tabled that in favor of working on a "Stitch June" project that I hadn't gotten to:  Mani Di Donna's "Right To Vote":

This meant I'd be challenging myself to working on Linen after all since I had purchased the "called for" fabric of the same stitch count for this project.  Well if I thought stitching on Evenweave was hard, Linen proved to be even more challenging!!   

I will admit I'd pick this up, struggle to do very little (or a lot of ripping and re-stitching) and then put it down, sometimes for more than a day or two before getting back to it.  As I came into this last week, as much as I felt like I was finally starting to get the hang of it, I also realized that it was going to take a lot more time than I had left to focus on it and get it done.  So I only got as far as this for the month:  

Oh well, at least I now have a better idea of how working with this type of fabric is executed.  What was a lot easier to tackle was the Summer Camp badge issued for this year.  I stitched that on a simpler 18 count Aida and while easier to stitch, I did flub some of the pattern counting and there are some motifs that are a bit off.  The finished badge will also be larger than patterned since it was designed to be stitched on 25 count Lugana (Evenweave).  

I worked on the badge between the times I tried to work on the Linen project.  Even so, I still have flowers to add to the wreath and a stitched border to finish this up so it too will remain on the stitching docket until it gets done. 

And More Cross Stitch!

As I noted in a previous post, the founders of my community garden are very craft and art focused and like to program workshops for creative endeavors that can be hosted in our garden.  I had done an EPP workshop for them back in 2020 and was asked if I had anything for this year.  

Right before that, I had come across a cute (and free) little pin pillow pattern with a Lavender theme.  I got excited because I knew we had a lavender patch in the garden so thought it would be cool to stitch this up and harvest and dry some of the garden lavender to put in it.  

It wasn't much of a leap to think about how this could translate into a class so I proposed it and the proposal was accepted.  Of course then I had to actually prepare for the class which presented its own issues and a bunch of work to be ready for it on the last Sunday of the month!

I finished stitching the above samples early in the month then spent the rest of the month sourcing materials for kits for the class attendees that would include little mini project bags.  I wrote up an information packet that summarized some of the basics of the stitching techniques, supplies used and sources and a glossary of common terms and acronyms used by CSers.  

Unfortunately, our garden lavender patch was a little worse for the wear.  I have since learned that is because we never pruned the plants.  I will work on rehabilitating it for next year but now that also meant sourcing dried lavender to turn these little pillows into sachets.

The class went well although many found the concept of cross stitching a bit challenging.  However a good time was had by all and we have scheduled a follow-up session to see if everyone was able to complete their stitching and to go over how to finish the pieces.   

A Little Bit 'O Quilting

The only quilt-related thing I worked on this month came about because I needed fabrics to provide the workshop attendees backing squares for their little pillows.  To that end, I remembered a set of fabrics I had purchased to make a doll quilt for a (now deceased) aunt of mine.   I found the batch of leftover fabrics that had lavender motifs on them but also found the remains of the project that had been my first attempt at making that doll quilt.  

Back then, I had worked up a design in the Quilt-Pro design software I had at the time and had started piecing the nine patch blocks for the center.  


However when I went to cut fabric for the outer round of blocks, I wound up not having enough of the large floral fabric for both the blocks and the outer border of setting triangles and at the time didn't have the budget to purchase more.  As a result, I had taken what fabrics had not already been cut up and used those to make an alternative "Twister" quilt design for her instead.  

Coming across the remaining fabrics and the nine patches that had been pieced, I realized I still very much liked the first design I had come up with.  I wondered if even though all this time had passed, I might be able to A) get more of the border fabric and B) finish the piece.  I really was interested in doing this because I knew it would now coordinate with the fabric I had purchased back in April for doing Angela Walters "Floral Frames" free-motion quilting challenge.  That would give me a coordinating quilt to go with the challenge quilt when(ever) it gets finished.

So I worked up the design again, this time in the EQ8 software I have now.  I added additional borders to the design to make it big enough for a wall hanging and used the software to confirm how much fabric I needed to have.

Lo and behold, I was able to source more of the floral fabric even after all these years!  However that led to a new problem:  I now also needed more of the blue leaf fabric I had planned to use in the outer nine patch blocks because I had used up most of what I originally had when making the "Twister" quilt.  Unfortunately, more of that fabric in that color could not be found anywhere!  

However, in the course of sourcing more fabrics for the class project backings, I picked up some promising prints that I thought might now replace the old blue fabric I couldn't find.  I realized that I no longer needed the quilt to be strictly and primarily blue and white (which had been the colors my Aunt liked) so could introduce a little purple into my version.  I found the leaf print from the original fabric line in purple and one of the cross stitch backing prints looked like it might work.  I also picked up another blue flower print that I hoped could be another potential alternate.  

I made up a few test blocks including some with what little I had of the original blue leaf fabric.  I'm still not sure which works for me so this project too is now on hold.....

Last But Not Least:  A New Addition!

A BIG change to the quilt studio happened in August:  there has been a changing of the guard!  The Brother Nouvelle 1500 machine that I had purchased used back in 2019 unfortunately was determined to have breathed its last (well, actually it needed a replacement part that could no longer be procured).  

Fortunately the machine repair shop I had taken it to was able to give me a great deal on a demo model of the machine I had always wanted in the first place so I am now the proud owner of a Juki TL 2010Q machine!

I am thrilled but once again am now in the position of needing to get used to working with a new machine.  The good news is that this has pretty much the same "stitch feel" as the Brother did without the problems I had with the other machine being periodically unresponsive.  

This means I may finally be able to really settle in on getting my quilts quilted up faster.  I do like that the Juki has an adjustable speed control, a needle threader and that the thread cutter can be activated from a button on the front or with the foot pedal.  Also just like when I purchased the Brother, the Juki offers the ability to be put onto a long arm frame if I ever get the space to do so in the future.  So a new adventure is a foot!  

Looking forward to seeing what September and the Fall bring in!! 

Sunday, June 30, 2019

Another Once A Month Update....

Summer is officially here and I'm still struggling to get in gear for Spring!  Both my sewing and cutting tables were pretty piled up and it took me a long time to cut through them.  They're still not totally clear but at least now there is some space for working on a few projects.

As usual all the new and exciting Squirrel sutff that comes in through the email and Bloglovin' had me filing away ideas fast and furious.  I also made another new aquistion.  I've long fretted about whether to replace my Euro-Pro and Janome electonic machines.


I wanted something with a wide harp space like the Horizon but given the issues I've had in the last few years with those machines, I longed for a simple and reliable mechanical machine like the vintage Singers I have.  So I was once again back to researching machines and honed my choices down to either a Juki TL 2000 series or a Janome 1600 or a Brother PQ-1500.  New, all were still a bit more than I had to spend right now even though they are all far cheaper than a comparable electronic machine with all the "bells and whistles".

I was hoping to luck up on a good condition used one of any of the brands.  I did eventualy find one --- an older model Brother Nouvelle 1500 which seems to be the precursor of the PQ series.


Purchased from a sewing machine repair shop over eBay, it cost about the same as what I paid for my Euro-Pro back in 2004 which had been a bargain priced "bells and whistles" machine back then.  Admittedly the Nouvelle is a bit doudy and when she first arrived she gave me fits by not responding to the foot pedal!  However she eventually came around and I've got to admit she stitches like a dream and can go really fast!  It came with all the necessities:  quarter inch foot, walking foot, free motion foot, zipper foot, knee lift, extension table, a few bobbins and the high speed needles it takes.  I have a ruler foot and additional bobbins on the way.  I also ordered a new brighter LED light for the machine which I've gotten used to having on all my machines including the Singers.   As a I did my research, I was glad to see that the Grace Company has quilt frames that wide throat domestic machines like this can be loaded on to and used like a long arm.  I expect to be an empty nester in a few years and might then have an extra room for such a set-up.

I have plans for a community sewing event I'd like to try to launch next year.  I will still need my electronics for that so for the time being I have put them in storage and will pull them out and invest in repairing them then.  For now, me and Nova the Nouvelle will spend some time getting to know each other!

We started off our relationship by piecing and quilting a quick mug rug gift for a friend's birthday.


This was made from the same June Tailor printed panel pattern kit I used to make the mug rugs I gifted for DH's family Kringle last Christmas.  Her next test will be finishing up the quilting on my Cobblestones and Scrappy Trips projects.  If she can successfully tackle those, I've got a whole line of TBQs (To Be Quilted) we can continue to work on togther through the end of the year.  I'd love to clear my shelf of tops and partially quilted projects to make room for some new projects!

In my last post I also talked about wanting to make another QOV top.  I finally had some time to sort through the seven potential projects I had picked out last month and make a final decision.


I've made good progress on this quilt and hope to finish sewing the top over the next few days.  I orignally saw this quilt on the Katy Quilts blog.  If you are looking for QOV ideas, you have to check her blog out -- she quilts for a local QOV group and there are always so many great looking designs that come through her feed for this purpose!  The only downside is she often doesn't have pattern information for the designs so be prepared to do a little research or quilt math or fire up your EQ software if you want to make any of the designs she showcases.  I did find the info for this one  (although admittedly that was after I had already figured out the piecing design) and found out that this is the "Patriotic Patchwork" quilt by Debra Finan.  It appeared in the July/August 2012 issue of Fons & Porter's Love of Quilting magazine (which I know I have a copy of around here somewhere) or can be purchased as a stand-alone digital pattern from The Quilting Company website. 

This one got the thumbs up because the same outer border fabric used in the quilt Katy showcased I actually had in my stash.  I also had enough of a scrappy mix of R/W/B prints to make the rest of it completely from stash.  So I finally made good on a "One Thing Challenge" these last two weeks and because this project is relatively easy, I might still make the deadline of having the top done by July 4 as originally planned.  To completely finish it, I'll only need to add backing and possibly binding if nothing in stash works for me when I get to that point.  Once I jumped in on this, I felt the way I do when I'm in Quiltville Mystery mode because I quickly cut out all the squares and borders needed for it and then went right onto the production line of making red, white and blue four patches.  Guess I'll be nimble and ready when Bonnie Hunter sounds the annual mystery siren call after Thanksgiving!

Still so much to do but I'm glad that now I am actually working on things rather than just THINKING ABOUT working on things!   I'm hoping I can keep up a steady momentum and get some more things completed.  Let's see what the next "Once A Month" post brings or if I can get back here before that!

Monday, November 12, 2018

A Warm Welcome To A New Member of My Quilt Studio Family!

The thing that stopped me most recently was the loss of my Featherweight machine for two weeks.  No it wasn't broken -- it was a featured star!


For a while now I've been sewing on Fanny my Centennial Featherweight.  A friend in my complex got a grant to host a series of Oral History nights for the Tenants Association of her building.  She recruited seniors in her building born between the years 1920 and 1950 to come down and share stories of their lives or how they came to live in our community (which, by the way, is Co-op City, which has been said to be the largest affordable housing complex in the world).   She had the idea to decorate various areas in her Association room with "nostalgia stations".

When she started telling me about a sewing themed one she wanted to do, I asked her:  "do you have a machine?".  She didn't so I volunteered mine.  When we brought together our stuff, I realized she actually didn't have much in the way of iconic sewing items so a lot of what you see on the table is from my stash of family sewing items.  As I've related before, the Featherweight came to me through my mother whose boyfriend had been a tailor.  The forged cast iron on the table is real and belonged to my great grandmother, the pinking shears, tracing wheel, sock darner and tape measure were from my grandmother's sewing stash along with the Poinsettia hankie displayed.  I have a bunch of my grandmother's hankies and we were able to use them to accent each of the other displays in the room as well.  It was fun to work with her on these first two events and I was pleased to get to share some of my own family history in the process.

Another part of my loss of momentum was getting stuck on another project (and hopefully more on that in another post).  Getting stuck led me to re-evaluating my equipment needs.  I've long needed to fix my two electronic machines but admit I've been reluctant to do so.  Both were serviced in the last year and yet the problems I'm having with them have reoccurred making me wonder if it's time for an upgrade.  I'd really like to trade in both of them for one new upgraded machine but admit that the cost of that, even with the trade-in, is at the moment prohibitive.  This led me to think about what I features I really needed right now.  Fanny the Featherweight has been a champ and I love that I can maintain it myself for the most part.  The two limits have been the 5" throat space and that it doesn't do zig zag.  Actually the throat space is not a huge issue considering that it's still possible to quilt on it for small projects like mug rugs and runners.  For six years of this quilty life I quilted even queen size quilts on my Euro-Pro which is a standard 7" throat space machine.  

Quilting the flannel "Triangle Trips" in 2010.

Also, some years ago I bought Marti Michell's "Machine Quilting in Sections" book.


She also has a class and DVDs on Craftsy/Blueprint on the same topic.  I've never tried this technique formally but had already planned to try it with a Christmas top I want to get quilted before the year ends.  So it occurred to me that for the cost of servicing these two machines, maybe I could consider investing in another vintage machine if I could find one that had zigzag capabilities.  

I did some research focusing on the all metal Singer models.  I narrowed it down to the machines in the 400 - 500 series (this and this are two of the many posts and YouTube videos on the various machines in this series).  After scouring listings on eBay, Craigslist and Etsy, I just recently came across this beauty.


So now there's a new equipment addition to the quilt studio!  It's a Singer 401A from 1956 purchased from Etsy vendor Ed Hurston of Stitches 'N Bobbins in nearby Connecticut.  She came Saturday and I've already had a chance to test out her zigzag and decorative stitch capabilities which allowed me to give my stalled project a boost.  I'll do a full post on her once I've had a chance to put her through her paces.  But I'm really looking forward to establishing this new relationship!

P.S.: I think I'm starting a new quilt addiction:  vintage machines.  I swear if I had the display space, I'd get this one just for show!


Do you own or covet vintage machines?  Do you like them better than modern electronic machines?  Inquiring quilt minds want to know!

Tuesday, April 19, 2016

A New Post for the Tuesday Archives: Design Walls

Wow, Val who blogs at Val's Quilting Studio picked the perfect "Tuesday Archives" topic for me this week!  I had just finished upgrading my design wall  this morning when I checked to see that this week's topic is Design Walls

So this week my wall went from this:


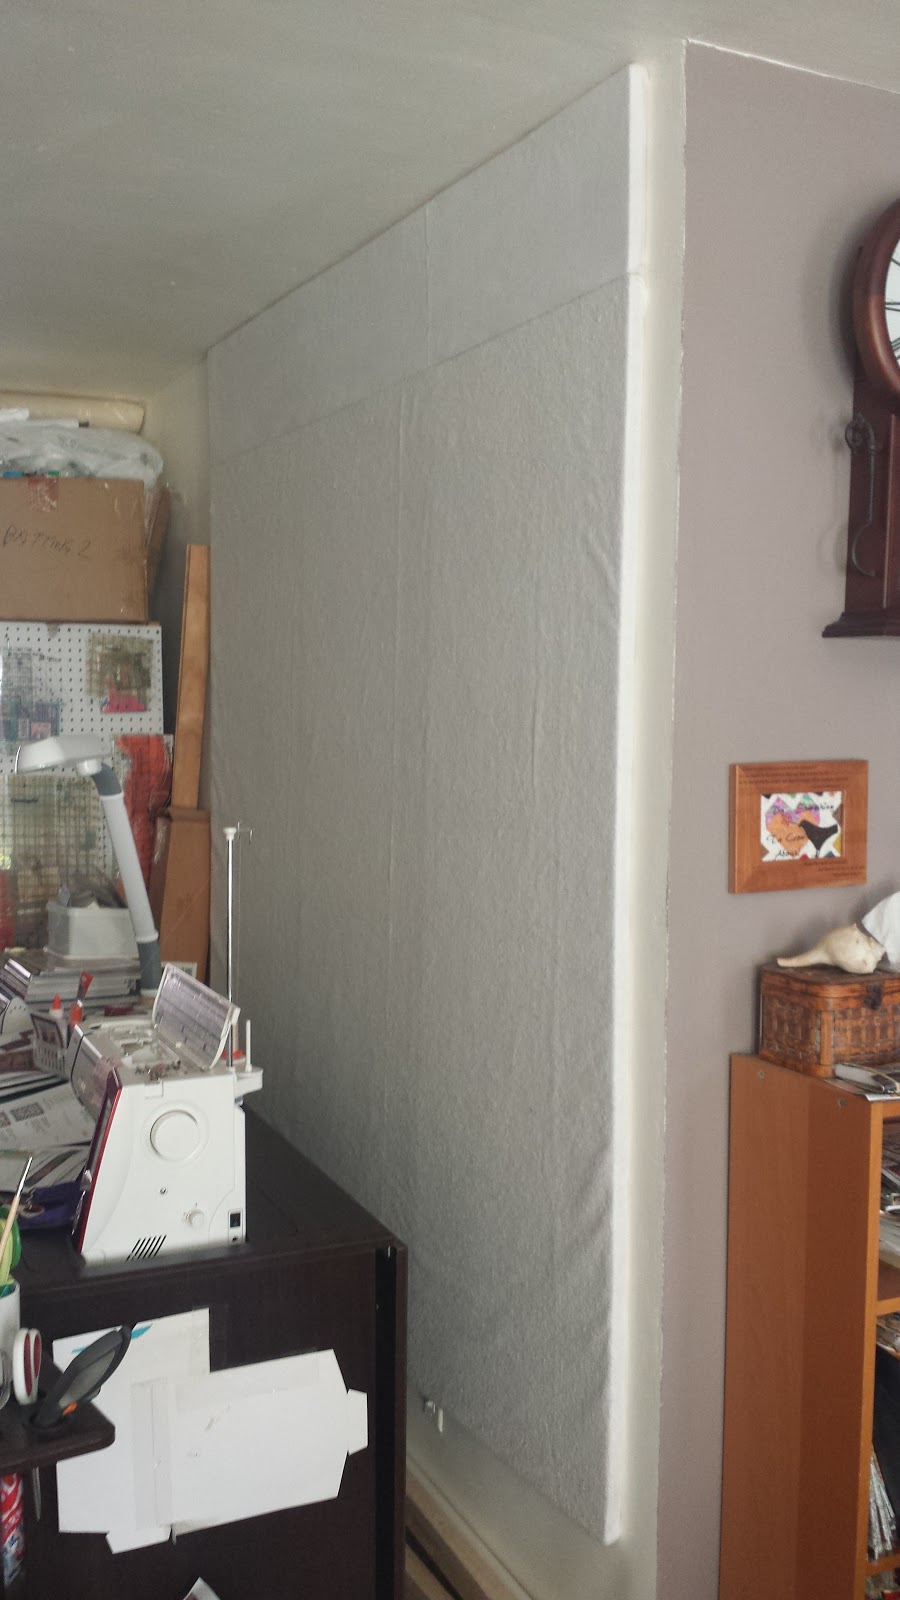
To this: 

Here's why:  I had put up this "permanent" design wall back in 2012 after we had finally gotten around to painting the townhouse after moving in in 2011.  In our previous apartment, my design wall was a flannel backed tablecloth stapled to the wall:


(Those blocks are from my Brrr! quilt which can be seen here.)

When we moved, I mounted the portable design wall I had constructed in 2010 (details on that in this post) to the wall as a temporary measure....


......using these giant 3M hooks:

17004 Command(TM) Utility Hook
Photo courtesy 3M Command Products
Click here to find out more about them

Product Plug:  I love all the various 3M hanging products!  I use them to hang all my quilts, picture frames, a bulletin board, posters, signs and my design wall.


As you can see from my 3M storage case, I use the small clear hooks, all the sizes of the picture frame (Velcro-style) hooks, the plastic and metal picture frame hooks (for frames that have those sawtooth hangers on the back) and the cord clips (see this Bonnie Hunter post about that).  My Underground Railroad/Pioneer Sampler quilts are hung on a curtain rod that is hung on two designer 3M hooks!  Recently, I saw that Janet over at the Rogue Quilter blog also uses 3M hooks to hang her "Yardstick Quilt Holders", something I must try in the future.

My current design wall is made from three 2ft wide x 8 ft long, 1" thick pink foam insulation boards you get from Home Depot.  I had cut the boards down to six feet because although my walls are 8 ft high, I needed to accommodate for the outlet on that wall which I did by hanging the wall above it rather than cutting an opening in the boards:


I also decided to only mount the wall as high as I could reach without using a step ladder.  At the time, I believed that six square feet of wall space would be enough to handle most jobs and it has.  My plan for the open space above the wall?  To make a quilted (what else?) banner declaring this "My Happy Place".  And while I have gathered ideas for that, I hadn't up to now started on that project yet. 

However, I admit there have been a few jobs over the years where I could have used just a little more space.  Earlier this month I was finishing up "Christmas Cobblestones", a Moda Bake Shop project, that started as a leader/ender for last month's pieced label project


Unfortunately, I only have a shot of the finished top but while I was laying out the blocks and strip-pieced sashing to confirm the final layout, I needed just a little more space for it all.  For that, I had to tape the top sashing to the open wall space above the design wall.  Right then it clicked in my head:  maybe I really should have made the design wall to the full height for those times that I needed it AND (more importantly) why couldn't I PIN my "Happy Place" banner to the wall for day to day display and then just take it down when I needed to use the full wall?   

Fortunately being a quilter, I never threw away the "scraps" of the original insulation panels so was able to pull them out and measure out the additional amount needed for the new inserts.  As can be seen in the picture below, I prepped them the same way I had done the original wall, clicking them together and then taping the back seam with Duct tape, covering it with batting stapled to the back and mounting the 3M hooks on the back of the boards and the wall. 


using these.....


Click here to find out more about them.

I'm glad to have a full wall now and the bonus is that I pulled out my banner ideas folder and hope to start making some of the parts for it which I can put on the wall as I finish them, designing as I go which should be fun!  I haven't done any quilt work lately so hopefully the next time you stop by there will actually be a "project-in-progress" on it for you to see!

If you'd like to see what other design walls look like and what they have on them, click over to Val's Quilting Studio and see "how's it hanging" in other people's studios!

http://myplvl.blogspot.com/2016/04/tuesday-archives-107-design-walls.html

Monday, March 28, 2016

Efficiency is finally a GO!

Was checking in to draft my next "Get It Done" post and realized I haven't posted since the first of the month!  There has been things going on although not really pertaining to the "Done" list!  My word for the year is "Efficient" and from my humble beginnings as a quilter, I've always been a fan of having "the proper tool" to complete tasks.  However, that can get expensive fast in this quilting game.  To that end, there's been some new arrivals in this Gadget Fanatic's household:


(Be forewarned, as usual, a long story ahead!)

From the time they came out, I admired the Accuquilt Go! cutters.  However, I'm fairly proficient at cutting with rotary cutters, rulers and acrylic templates so I couldn't justify the cost of the machines and dies for most of the projects I had plans to make.  Most people seemed to like the machines best for strip cutting.  I use the June Tailor Shape Cut (pictured below) for doing most of my strip cutting and find it fast and efficient so didn't see where a GO! would improve upon that. 


When I learned to Hand Applique back in 2010, all that changed!  I realized that a GO! cutter would really be a benefit for cutting all those odd or repetitive applique shapes.  Imagine cutting circles, leaves or really small hexagons or other more complex shapes like birds, feathered fronds or swags six at a time with just a crank of a handle!  That's when I really began to covet getting a machine!  Any time I saw a giveaway for one I entered hoping to win one.  Usually in order to enter you had to sign up for Accuquilt's e-newsletters (which you can also do at the bottom of their home page) and that of course led to periodically getting notices about new dies and offerings. 

I thought about dipping my toe in when they introduced the smallest machine, the GO! Baby which is not too expensive.  That idea got nixed when I realized that one of the applique dies I coveted most was the Alphabet die set which is too big for use in the Baby machine.  The Baby can use dies up to 6" wide and while there are many dies that size or smaller, the ones I wanted most are bigger.  The largest Accuquilt machine, the Studio cutter, was also out for me because it is heavy so requires a dedicated space for it and I don't have room for that.  So a regular GO! machine it would have to be.  Then as I began regularly trolling the Accuquilt site, I discovered their "Block on Board" (affectionately known as "BOB") dies.  These are dies that cut all the units of a pieced block on one die.  Okay, now they were starting to pull me in with the possibility of also using the machine for regular piecing but again, how to justify the price?

One of the features of buying directly from the Accuquilt site is that each purchase generates "Rewards Points" that can be cashed in to discount the price of future purchases.  During the Holiday shopping season last year, they made an offer that if you just created an account on their site and set up a wishlist, they automatically loaded 250 points into your account.  Worth $5 and given the cost of the machines and dies, I felt that every little bit helps!  I examined all the dies they offered and loaded my choices into a wishlist but my points sat unused until after the New Year.

Even as I trolled the Accuquilt site, I also trolled eBay, hoping that maybe another option was to buy a used machine from someone giving theirs up or upgrading to the larger GO! Big Electric machine that came out recently.  Many machines came up on that site at many, many, MANY different price points.  What was offered also greatly varied in terms of how close to (or far from) "New" the unit was and whether it came with the Value Die set usually offered with the machine (and whether it was the old 10" x 10" version of the value die or the new 6" x 12" version of the same die).  Some auctions included extra dies (new or used) and you had to read carefully to see if the machine came with all the original accessories like a die mat, the die pick, the instructions or even the original box.  Also, on eBay many sellers (both individual and stores) are selling the individual dies at prices that sometimes beat the sales offered on Accuquilt's site.

That is how they got me!  Shortly before Christmas, an auction came up for a BOB die called "Alex's Baskets" by quilt designer (and celebrity and the woman who got me hooked on quilting) Alex Anderson.  This die cuts all the triangle and square shapes to make a 4" (finished) pieced basket and the bias strip for the basket handle that's appliqued onto the block background.  This was special for me in that I had actually made these baskets for a scrap quilt from Alex's design back in 2009:


I had used the pattern from her very first book "Quilts For Fabric Lovers" which made 4-1/2" finished basket blocks:


I enjoyed making that quilt but hadn't really thought about making another one since it's really fun done scrappy but that means the cutting is also a bit fiddly.  When I originally made it, I collected scraps of  6-1/2" inch and 6" inch squares of basket and background fabrics, paired the fabrics to be used for the blocks and sub-cut them into (2) 3-7/8" large HST triangles (in basket and background fabric) and (2) 2-3/8" small HST triangles and a 1" wide bias strip (basket fabric) and (2) 2" squares (background fabric) to make the block. 

Using this die, I can cut a 5" square for the basket and a separate 5" x 6-1/4" rectangle for the background and run both through the die once to cut all the little pieces.  Even better, if the fabric I want to use would work for both the background and basket (although not in the same block!), I can cut one 5" x 11-1/4" piece of fabric and running it through the machine will leave me with both basket and background units that can be mixed and matched at will with units cut from other fabrics . 

Funny thing was that I didn't remember seeing that die on the Accuquilt site and sure enough when I checked back it wasn't there although they did offer other dies by Alex that I also saw listed on eBay.  Was it possible this was a discontinued die?  Well that was enough to peak my interest but even better, the die was up for auction for a starting bid of 99 cents!!  Most dies retail from $20 up to a high for the Alphabet 2-die set of $200.  I figured if I could get this die for anything up to $30, I'd consider myself lucky.  And guess what?

And I tested the die by making a block!
I won it!  Even better I paid $17 for it including shipping!!  Even better than that, since then I've seen the die offered on eBay for no less than $40 and as high as $80!!!  This is definitely one of the older dies because the areas on the foam base where the block units will be cut are the same color as the uncut areas.  On the new dies, the area where the fabric will be cut is a different color from the uncut areas so it's easier to see where to place it (see the picture of the Value die at the top of the post).  Okay, so now I had a die but I couldn't use it unless I got a machine! 

From that point on, I very diligently checked out all the eBay auctions that came up.  I'd come close to placing bids a few times and did submit a "Best Offer" on one that was declined.  In the meantime, all during February,  Accuquilt had a sale on dies and accessories, offering 10% off if you bought one and 15% off each item if you bought two or more.  Next to the Alphabet die, my next most coveted die was the "Log Cabin" BOB.  One thing I've also learned while trolling is that the individually purchased dies don't come with the (white) mats needed to cut the dies.  The (new) Value Die set that comes with the machine does come with a 6"x12" mat which is what I also needed for the "Alex's Baskets" die.  For the Log Cabin die, I'd need a 10" x 24" mat to go with it.  The Accuquilt sale and my new account points were enough that if I bought the die with the mat, the discounts (and the fact that if you spend above a certain amount shipping is free) would mean I'd basically be getting the mat for free.  I was very, very, VERY tempted to buy it but only if I could get a machine beforehand.

With time running out on the sale, from my lips to the Quilt Gods' ears!!  A machine came up as a "Buy It Now" listing that was around the price I was hoping to pay for a used machine in good condition.  It seemed to come from a thrift outlet store and the description said that the machine was barely used and had all the original accessories.  With the shipping it was about $30 more than I hoped to pay in total but that was still $20 less than the best super-discounted price (with free shipping) I had seen for the machine on the Accuquilt site back at Christmas and was $70 less than the regular sale price it sells for normally.  I still had some reservations about buying used but took a chance since although the seller didn't take returns, eBay offers a 'Money Back Guarantee" if you are not satisfied with your purchase. 

Well, if you've stayed with me this long, you saw at the top of the post that I got my machine!  And once I placed the order for the machine, I went to Accuquilt and placed the order for the Log Cabin BOB.  Since then I've found more good deals on eBay for basic dies that cut circles (which I've already used for a project that I'll detail soon), hearts and the Fall Medley die because there is a treat jar that I'd like to make that I thought I could use it for.  When I found a discount coupon that gave triple reward points, I also splurged on the 4" Clamshell die and a 5"x10" mat for my circle die.  Now I'm waiting to see if  can catch a really big sale (maybe Mother's Day or they'll have another warehouse sale like they did in January) and I can use the sale discounts and all my accumulated points to get the Alphabet die set.  I've tried the machine and all the dies out (the machine did come with the Value set and an extra 6" x 6" mat which is another reason why I splurged for the Clamshell die) and they all work great!  So I'm now looking forward to putting yet another new machine through it's paces this year!

If you have a GO! (or another brand of die cutter that you use for quilting), tell me what you like or dislike about it and if you have any tips for using and storing the dies.  Any information that makes this even more useful will be much appreciated!

Wednesday, February 24, 2016

Putting the Featherweight In Service

Twelve years ago, I came in possession of a Featherweight machine.   It originally belonged to my mother's boyfriend who was a tailor.  At the time, I had only been quilting for two years and had always heard such good things about these machines so like most quilters I coveted one.  Not for sewing with it mind you -- I just wanted to display it!  Once I had it, I set up the quilt space display I had dreamed of.

The iron 2nd from the left is real and belonged to my great grandmother!
I made my first mini quilt for it, choosing the design and sizing the quilt so it would deliver the maximum impact when displayed on the machine bed.  I also eventually learned that you can date these machines by their serial numbers (here is one place to look that information up).  Based on its serial number, this one was made in 1952 so is one of the "Centennial Edition" machines.   It was a given that when we moved, setting up another display in my new quilt space was a priority.  At first it started like this:


However that first little quilt looked really lonely on that long expanse of wall and I realized that I had the perfect excuse to make more mini quilts and the perfect place to display them.


Back in December with a couple of projects still to finish up for the end of the year, both my main Janome and back-up Euro-Pro sewing machines went on the fritz.  At that point, I thought it might be time to actually try to use the Featherweight for sewing.  When I originally got the machine, I had no idea if it still worked and (sheepishly) admit that I didn't even try plugging it in.  Ironically, I had thought about this very same thing in April so had done some research about Featherweight maintenance and based on what everyone said had purchased David McCallum's book "The Featherweight 221 and I" which promised to get me up to speed on servicing, maintaining and even restoring Featherweights.  So when I sat down with the book and the machine.....


....almost immediately I found out that I was out of luck!  The first thing I discovered was that the belt on the machine was split!!  This meant that even if everything else worked, the main part that drives the needle was kaput!  Fortunately I was able to switch production of the projects I wanted to work on to doing them by hand.  Even so, I still (finally) plugged in the machine and found out that in fact the motor and light DID still work so decided not to let the broken belt be an impediment.  I added a plan to service the machine and get it back to running to my 2016 "To Do" list.

Once my hand work was moving along at a good clip and my Janome came back from service, I wanted to see if I could also get this machine up and running to use as the new back-up.  If I can learn how to maintain and service this completely mechanical machine myself, I won't have to stop production when my electronic machines need to go into the "hospital".

I finally sat down with the machine two weeks ago and reviewed the whole book and the machine to determine what parts and supplies I would need.  I researched where I could get the things on my list both on the web and locally.  Unfortunately none of the local places were nearby whereas two of the three best web sources I found offered free shipping.  Even for the one that didn't, the shipping cost was less than what I would have paid in carfare to travel to Manhattan or gas to drive up to Westchester which is where the two closest local sources are.  By the weekend, all the orders arrived from:

April 1930's Featherweight Specialty Shoppe (now The Singer Featherweight Shop): 


Note:  They are conducting in-person workshops on Featherweight maintenance all across the country this year.  If you're interested, information about where they will be held is here.

Nova's Featherweights and Quilting:


and NgoSew (eBay): 


 Also following the instructions on Nova's site (scroll down to her June 2015 "Tip of the Month"),  I went to the local hardware store to purchase some Kerosene to clean off the old lubricant on the gears before putting a fresh application on (this is the smallest bottle I could get which is still waaayyy more than I needed!).


With Mr. McCallum's great instructions, I worked my way through replacing the belt, cleaning and lubricating the machine's gears (there are also great videos on this at April 1930's and at Nova's at the bottom of their pages), oiling the machine and cleaning it off (soap and water).  I also had to change the feet on the bed of the machine -- the old ones were totally dried out and crusty!


I replaced the original light bulb:


....with a new bright LED one:


 Here are the two bulbs:  the old one on the left and the new one on the right.  Not only does the new bulb have a "cleaner" light but another advantage is that it is sheathed in silicone so is not hot to the touch!  I've read more than a few comments about being burned by the old lights because they (and the metal housing above them) get very hot once they've been on a while.


I bought a supply of bobbins, a 1/4" foot and a walking foot made for single hole thread plates so I'd be ready to stitch once it was up and running.  I would like to eventually buy a new bobbin case and a needleplate with seam guide markings but I think I've spent enough on this for right now!  Oh and what's a shopping expedition without a few tchatchkes!


Nova had this cute Featherweight pin that I just had to have to add to my quilt pin collection.  I had seen red or white felt spool pin pads at a number of sources and figured I would just make my own from some felt I have around here --- that is until I saw the *cutest* crochet spool pin doilies at April's and again I just couldn't resist!!  The only thing I've still got left to do is get some (would you believe it) car wax to polish her up.

I've christened her Fanny -- a fun bit of alliteration and a nod to a (deceased) aunt of mine!  So after all of that, the real question is:  Does she work?


Yes!!  Here she is on her first project with me:  sewing the binding strips (with the new 1/4" guide foot) for my High Strung +2 quilt.  Something else I didn't know about Featherweights is that while they are straight-stitch only machines, they are able to stitch in reverse!  Next she also managed just fine attaching the binding to my "High Strung +2" quilt that I finished hand quilting on Monday.  This gave me a chance to try out the walking foot. 


What I hope to use her for next is an accessories project just for her!  Many people swear by their Featherweights as a traveling machine.  My Euro-Pro machine was my traveling machine but I admit it's pretty heavy and bulky even with the Tutto bag my MIL gifted me many years ago.  One of the places where I saw McCallum's 221 book recommended was on Jeni Baker's blog In Color Order.   She did another post where she made a tote for her machine (and there's another good tutorial over at the Crafty Hipster blog too).  It just so happens I already had a bag pattern for a tote the same size and having made a tote in 2014 as a gift for our neighbors, figured I can try making one for the Featherweight too.  Looking forward through out the rest of the year to put this baby through her paces!!

* * * * * * * * * * * * * * * * *
Attention Vintage Sewing Machine Fans!!
If you are a fan of antique machines, you may be interested in a new documentary on them called "Still Stitching".  It can be purchased on DVD or watched as a streaming download.  Check out the preview on YouTube here.  The DVD can be purchased here and you can tell your own vintage machine story here and possibly win prizes!