Showing posts with label Squirrel Moments. Show all posts

Monday, March 13, 2023

Moving It Forward Monday: The "Cotton Boll" Blocks Are Finished!


Ta Da! And one day early!

I had managed to stay on track making these blocks for "Roll, Roll, Cotton Boll" as my "Block-A-Day" project for the first half of the month.  Yeah, stayed on track right up to last Friday when the usual "squirrel" diversions happened (more on that later).  

I had hoped to catch up over the weekend but only managed to get Friday's block done on Saturday and then had to spend Sunday die cutting more red and neutral HSTs and making more of the pieced border strips for the remaining blocks.  So today I decided to just finish up both of the weekend blocks as well as the last two blocks that were scheduled to be made today and tomorrow.

Now with the last of the blocks done, I plan to pack this up to take with me when we go to visit my MIL at the end of the week.  I'm hoping to layout all the blocks and put the top together while we are away but we'll see if that happens since I also have other projects I am taking with me.

Now, as for that "squirrel":

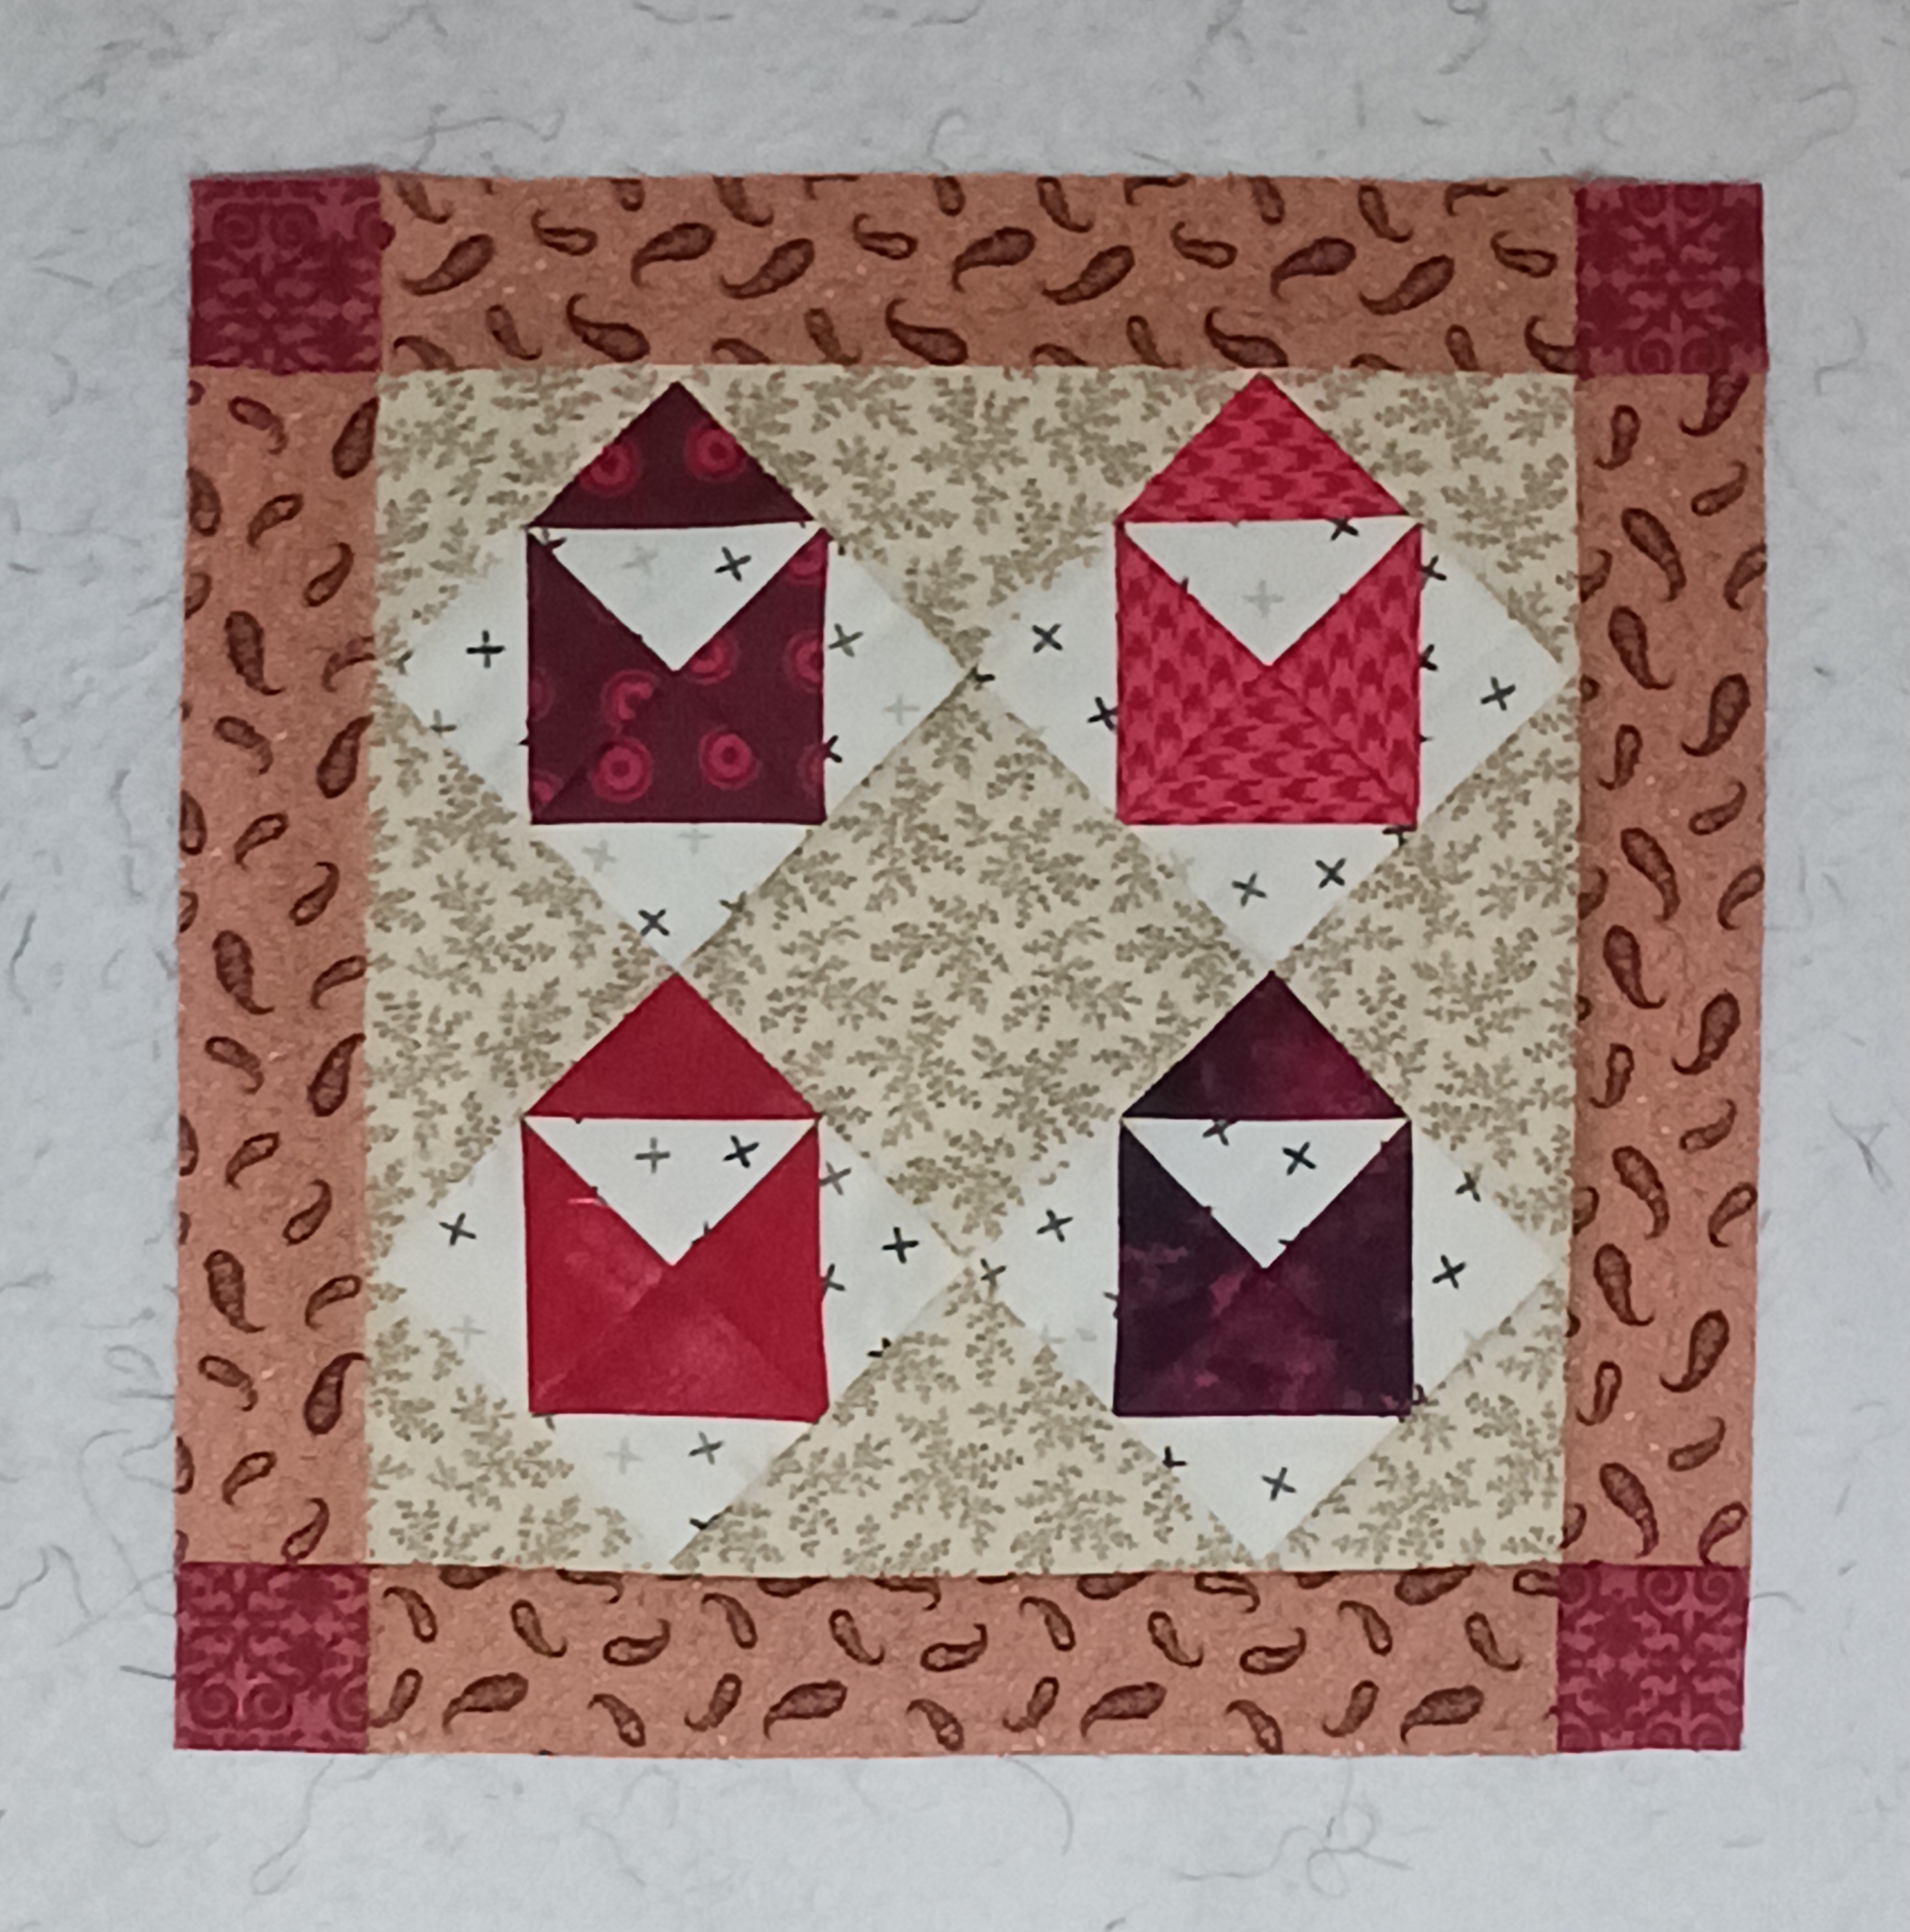
Yet another Valentine's Day project

I saw Kathleen Tracy's Valentine's Day Mini mystery quilt project on her blog last month and it was just perfect for a recent conundrum.   When I had finished the "Cherry Crunch" quilt last month,  I put it on the living room chair.   Hanging above the cabinet next to the chair was the little "Hearts & Flowers" mini quilt on display for the Valentine's Day holiday.  I was surprised that the "red and white" color scheme of "Crunch" didn't seem to mesh all that well in the space with the mini quilt.  Although the mini quilt has red fabrics in it, it reads more pink overall.  I would have thought that since pink is a tint of red they should look good together.

So my solution was that maybe if I made a pillow with some pink and red in it that could sit in the chair it might help the two get along better --- even though they would not hang out together for very long in any given year!  I wondered what I could make for that and as soon as I saw Kathleen's design I thought:  "that's it!".   With all the red fabrics I still have lying around right now, I decided to see if I could find a few that might work for it.  I actually picked the block and border corner square fabrics out quickly and then found a good print for the borders in my Civil War reproductions stash.  

However,  I had more trouble choosing the background fabrics.  The scrappy neutrals in "Crunch" actually read more towards light beige/tan over all in comparison to the mostly white background fabrics I used in the mini quilt.  I wanted a light neutral that would bridge the two.  What I had really hoped was that I had more of the Jo Morton stripe with pink buds that I had used for the vertical sashings in my "Civil War Strippie" quilt.  That print would be similar to what Ms. Tracy used in hers and bring more pink into the background.  

The striped print on the right is from Andover fabrics "Lucinda's Needle" line.

Unfortunately, I couldn't find any more of that around in the stash or scraps.  So after auditioning a few fabrics, the light tan with brown branches worked the best.  Kathleen had used scrappy backgrounds for the little envelope blocks but at this point I didn't want to do a lot more auditioning so wanted to find one print that could work for them all.  At first I tried using the wavy textured light inner border print I had used in "Crunch".... 


.....but thought it too light and "blah".


What surprised me was a sort of mod print with "X's" turned out to be the best choice to my eye of the fabrics I had on hand.  It also works in that "X" stands for "kisses" in Valentine's iconography.  Of course that meant taking the blocks completely apart to replace the fabric, sigh!  


I like the final top although I am now debating on whether to add some appliqued hearts or maybe quilt it with heart motifs using red thread.  Of course with Valentine's Day well and truly over until next year and with many other priorities on the list for March, I'll settle for just having a finished top for now.  

BTW:  Kathleen recently did a great blog post on how she displays her mini quilts (and most of them are made up in reproduction fabrics).  Check it out here!

For the rest of the week, I will be pulling stuff together to take on the trip!      

Thursday, April 30, 2020

Last Minute Check-In For April!

Whew, April has been a busy month!  I figured I'd better post about it before I miss it!  As usual, a LONG POST WARNING is in effect!

I had so looked forward to staying in for the quarantine because I thought it would be a great time to catch up on existing projects.  Instead there's been a flood of new projects -- well, old project "desires" that were fueled to move to the forefront.  This was courtesy of some inspiring projects that have been posted for the many "Quarantine Sew Alongs" that are out right now.

Prior to quarantine, I had been trying to finish up an old Bonnie Hunter mystery  until along came "Elvira" in late March:


Gudrun Erla's (GE Designs) quilt along was the perfect prompt for me to finally make that follow-up Spring quilt I've long wanted (and the details of that fun romp is here).

FYI:  Gudrun is doing another Quilt Along this weekend called "Hope".  This time, there is a nominal charge for the pattern but all the proceeds of the sales are going to three local charities in her area that are helping people during the pandemic.  Check out the link above or her recent "Tipsy Tuesday" video for more details.

 Just as Gudrun was announcing hers, I also learned about this:


Edyta Sitar of Laundry Basket Quilts was also doing a Sew Along Mystery design that is now officially named "California" (she also has kits for it now too).  For me it was yet another prompt to finally use another stash of fabrics I've been holding:  I had put away fabrics a long while back with plans to make a "Pinks, Browns and Blues" quilt.  I've always envisioned it to have a "Shabby Chic" vibe and Edyta's quilt designs always invoke that for me.  It was a quarantine match made in heaven!  Details about how that went is in my next post.  Right now it is only finished blocks on the design wall, not yet a top.  I will also need to work on an outer border.

Another good thing is that while working on this, I also got a little leader/ender work done for Bonnie Hunter's "Roll, Roll Cotton Boll" which I hadn't worked on since February of last year!


I needed a few more pink fabrics for the Sitar mystery and knew I had some stash still to process for Part 2 of the Quiltville mystery.  So I made up the triangle sets I needed to piece together and then added what was left to the Sitar stash.  Then there was also this:


My husband works for UPS which happens to be one of the "essential businesses" that has stayed open during the pandemic.  He was on vacation when the orders from NY's Governor Cuomo came down for everyone to stay home so we had at least that first week to be able to go together to stock up on things and start planning for the adjustments to "the new normal".

When he went back to work the next week, the company fortunately had masks and gloves for everyone and he was also able to buy an additional set of masks from a co-worker who had picked some up from a medical supply company and my husband brought those home for our family to use.  My husband works in the tractor trailer division and although he has to occasionally drive loads to other centers, he primarily works in the yard.  He and his co-workers shift and organize the trailers that come through, putting them into the loading bays to be unloaded or loaded and pulling them back out to be set up to go back out on the road.

If you wonder what that's like, check out this video: 


and this one: 


As you can imagine, a freight yard is not a very clean place and it didn't take long for the mask given to him to get pretty dirty and the dirt that gets on them isn't easy to remove.  We didn't want to have to replace the masks so frequently or destroy the filtering capacity of them with intense cleaning methods.  

Having already seen many of the mask tutorials on the web, I took one of his old work shirts and made him a mask to wear over the company issued ones to help them stay cleaner and last longer.  I used the tutorial and templates from Craft Passion and made the version that would allow us to add replaceable filters to the mask if at some point he can't get replacement ones from his job (and a supply of that fabric is on its way).

Well of course no sooner did he wear it to work, I got a request to make more.  So I joined the cottage industry ranks:


Of course getting into the mask making game that late meant I had a terrible time sourcing supplies.  His job provided plenty of shirts for cutting up and I had a good stock of thread but elastic?  Forgeddaboutit!!   I only had a little bit of it in the house when I made my husband's mask.  Also when I made his mask and some regular ones for me for going to the community garden and general shopping,  I found I needed to be able to adjust the length of the elastic for personal fit.  Not something I wanted to have to do for a bulk order!

Fortunately I had also seen Julie Sefton's post on her Quilt Diva Julie blog about how she did "around the head ties" for her husband's mask that were secured by a spring toggle.  Craft Passion had also showed that way of securing the mask in her pattern although hers was tied.  I sent one into work with my husband using the only comparable supplies I had on hand:  a long black sneaker-lace and the one toggle I found in my sewing supplies.  That mask was quickly snapped up by a co-worker so I decided to see if I could source toggles and paracord in bulk to make them all that way going forward.  That too took a while --- again, by that time, black paracord and black toggles were also hard to find!  Fortunately, I found a vendor on Etsy (thanks Debbie!) with the only color she had left which luckily for me happened to be Coffee Bean (brown)!  Perfect for UPS!!  Then I was also able to source a large spool of  brown paracord.


Another match made in heaven!  So this is what I've been sending in.


Since each shirt only provides one logo, I also make plain shield style masks and folded masks to use up the rest of the "fabric".  The folded design I've been using is from this YouTube video which I liked because of the side casings and that I could also make it so that replaceable filters could be inserted.  To help with some of the prep,  I had to show my husband how to "de-bone" the shirts, Bonnie Hunter style.  Another great quarantine activity while watching TV!

The downside for me is that once I had finished "Elvira", I had been geared up to quickly work on the Edyta Sitar mystery, get it done and return to my other projects.  However, the accumulated stash I used for the mystery didn't as easily integrate into the design as I had expected.  So that meant I went back and forth on most days trying to establish a balance between mask production and quilt design and layout work.  All of that had to happen between grocery runs and a few garden days.  And thank goodness for the latter:


Reminds you that even in the midst of this chaos, Mother Nature commences Spring right on schedule!  Fortunately for me, the winter gardening I did meant my little garden bed was already established and I've been able to harvest lettuce greens and a little celery and chives already.  The tall things around the perimeter are garlic which won't be ready for harvest until June.


The only casualty in all of this is that the only BOM work I was able to do this month was for the Joann Countryside Cottage BOM (as more leader/enders) because the pieces are all pre-cut.  I've even already done the May block!


Still, I'm going to have A LOT of catching up to do in May on the other BOMs I'm working on!  So I am hoping to finish the mask order in the next two weeks and in between will try to put the top together for Edyta's mystery.

I wish I could say that right after that I will get back to my other regular project work -- and I will, eventually -- but I admit I also have two other "quarantine quilting" projects that I'd like to get started.  Who knew that a pandemic would generate so much FOMO and Squirrel moments?!?  Let's all move safely on to May!

Thursday, March 26, 2020

Quarantine Squirrel Moments

So the good thing about a pandemic is that it forces you to "shelter in place" giving you more guilt-free time in your quilt space.  The bad thing is that there are sooooo many quilt designers doing daily online videos and posting special projects online and through social media to help us quilters find something to keep us busy while we have to stay inside.  Although how many quilters really need something new to keep them busy?!?

Yeah, so this happened:


Remember back in my last post I mentioned that Gudrun Erla of GE Quilt Designs was going to host a free Quarantine Quilt Along for a new pattern called "Elvira"?   She hosted the quilt along live on Facebook (with delayed airings on her YouTube channel) this past Sunday.  The pattern was free over the weekend and would you believe:  16,000 (!!!) quilters downloaded the pattern!  If you like it, don't worry, it is now available to buy on her website.

So what prompted me to make this?  I've made one of her patterns before so knew I liked her design and instructional style.   I initially hadn't planned to participate since when the quilt along went live I was still going to be catching up on my BOM work.  However, after downloading the pattern, I realized I had a fabric stash already compiled that's been waiting for just the right project and thought it'd be perfect for this.  It also looked like it was going to be a quickie quilt and right now that appeals to me greatly.

However, when I went looking for the HSY (Haven't Started Yet) stash I had thought of, I found another one:  I had purchased a fat quarter bundle back in 2017 from Turning Twenty from their "Specials" page.  I had hoped to use it to make a new Spring quilt to replace my "Fabric Gal" quilt that I had gifted to an ill family member in 2016.  I'd packed a few quilt ideas in with the stash but none had been ready for "boots on the ground".   When I saw that stash, I knew it was also perfect for this project and was even better suited for the simple but fun look of the "Elvira" design.  I needed to add a few more pieces to it to have what I needed for the (generously sized) lap quilt and wouldn't you know it, a few stash injections and some leftover cuts from the BOM I was working on perfectly rounded out the fabric pull.

From this....
To this!

So at that point, I committed to working on the quilt once I finished the current round of BOM work.  However, I did watch Gudrun's live streams on Sunday during which you got to see some of the inspiring fabrics, blocks and tops that other quilters were creating.  During the QAL, Gudrun also interviewed other quilt designers including three of my faves, Bonnie Hunter, Terry Atkinson and Pat Sloan.   All the designers she spoke to also participated in the QAL and made tops (well, except Pat who is still working on her blocks which you can see the progress of in her daily "Crazy Quilt March" YouTube videos).

"Elvira" is a pretty easy pattern and my favorite type of technique -- it uses a gadget!  If you own or have thought about buying Gudrun's Stripology ruler this is the pattern for you!

This replaced my (beloved) June Tailor Shape Cut ruler. 


It really makes great use of the ruler for all aspects of cutting the fabrics and trimming the block units and finished blocks.  In the videos, Gudrun teaches you some advanced tips and tricks for getting the most out of the ruler.  I highly encourage you to watch the videos even if you don't plan to make the quilt but have a Stripology ruler and have never used it.  Also take a look if you've been considering buying one and would like to see if it's worth the money.  I have the original ruler which is now discontinued so is cheaper than when it first came out and now there is a new, larger Stripology XL.  Gudrun shows how to cut the fabric for this pattern using either ruler as well as using regular rulers.

The video sessions where Gudrun walks you through the making of the quilt are still up on both her Facebook and  QAL You Tube pages.  Its helpful to get to see exactly how the pattern steps are done and to get answers to common questions quilters had about making the pattern.  She even had a Spotify playlist on the bottom of the QAL page if  you needed a little background music while you sewed!  I didn't get to start on it until Tuesday but once I did, I really appreciated having the playlist for when I wasn't watching the tutorial sessions!  I finished the top this morning and loaded the picture of it to the quilt along Instagram page (#quaratinequiltalong) where you can also see all the other tops that have been completed by the quilters who participated in this around the world.

Gudrun, like most of the traveling quilt teachers, is grounded for the foreseeable future so in her latest "Tipsy Tuesday" video (Elvira Wrap-up Edition) she announced plans to offer her annual "Strip Along" pattern for half price on Friday through her "Gudrun's Quilt Crew" Facebook group and will be announcing it during her "Facebook Friday" live feed.  So here's another chance to get in on the Corona-cation ground floor!

Updated 3/30/20 to add:  To get all the scoop on the Strip Along go here!

Soooo, not only that happened but this will happen:


Edyta Sitar of Laundry Basket Quilts started a Mystery 2020 QAL last  Friday.  This is a another designer who I've longed to make a project with.  Edyta's quilt style is sort of  "Repro Shabby Chic" which I realized was perfectly suited for that first stash of HSY fabric that I thought of using for "Elvira"!  I originally envisioned using this collection of Creams, Tans, Browns, Blues and Pinks to make a "Blended" style quilt or maybe a Turning Twenty.


I also thought I had more Pinks set aside with these but I think I raided some to make Bonnie Hunter's Double Delight.  I also added some grays to the neutrals pulled because I like using those now too.  Well, this mystery is going on for fifteen days so I have some time to both join in and augment the stash.  What I really appreciate is that as she is releasing the parts of the mystery, she is showing where the blocks will end up in the quilt.  That helps me decide which of my fabrics to use since I'm not using the fabric bundle she is working from.  Sweet!

I'm going to try to start setting up the blocks to be leader/enders for the block work I still have to do for the remaining two BOMs  I have to work on before this month ends.  And on that note, back to the machine!

Tuesday, December 18, 2018

Two Mug Rug Christmas Gifts Finished!

There's no doubt about it, mug rugs make great gifts!  l also love that you can personalize the sentiment in them for the person you are giving it to.  You can use the rug design to express it and/or give a mug appropriate to the situation or to them.  That's what I did for the last rug I made for a friend's desk at her job:


This time around I made two rugs for Christmas gift giving.   My MIL is my Kringle giftee this year.  She is a quilter too so of course part of her gift is fabric -- a small quilt kit and the backing for it.  I had also found a cute basket to pack it up in but I needed to add a little something to fill it out.  My first thought?  A cute mug with quilty sayings!


I found this one on eBay but I've got to tell you it was really hard to choose!  There were soooo many funny ones that I also could have sent like this....


or this.....


...oh and this!


I settled on the first one because in my book 'ya can't send a mug without an accompanying rug and I already had these in the house....


June Tailor has a couple of versions of these mini panels for mug rugs and each version has a different theme.  I really wanted the set with Quilty sayings but couldn't catch it on sale so settled for the "Uplifting" set.  I felt the top sentiment in the picture below went perfect with her mug.


The great thing is the panel set had one perfect for her sister too.  It wasn't originally in the plan to send her sister a mug and rug but I think the Quilt Muses were ahead of me on this one.  You see, each year (regardless of whether or not we have them for the Kringle) I also bake and send my MIL and one of her sisters Peanut Butter cookies for Christmas.  That started on one of the last Christmas' when they were still here in New York. We were talking about cookies and the sisters reminisced about how they had loved the ones that their mother used to make.  My husband then bragged about mine so that year I sent them both a batch.  It was a big hit to the point that even if I don't feel like making them, I'd better get them out in the mail because I WILL get calls if they don't show up!

I usually try to plan the cookie drop to coincide with the Kringle gift drop to consolidate the mailing efforts.  It just so happens that this year my husband has his Aunt as giftee so the good news is that I could send her cookies along with his gift.  Then I remembered that I had found a mug related to Christmas and cookies while out shopping either last year or the year before and had saved it for just such an occasion.  So when DH said he couldn't think about what to get her, I told him about the mug and said I'd even make a rug for it.  He loved that idea and then said it'd be great if we could find a cute cookie jar to go with it.  Fortunately Home Goods came to the rescue on that one!


My MIL's favorite fabric is batiks so I bought her a batik fabric kit for her gift and then I decided to use prints from my own batik stash to make her rug.  For her sister's rug, I was told she liked neutrals.  I didn't have that in my batik stash but I do have a stash of Black and White fabrics -- the original neutrals!

The June Tailor panel kit has mug rug designs patterned in the package for each size panel offered in the kit so I wasn't going to have to think about a design for them.  However, for his Aunt's panel, the rug layout used a Card Trick block and I wasn't in love with that.  The good news is a Squirrel Moment came to the rescue:  This month, the American Quilters Society (AQS) has been offering their annual set of Christmas Countdown blocks.  This year, they are giving the daily instructions for the blocks two ways:  colored in Red and White and in Red, Black and White.  Perfect!  I decided to pick one of the RBW blocks to substitute for the Card Trick block in the pattern.  I chose Block #6 and resized it to the 6" finished size the panel pattern used.  Then I figured out where else I could insert a little more red in the design for balance.


It took me a few days to get both rugs done.  I had originally just quilted my MIL's in Quilt-As-You-Go fashion by adding the strips right onto the layered batting and backing.  But after it was done, I felt like it needed just a little more quilting so had to take some time to figure what to stitch on it and then execute it.  The idea of using the echoed "Serpentine Curves" came from Mary Mashuta's book "Foolproof Walking Foot Quilting Designs".  This was good because at first I thought about doing meandering.  I've only tried free-motion on my 401 once and need more practice on it so really didn't want to try that on this deadline project.

For her sister's rug, I did a simple crosshatch over everything but the panel.  I also decided to do a faux piped binding hoping to add just a touch more red to the mat.  I used instructions for the technique that I've used before but on larger quilts.  The piping was a little more prominent than I would have liked so if I was to do it again on a piece this size,  I'd size the piping strip an 1/8" smaller and add that to the strip that creates the binding portion.

I think they both finished up very nicely and now both sisters will have a nice mug to fill with the hot beverage of their choice and have a pretty mat to sit their cookies on while they munch!  For me, I get another notch on the year-end Challenge finish list!  That's as sweet as a peanut butter cookie!