Wednesday, April 28, 2010

Quilters Accountability Report 4/28/10

 Checking In.....let's see how I did this week:

Last week's goals were:

  1. Finish quilting and bind the Stashbuster Quilt.  Done!
  2. Make up the blocks promised for Bumble Beans House Gather -- the deadline is April 30 so got to get moving on those. Done, but less than planned and harder than I thought!
  3. Work on at least two UGRR/Pioneer blocks (one from each).  Nope, but maybe I will work on these after posting.
  4. Work on two Sylvia's Bridal Sampler blocks (might be a long shot).  Nope, knew it was a long shot.
  5. If I get the Stashbuster done as quickly as I hope, continue the quilting on the Vintage Treasures BOM and (maybe?) have the quilting completed by the next post.  Extra time spent on the house blocks nixed that!
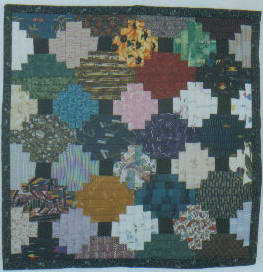
So the good news is that I did get my Stashbuster quilt finished and I am very happy about that.  It is my first Spring Finish finish and another completed project for 2010.


                         Front                                                                                                               Back

This was a project that started as a stashbuster challenge by Judy Laquidara at the Patchwork Times blog (2/23/09 post).  While I do like the quirky funkiness of my finished quilt, I've got to say that it looks quite different from her original design (which is now available on her site as a free pattern called "Out of the Bag").  Judy works only in tone-on-tones and designs her quilts the same way.  Her finished quilt and most of the ones by the quilters who participated in the challenge reflect that.  My stash has mostly prints so that's what I worked with.  My fabric choices and the limitations thereof forced me to eliminate the float for the center blocks and the inner border that were features in the original design.  But in the end it got done and all but the backing and binding fabric from stash.

This top had been finished since last year and was also on my list for last year's Spring Finish challenge.  So this was long overdue to get done.  My hope at the time was use it as quilt stitch practice and since that goal is the same this year, I still got to do that.  I did freehand Fans (on my DSM) for the first time.  A great all over fill (that's why it's a classic stitch pattern) and not that hard but I will say that if I use it again, I need to use a smaller repeat -- I used an 8" repeat which made it hard to keep the arcs evenly curved and spaced as they got to the larger half rounds.

                          Quilting Detail

The other thing I got done this week was to make the blocks promised for the Bumble Beans Basics House Gather.  I thought this would be a simple block to do so I didn't rush even as the deadline (April 30th) was looming.  Well, it's a good thing Victoria posted that she will still be accepting blocks even after the deadline (the deadline is for a chance at a give-away) since these took me waaayyy longer to do than expected.  I seemed to have a complete block (no pun intended) when it came to doing these.  The first block I did was 1/4" too narrow (they are supposed to finish 10-1/2" square).  I made adustments to some of the cutting specs but still managed to sew the next block too small, sewed parts together wrong or decided to change elements at the last minute.  I wanted to do ten blocks but I admit I reached the limit of my perseverence, so will mail these five out tomorrow.  The good news is that these blocks, along with those submitted by others, will be made into quilts that will be donated to a housing charity in my borough (which is why I refused to completely give up although I was tempted to many, many times).   The other good news is that she is arranging with the organization she is working with to agree to accept completed quilts for future donations (for details see here) and I have a top and back ready that I hope to quilt and donate.


The three other blocks I made that "weren't quite right" went into my "Orphan Block Bag" so will one day become part of a scrap quilt or journal cover and won't go to waste! 

So for next week I need to.....

  1. Finish the quilting on the Vintage Treasures BOM, get the clamshell binding made and finish the quilt.

  2. Work on four UGRR/Pioneer blocks (two from each).

  3. Try, once again, to work on two Sylvia's Bridal Sampler blocks.

  4. Restart my sons on sewing strings together for their "Denim Blue Lagoon" quilts and cut string pieced and denim triangles for the blocks.
And when you are finished here, check out what everyone else has planned for the coming week at Bari's Quilter's Accountability Report --- or even better post your own!
  Posted by Picasa

Wednesday, April 21, 2010

Quilters Accountability 4/21/10

Well, as promised I'm posting to Bari's "Quilter's Accountability" linky.  I have lurked the site before and admired the fortitude of everyone who has posted each week.  I'm hoping to gain some of that resolve -- I signed up for Jacqui's "Spring to Finish" challenge again this year and this time I'd like to make the FIRST deadline since last year it took until the SECOND deadline for me to get anything done!  We have six weeks (until May 31) to finish whatever UFOs, pending projects or interesting "new loves" we wish to get completed.  I know that keeping a weekly "To Do" list will help this process and perhaps insure that I will have something to show when we hit the May 10 halfway check-in.

Ironically, the first project I am working on is one that was on my list last year!  It is the quilt that I made when Judy Laquidara of Patchwork Times had her first Stashbuster Quilt-A-Long (the quilt design is now called "Out of the Bag" and is posted on her site here).  It was also my introduction to blogging since you needed to post your finish to participate in a finishers giveaway. The quilt has been layered since last year so I'm hoping this week to get the quilting done.  This was originally meant to be a project to practice my quilt stitching so I am finally getting to do that by trying my hand at free-form Baptist Fans.


So my goal list for the next week is as follows:
  1. Finish quilting and bind the Stashbuster Quilt.
  2. Make up the blocks promised for Victoria's House Gather -- the deadline is April 30 so got to get moving on those.
  3. Work on at least two UGRR/Pioneer blocks (one from each).
  4. Work on two Sylvia's Bridal Sampler blocks (might be a long shot).
  5. If I get the Stashbuster done as quickly as I hope, continue the quilting on the Vintage Treasures BOM and (maybe?) have the quilting completed by the next post.
I'm already feeling like there will be finishes this Spring!

Tuesday, April 20, 2010

Joining the Spring To Finish

Jacqui at Tallgrass Prairie Studio posted the deadlines and rules for this year's "Spring To Finish" challenge yesterday. I'm joining in again this year.  The deadline is May 31 (six weeks).  My goals are loose:  the main goal is to try to get at least half of the things on the list below completed - anything more will be gravy.  Jacqui has scheduled a mid way check-in on May 10 so I'll need to post for that.  In addition, I've lurked on the weekly "Quilter's Accountibility" Linky hosted by Bari but never posted to it because I really didn't trust myself to make the weekly goals.  But with this challenge, the need to stay on track weekly is even stronger so, I may also try to post weekly to the Accountability list in another effort to stay on track for the Spring Finish (double the pressure, double the "git 'ur done"!).

So the things I'd most like to get done would be:
  • the first three "To Be Quilted" (TBQs) projects on my flimsie list on the sidebar.
  • finish the Dino Sports 2 and Crumb quilt projects on my flimsie list. 
  • finish the Denim Blue Lagoons quilts on the WIP list
  • finish the blocks for the UGRR/Pioneer and DWR projects on the WIP list
  • work on the Pistachio SBS blocks (on the WIP list) weekly (so hopefully it will be habit by the end of the "Spring To Finish".
Jacqui hopes to have a prize lottery for finishers but we are encouraged to reward ourselves as well.  I already know mine:  I had already decided to hold off on two new purchases until June but if I can meet the my goal (remember, just half!), I might in indulge in those purchases early.  In any case, the Spring Finish ends just as June starts so it's just one more incentive to focus on building up my budget til then anyway.

Sunday, April 18, 2010

My Quilting Bucket List

I love that all quilters tend to do and think about the same things even when we don't know each other. Last year, I read posts by Pam at the "Knitnoid" blog (note: the link is for her old blog on Blogger, her new blog is on Wordpress) and Jen at "A Quilting Jewel" about what quilts or techniques they have on that "list of quilts I want to/always wanted to make".  Most of the quilts on their lists were also on mine.  Now, we are not talking about the "latest love" projects -- these are the quilts you feel you must make to "really be considered a quilter".  

Of course, as we progress as quilters, things get added to the list as we become more confident about what we actually can accomplish.  After reading those posts I did a quick review of the quilts I've said I wanted to make since I started quilting and was surprised to find that many have already been done.  So here is a pictorial review of the Bucket List items I've already accomplished:

Irish Chain


This quilt is Eleanor Burn's "Quilt In A Day" version called "Bits 'N Pieces".  I finished this in 2008 and it was also my first bed sized quilt.  

I've always been attracted to the Irish Chain design and have seen many variations involving using two to four different blocks (one version called for some of the squares to be appliqued on!) to achieve the chain design.  I was attracted to this particular version because it only required one block (!) and the block was completely strip pieced which made them easy to construct.  

I really like this design and hope to make another one in a three color format with a seminole border, a design I saw in an old issue of QUILT Magazine.

Amish Quilt and Trip Around the World 

Sorry For Picture Quality:  For Some Reason This Picture Got Stretched Out in the Upload

Like many people, Amish quilts astounded me when I first heard about/saw them.  They seemed so simple yet were so graphic.  Also one of the things I've learned about my own quilt color preferences:  since I started quilting I've always been attracted to "shaded" color tones (colors mixed with black) so the darker palettes of Amish quilts also were a big draw for me.  My first in depth introduction to Amish quilts was Rachel Pellman's book "The World of Amish Quilts".  The "Trip Around The World" quilts in that book (especially the cover quilt) were beautiful in the way the colors in some of them radiated. 

Another reason I began quilting was when watching the old "Simply Quilts" episodes on HGTV, I learned from the beginning that there were shortcuts galore to achieving many "old-time" block patterns and I was always fascinated by that.  When I realized that "Trip" quilts could be strip pieced, it immediately became one of the must do's.  I also love when one project can check off two things on the Bucket List.  This was made in 2006.

Log Cabin (Courthouse Steps Variation) and Miniature Quilts

Once again an old picture that got messed up in the Upload.


Although I like all the variations of Log Cabins and do hope to make a few, doing a log cabin was not a must do until I saw a quilt done in this "Courthouse Steps" Log Cabin variation.  I was intrigued about how the little lantern like shapes were formed and when I found out (careful placement of colors in adjacent log cabin blocks), I really wanted to make one.  

I finally did so after my mother died and I took possession of a Featherweight machine that had been her boyfriend's (a tailor) who had died two years before her (and unfortunately I never got to have a conversation with her before she died about why she had it since she did not sew).  I had always dreamed of creating a sewing themed display in my quilt space and I was able to do so when I got the machine.  When I put the display together, I immediately realized that the machine would look even better with a quilt displayed on it (the old iron belonged to my great-grandmother).  

After long debates about what would look good hanging on it when only about half the quilt would show, I saw an antique doll quilt made in this style hung from a shelf the way I planned to display a quilt from the machine.  BINGO!  When I measured the machine, I determined that I only needed a quilt about 12" square for this.  So this also became my first miniature quilt even though making one was not, per se, a must do for me.  This was made in 2006.

Strippy and Flying Geese Quilts


The details on this one were covered in this recent post so a picture here will have to be worth a thousand words!  This was another "two for one" on the Bucket List count down.

Bargello

Once again, sorry for picture quality, these are pictures of pictures taken BD, before digital 

This little project was made in 2004 as a gift for a friend.  It comes from Kim Ritter's "Quick Quilting" book.  I do hope to do a larger bargello project in the future and recently bought this book when Connecting Threads had a sale earlier this year.  But this gave me a nice taste of it and come to think of it, it was my first experience quilting clamshells.

Feathered Star


This was made in 2003.  I saw Marsha McClosky on "Simply Quilts" and she demonstrated the Radiant Star block.  It looked to me to be one of those blocks that looked a lot harder than it was to make.  

This is the "Joining Star" from her book "Feathered Star Quilts" a book that was really tough to get.  This was one of the easier blocks in the book (they are rated one, two and three stars for difficulty) and I was nervous about making it until putting it together.  Accurate cutting is the key -- if you cut right, the construction is a breeze.  

I originally made this to be a one-block wall hanging and hung it to go above a bookcase but then I wound up putting a chair where the bookcase was supposed to be so I added the bead fringe to fill in the blank space that was the difference in the heights of the two furniture pieces.  This was also a chance to try the "focus fabric color scheme" theory about choosing quilt colors, something that was a big concern for me back then.  All the colors in the center were picked out from the fabric in the prairie point border (and making those was also a first!).  

I hope to make a whole quilt of Feathered Stars and just this week purchased a set of Marti Michel's templates that were on sale at Keepsake Quilting (less than half price!) and also hope to get Marsha's new ruler in the future as well.

Still To Do......

So those are the Bucket List quilts I have done or at least "tasted".  But there are still some I haven't tackled (or at least finished) yet:
  • Double Wedding Ring (in progress and blogged about here)
  • String Quilt (also in progress and blogged about in the same post as the DWR above)
  • Lone Star Quilt (I have fabric already purchased for two different versions and had considered doing one for the Liberated Amish Challenge but I don't think that will didn't happen.  Started a one block wall hanging in 2022)
  • DONE!  Dresden Plate quilt (already have fabric for one to be done in Civil War Repros was completed in 2013)
  • A "complex" Applique Quilt (I've done a few simple appliques but a really complex one is still in the "dreaming of" stage)
  • A Baltimore Album quilt (currently in the "collecting ideas and designs" stage)
  • ....and the mother of them all -- to do a white whole cloth quilt to be quilted BY HAND!  I do have a quilt-as-you-go hand quilting project in process but and I think doing the wholecloth is still many years away was started in 2019.
So there you have it, my Bucket List.  So of course, I ask you, what's on your list?

Saturday, April 17, 2010

Flannel Series Finale (For Now)

So this is the latest installment of the "Flannel Series" and the second finish for 2010. As I noted in the previous post, this was one of two kits I got an email about from Keepsake Quilting. It's called "Triangle Trips" and was designed by Keri Nichols of Mountainpeek Creations. As I've said (too many times) before, I love flannel quilts and the first one I made (blogged about here) was made to be a couch snuggle but once I finished it and used it, I would not let it leave my bed! The problem was since it was only lap sized, if both my DH and I tried to use it together, a tug of war ensued. So when this kit came out and it was a generous 84" x 84", I knew I had to make it. The more masculine colors were an attraction too -- with all the quilts and flower arrangements I already have in our bedroom, I'm always looking to add a little something that the DH can relate to. I also have to admit that being on what's supposed to be a restrained quilting budget, I am a lot more happy to buy a kit that's bed-sized than one that's lap-sized given the fact that the cost of both tend to be almost the same.

This one was started in January while I was house sitting for my cousin while her house was undergoing an energy audit. Over two days, while workers examined her home's exterior, windows, walls, insulation and appliances and evaluated them for energy efficiency, I cut all the fabric into squares to make the triangle squares and the outer border and then sewed all the triangle pairs together. Back home I laid them out on the bed to organize the layout then sewed up the top. As always once I had the top done it was a long while before I set out to quilt it.

I wasn't sure how I wanted it quilted since I wanted the color rounds to remain the focus and preferred an all-over stitch design in order to get the quilting done fast. My original choice was just to do straight lines but I was afraid that would be too boring. The woodsy colors tempted me to consider doing a pictorial scene across the quilt with a river and mountain peaks, forest animals and a campsite scene but at this stage of my quilting skills, I knew that was an ambitious project that I would likely procrastinate on if I tried to tackle it. Eventually, I came across a "pebble" design at Leah Day's blog "365 Days of Free Motion Quilting". Eliminating the "stream" portion of it, this was a perfect union of something within my immediate abilities that I felt also spoke to the colors and feel of the quilt. A picture of the quilting detail and the backing fabric are below:

The quilting took me longer than expected and I wound up using a lot more thread than anticipated but it gives good texture and a rugged look to the quilt. Once again, the backing fabric was a brushed cotton courtesy of AAA Quilters Supply. My name for the quilt is "Manly Yes, But I Like It Too!" since the back is a flowery contrast to the front (and those of you old enough will remember that as the tag line of the Old Spice commercials from the seventies). I really felt that all this quilting did a lot to improve my control when doing free motion and I am encouraged to get moving on the rest of the quilts I have basted from last year.

And a bit of quilting serendipity happened too. Just as I finished the work on this, I thought again about how I still needed more guidance on choosing the quilt stitches for my projects. A long time ago, I had put Lee Cleland's "Quilting Makes The Quilt" on my Amazon wish list. Although the book is over ten years old, even used copies of it have always sold at a premium price. Checking in, as luck would have it, someone offered a copy for about $10. Needless to say I snatched it up! When it came, I have to say it is a real education in how different choices of stitches and their placement on the top can really effect the look of a quilt. In the book, Lee quilts the same quilt five different ways (and at the time, made all the tops herself in order to prepare them for the quilting!) to show the different ways to organize the stitching on various quilt tops. It turned out to be a great companion to another book I bought last year, Christine Maraccini's "Machine Quilting Solutions", a more recent book that takes the same approach -- quilting the same quilt three different ways to consider how the quilt stitches chosen and their placement affect the finished project. Lee is also profiled in another of my favorite quilt books (a must purchase after I read it at the library) "Celebrating Traditions: Quiltmakers in Australia".


The good news is that Jacqui at Tallgrass Prairie Studio is gearing up to host another "Spring Finish" quilt-a-long this year. Maybe participating in that will further motivate me to get to all the quilting I need to do. Also I must get to the House Blocks I promised to do for Victoria's "House Gather" that she will be making into quilts for charity. The deadline is April 30th so there is till time if you'd also like to contribute blocks. And as promised in the last post I hope to get back here soon with some ruminations on my quilting "Bucket List". Whew! A lot to do! Thanks for stopping by!


Posted by Picasa

The Flannel Series Continued

Last week I finished my second finish for 2010 and the latest quilt in the "Flannel Series", so as promised in my last post, I wanted to give the details for both projects.  First up is the finished quilt pictured in that post.


It's called "Flying For Cover". I learned about it when Keepsake Quilting sent me an email last October about projects using flannel.  This was one of two quilts offered as a kits. I thought it was a gorgeous quilt, loved the fact that it was in flannel and probably most important, would fulfill two "Bucket List" desires.  You know, the Bucket List -- the list of quilts you want to make before you "kick the bucket"!  

While I plan to do another post about that later, I will say that the two quilts this satisfied for me was doing a strippy quilt and doing a quilt with (a lot of) Flying Geese.  I wasn't able to purchase the actual kit for this though -- at the time I wanted it Keepsake had it on back order for quite awhile.  I was able to find the sashing and border fabrics ("Two In The Bush" by Bonnie Sullivan for Maywood Studios) at EQuilter.com and the flannel tone-on-tones at Fabric.com and then bought the pattern at Keepsake (which was also sold separately from the kit but also can be purchased from the pattern designer's website).  With everything gathered, I was able to put together my own "kit".  Later, the backing fabric came from AAA Quilters Supply another favorite Internet vendor.

Most of the time when I make a quilt, I am also looking to try new techniques.  In this case doing the Flying Geese allowed me to finally get a chance to use what I call "Eleanor Burn's Two Squares" method of making them.  I saw her demonstrate this when she did the "Pioneer Sampler" and the "Underground Railroad Sampler" on her Quilt In A Day TV shows.  If you've never seen her technique check out Mary's post on this blog or go to the Quilt In A Day channel on Quilters TV.com and watch any of the Pioneer Sampler episodes or any other episodes using the "Triangle Pieced Rectangle" method. 

Although the finished units can be squared up with a regular ruler, I knew if I ever did a project with a lot of flying geese, using hers would be easier but I hated the fact that you needed a different ruler (sold separately) for each different size geese (actually each ruler makes two sizes).  I resisted buying them until I was able to get her Mini Ruler set on sale. Unfortunately the mini set didn't make the size needed for this pattern so I wound up also buying the Jumbo set.  Once I started making them, I was hooked (it's such an efficient method) and then wanted all the rulers which I wound up buying before I finished this project!  Prior to this my favorite method was the "five squares" method demonstrated here but now this is my favorite.

Another technique I got to try was Sharon Schamber's hand basting technique.  You can watch videos of it here and here.  It was really easy to do although I disagree with her that it's any faster than pin basting.  She says you can baste any size quilt like using this method.  However, you should take note that to do a large quilt like a queen or king size will require a couple of long tables to hold the whole top stretched out end to end.  However for this lap size quilt, my cutting table accommodated it just fine.


This method worked really well, in the end I had no puckers on the back and as she notes in her demo it was very easy to remove the basting stitches as I quilted. While I won't give up pin basting (I baste on my cutting table so physically it is not hard), I definitely would use this technique again as well.

The finished quilt was quilted in a clamshell pattern.  I got that idea from the pattern designer Janet Locey of Henscratch Quilting. In the picture of the quilt on her website, that was what she used and I felt it was doable.  While I have always quilted my own quilts, I am not always confident about doing it before I start.  I started out with the plan to use templates printed on sticky-backed full sheet labels as instructed in the book "One Line At A Time" by Charlotte Warr Anderson, one of the many quilt stitch books I invested in last year.  But after doing two rows across the quilt I felt confident enough to finish the rest of the quilt freehand.  I can't say the clamshells were all even but in the end, the texture on the quilt looked real good.

In the next post I'll detail the latest installment of the Flannel Series.