Saturday, September 16, 2023

Quilting On National "Sew A Jelly Roll" Day!

Woo hoo!  It's National Sew A Jelly Roll Day!!

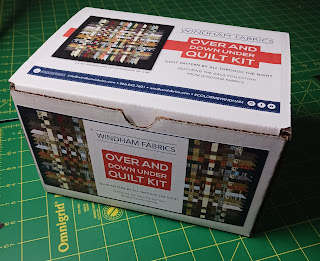
I don't buy a lot of jelly rolls although I love to cut my own Jelly Roll (2-1/2") strips from project leftovers to save for scrap projects.  However, last month I was lucky enough to snag a kit for a pattern I've long wanted to make:  Bonnie Sullivan's "Over and Down Under" quilt originally designed to showcase her "Woolies" flannel fabric line.


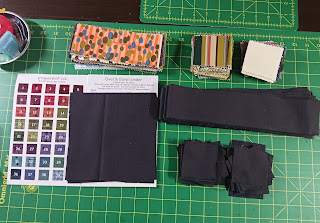
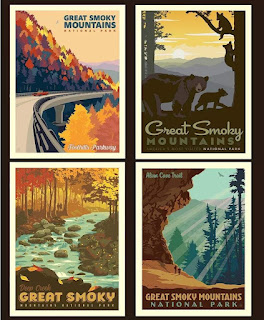
On the left is the kit contents (jelly roll and border/binding fabric) and on the right is the Riley Blake National Park Pillow panels yardage that I am going to use for the backing.  I had liked this set of panels because it picked up the colors of the kit fabrics and because we will be going camping in the Great Smoky Mountains National Park next month.  To fill out the rest of the back,  I purchased yardage (center) of the "Signs" print  from the National Parks line in Cream.  

I'm hoping to make this a "sew day" and just work on this project.  To be ready for the day, I reviewed the pattern and supplies.  I had wanted to pre-cut my fabrics but finishing up my "Christmas Ribbons" quilt took longer than expected (which always happens so is what should be expected!).  I also think I will cut some of the things different than the pattern calls for.  

This past week I had found a picture on my phone of a quilt top my MIL had made and asked her if she remembered what it was.  She didn't initially but after looking around, found the pattern -- which was made from jelly roll strips -- and decided she wanted to make it again.  She had picked up a partial Jelly Roll at her guild's "take away" table but would need to add a few strips to it and pick up two more coordinating background fabrics to make her project.  I told her about today so if she was able to get the supplies, we may sew in tandem and Skype during the course of the day.  

I also got an email from the Fat Quarter Shop that said Kimberly Jolly will be doing a Live Stream today on You Tube at 2 PM CT (3 PM EST).  She will be showing new fabric releases and previewing their new Jelly Roll pattern book.

It will be interesting to see how this goes!

12 Noon Update:

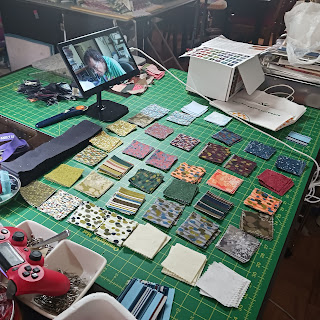
Okay, everything is cut out and I actually stuck to the pattern directions for doing so. 

This was a great work out for my Stripology ruler (note: link is to the even larger XL that I hope to upgrade to one day).  Whenever I have gobs of strips and squares to cut (whether from yardage or pre-cuts), the ruler makes it easy to cut many multiples at once. 


There is not as much leftovers in a Jelly Roll kit as there usually is in a yardage kit but I guess that also depends on the design of the quilt.  This one definitely makes use of most of it!

All that's left!

So for the next hour or so it will be a lot of chain pieced "flip and sewing" and then trimming.  


Then it will be onto laying out all the tipped rectangles and the squares to preview the layout.

4 PM Update:

Turns out there were many other You Tubers I follow who posted vids for today. 

Emily @ TeriblyRad (who is better known for her 3 Yard Quilts series):  


Jo Carmel @ Quilts By Carmel in CA:  


Even the Fabric Cafe (the 3 Yard Quilt people) had one:  


And a "Public Service Announcement" with advice on using your own fabric to participate:

My MIL actually found another project to work on and after some problems getting her computer working, we were able to Skype for a while too.  

I've gotten a bit more done in the last few hours:

The rectangles were all prepped, trimmed and pressed.  I also sewed up the "bonus triangle" cutoffs too!


Then it was laying out the quilt on the design wall, starting with the outer borders of rectangles.  I threw them in a paper bag, shook it up and picked them blindly in the hopes of developing a random initial layout:

At this point, I'm half way through filling in the center with squares.


Once that is finished (and I tweak the layout if necessary), the next step will be taking down each row to sew them together.

8 PM Update

Well that's it for today!

The Fat Quarter Shop Live Stream was fun and there are some cute quilts in their new jelly roll book

Also be sure to pick up the discount code from the video, good until Monday for 20% off jelly rolls. 

As for me, I finished filling in the layout and no tweaks were needed!


As the day drew to an end, I had half of the rows of rectangles and squares sewn together.  

It looks so much smaller once the seam allowances are taken up!

Bonus:  Putting the rows together was also a perfect opportunity to leader/ender a few more trapezoids for my Quiltville Roll, Roll, Cotton Boll quilt.

DH and I have the opening shift for our community garden tomorrow and I have the follow-up cross stitch class later in the afternoon so I doubt I'll get back to this before Monday.  However, I'm very excited to get this to a top and then work on the planned pieced backing!

For my first Jelly Roll Day this was pretty good!  In the coming months, I'll have to pick out another roll and a pattern to be ready for next year!  Hope you enjoyed the day too!

Friday, September 15, 2023

Finished Or Not Friday: Better Late Than Never!

It's been a while since I've had something to check in over at Quilty Girl Alycia's with another:

That's because I've FINALLY finished the last of the quilts I had set out to make for Christmas decorating in 2022, "Christmas Ribbons":

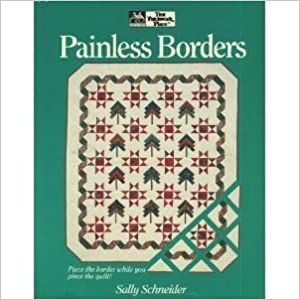
Every quilt has a story and this one started out as my interpretation of Sally Schneider's design using her "Painless Borders" technique from the cover of her 1992 book (published by the already dearly missed Martingale Publishing).

Her design technique is to piece blocks that when set into the edge of the quilt layout (usually on point), create the look of a "border" around the outer edge.  

I modified the piecing instructions for the four blocks needed to complete the design so I could cut most of them with my Accuquilt dies.  In particular, I changed her original tree blocks so I could use my Log Cabin die to cut the strips for the "branches".  I made the "tree trunks" using a Signature block die and trimmed it down to 4-1/2" to create an 8" finished block.  

First time using MODA "Grunge"!

Ironically, I had worked up my layout in EQ8 but didn't notice until after I finished piecing the top, that I had completely overlooked the fact that in Sally's design the tree blocks "float" because they have background strips pieced around them.  Oops!  However, since it hadn't bothered me when I drafted and colored in the layout, I decided to leave my blocks "snuggled together", LOL!!   

I also decided that a line of ribbon needed to be finished with a bow and fortunately I also (to quote Accuquilt’s Cutting Expert Pam Heller) "have a die for that"! 

The back is made with one of my favorite kinds of fabric:  flannels!!  

I did the backing the same way I had done my "Indigo Weave" quilt finished back in 2021.  A couple of extra star blocks were used to create a label area.  One thing I had managed to finish in time for Christmas was to sew pieces of the two flannel fabrics together to make a tree skirt wrap for the Christmas tree I had put up.

I had a very helpful push for getting this done now:  my community garden is doing an Art Show exhibit of things made by our members who are artists/crafters.  I'm going to do a Red and White quilts display so need all the ones made for last Christmas as they are the only R&W quilts I have.  I do have one more quilt (that's not a Christmas quilt) to also finish for the display which I hope (no, have to!) to get done in the next week or so since the show is at the end of the month.  

Now that I'm done here, I can go over to Quilty Girl Alycia's to link up and get to see what everyone else finished up this week!  Meet you there!

Wednesday, September 13, 2023

Week 2 Project Updates for September

With the long list of things I want to get done in September, I've needed to clear some things off of my sewing and cutting tables.  

Quilting

One of them was a little companion project to the By Annie Piecekeeper bag I finished up back in July.  At the time, I said I was debating between which charm to get to add to the bag.  Well, I finalized the decision and got it recently.  Then I was looking through some of the Shop Hop stash bags and found something to make another accessory to go with it:

Sunbonnet Sue zipper charm by Lori Holt from Fat Quarter Shop 

The fabric License Plate used in the front had been purchased during the Shop Hop last year.  It was an old plate the shop still had in stock from back when the national Row By Row shop hop was still happening and so of course was on sale.  I've always loved these and didn't get any when I did a tri-state (CT, NY, NJ) Row By Row swing back in 2016 so was thrilled to get one now.  

The good news is that this plate matched the color scheme of the Piecekeeper bag.  The English Paper Piecing cheater print I used above and below the plate on the front and for all of the back was actually purchased from the same store the first year we hopped in 2021 so came in real handy right now.  

I have another plate that I am going to pair with more of the Hop fabrics and make up to go with the other Shop Hop project bag when(ever) I get around to finishing that WIP. 

Not the things I should be focusing on but it did help take one thing off of my sewing table so it's a start!

Once I got all of the other stuff piled on the sewing table cleared off, I pulled out the "Christmas Ribbons" project and started work on quilting it.

The stitching was clearer to see from the back.

It may be a little hard to see here but I've finished the cross hatching diagonally across the center of the quilt in one direction.  After the cross hatching will be some free-motion petal swirls in the ribbon border and then back to straight-line stitching with some piano key lines in the outer border.  Hope I can finish the quilting by the end of the week.  

Edited To Add:  The finished quilt can be seen here.

Cross Stitch

I've worked on a couple of my cross stich projects:  I completed all the stitching on the Summer Camp badge.

I still need to do the "Nun Stitch" around the design so I can fringe the edge of it.  I've watched a couple of Flosstube videos on this and it seems pretty doable.  

Admittedly though, I've done no further work on the "Try Something New" project that was the actual camp project.  I'll get back to the "Right To Vote" piece I'm stitching on Linen once I can get past some of these more urgent deadlines.  I'll be more mentally prepared to focus on that once these other things are done.  

I also picked out the finishing fabric for the "United  We Stand" piece I stitched back in June.

I would love to add a trim to the edge as was done in the pattern.  I think this may be the perfect small piece to finally try the Shell Edging  (although not piped) that I talked about back in this post.    

I've also started on the "Christmas in the Round" piece that I want to display at my community garden's Art Show.  

So things are moving right along!

Edited to Add:  You can see the finished cross stitch piece here!

Sunday, September 10, 2023

Plans for September

Fun Crafty Holidays Ahead!

As always there is so much to do in my own crafty world and in the world of crafts in general.  For anyone that wants to put a needle to fabric whether it be by hand or machine, September is the month to celebrate all that is Sewing!

You can check out the history of this celebration on the National Sewing Month.org site here.

For Quilters specifically, there is also another day to celebrate!  The big quilty holiday this month is...

MODA Fabrics (the company that originated the term "Jelly Roll" for pre-cut 2-1/2" fabric strips) has an information packet that you can pick up here.

For lots of free Jelly Roll project ideas, check out the Fat Quarter Shop here and the Hancock's of Paducah website here.

Also check out the sampler designed by Sherri McConnel of A Quilting Life for the event (blog post with the quilt details is here with links to tips on using jelly rolls and a video showing the quilt is here).

I don't frequently buy Jelly Rolls but for once I do have one perfect to celebrate with!  My project for that day will be to finally get to start an "Over and Down Under" quilt.  This is a pattern that was designed by Bonnie Sullivan to showcase her "Woolies" flannel fabric line.  I love flannel quilts and have wanted to make one of these for years.  In early August, the Annies catalog site ran a clearance sale and I was able to get a kit that also supplied the pattern.  

It's still selling at a reduced price now although I got it even cheaper back in August.  This kit uses regular quilting cottons but now that I have the pattern,  I can make the kit quilt and then use my flannel stash to make another version.   

I'll admit at first I didn't like what I felt was the "dull" color scheme of the fabric line supplied with the kit but another fortuitous find helped me quickly get over that.   I happened to be on Etsy and saw this panel:

I got excited because the colors in it reminded me of the over all murky colors of the kit quilt.  However then I also saw this pillow panel set:

I loved the greater range of colors that reflected even more of the colors in the kit fabrics.  I also liked that it highlighted some of the popular attractions to visit in the park.  Now that resonated because my DH and I will be going camping there in October so I will actually get to see those places in person!  

When I purchased the pillow panel, I also purchased what was billed on both the vendor's listing and the manufacturer's (Riley Blake) website as a "Charcoal" tone on tone print from the NP "Legends" fabric collection.  I had planned to piece wide strips of that around the panels to make up what would be the backing for the kit quilt.  However, when the fabric came this is what it looked like:

Yeah, really more brown than charcoal.  I can't fault the vendor as the SKU# on the selvedge matched what the manufacturer listed as the "Charcoal" fabric.  Sigh, once again foiled by shopping online!  

The good news is that I am familiar enough with the various National Park fabric collections and prints and knew there was also one in Cream available that would work just as well.  Fortunately I found another shop that had that on sale so scooped some up and now that will be my backing filler.  So I really look forward to getting this one underway.

Preparing for a Quilt Art Display

My community garden is having it's third annual Art Show at the end of this month.  For the last two, I've participated by displaying some of my quilts.  The first year I displayed a variety of quilts showing the versatility of quilt designs, fabric styles and piecing and applique techniques.  

Last year my theme was "Scraps or Scrappy?" with a display of quilts that showed quilts that used a lot of different fabrics in them. 

There were additional quilts presented in the back of both displays.

This year's theme needed to start from what I already have made up so I've decided to do a "Red and White" quilts display.  This would allow me to make primary use of all the quilts I made for decorating last Christmas.

However I also have the "Christmas Ribbons" quilt top left from that endeavor that still needs to be quilted.  

This will be a good opportunity to tackle that because it will also give me a chance to familiarize myself with my new Juki machine.  I think I will also display my little Valentine's Day quilt since it has a lot of Red along with Pink (which is a tint of Red) in it:

And speaking of Red and Pink, I think I will add one more for the back of the display:  my "Roll, Roll Cotton Boll", a Bonnie Hunter-Quiltville mystery quilt.  This would be of two fold benefit to me:  another quilt to display and (yet) another chance (with a firm deadline) to try to finally get it finished up once and for all! 

It think it also fits well within the Red and White quilts theme.  Plus, it was moved forward along with all the holiday quilt sewing so it fits right in on that count too!  
Adding In A Little Cross Stitch!

Of course now I can't display quilting without also showing off a little cross stitching so I am planning to work on this too:

Because two of the Red and White quilts to be displayed are mini quilts, I'd love to finish and "fully finish" this little "cross stitch in the round" design to add to the display.  

I'll need to do a little stitch test first though.  The middle floss pictured here is the DMC conversion called for in the pattern.  However, I also liked the top floss which as pictured here doesn't look much different but is "pinker" than the called for thread in person.  The bottom thread is the variegated floss I plan to use to make "Quaker Christmas II".  If I decide to use it for this, it will be a good preview of how it stitches out. 

As always lots of big plans for the month so let's see how many I actually get done, LOL!!  Hope you are gearing up for a busy and enjoyable September and bracing yourself for the oncoming Fall weather.