Thursday, September 29, 2022

Ending the Month on a High Note.......

 Scrap Happy Progress

During the past week, I have continued with the quilt along......

This week we had to continue making the larger "B" blocks.


For two of the new blocks, I did try just making the larger "B" blocks as one big unit rather than making four smaller "A" units first.  As I had suspected, it takes about the same amount of time as making the smaller blocks first and then combining those although the pressing is much easier.  

Next week is scheduled as a "catch up" week and I sure need that!  I figured out that I need to try to make two blocks a day for the rest of this week and the next to even come close to what is called for in the design.  Of course, that assumes I plan to make a bed sized quilt as in the pattern.  We'll see as I continue making these blocks if I choose to do that or make it a different size instead.  

Christmas Quilts Progress

Temecula Quilt Co. 12 Days Mini Quilts

All the tops are done!


The backs and binding fabrics are also picked out.  Now to think about how I want to quilt them.

Painless Borders Christmas Ribbons (aka Trees and Stars) 

With the mini quilt tops done and down off the design wall, the tree blocks could now go up.  Next step is to start making the border blocks but since I already had a new project cut out (more on that later in the post), that jumped into the leader/ender queue before I could get started on those.   

Garden art show rained out!!  

Well actually, Sunday morning dawned cloudy with it expected to be overcast all day and a possible chance of rain during the time of the event.  The garden's Steering Committee made a decision early that morning to cancel the show and reschedule it for this coming Sunday.  Since my DH and I were already on the schedule to volunteer for the opening shift that day, it's a win-win for us! 

As they say, I was "all packed up with no where to go!" but on the plus side, I'm already prepped for this weekend!  On the downside, there are forecasts of possible rain for this weekend as well due to Hurricane Ian.  So we'll see if the show does go on!

Adding Some Fall Quilts to the Mix  

I'm never one to resist starting a new project!  With September now coming to a close, I am of course turning to Fall decorating.  I already have some Fall colored quilts and a few more that I want to make or finish (a pumpkin applique couch pillow, in that last case).  

However there are also some new things of interest around and one of those is Pat Sloan's "Thankful" wall hanging from her latest book "Holiday Hoopla".  I loved the idea of making Pat's wall hanging to hang at the top of our entry staircase and I checked to see if I already had enough fall fabrics in stash to start this one up.  Good news, it turns out I did!

More good news is that it only took a few dies and now the fabrics are all cut and ready for leader/ender sewing!

I look forward to the warm glow of the colors of the season filling my sewing space for the next few months!  So I'm all ready for the start of October, are you?

Tuesday, September 27, 2022

Summer Recap: August

Trip To Maine and More Adventures in Cross Stitch

I've had a dream for a while to visit all the National Parks.  Or at least all the ones shown here:

Okay, maybe the panel was another factor in finalizing that dream!  It was also always part of the dream to do this in an RV.  DH and I have discussed the possibility of getting one for over ten years.  Now that our sons are grown (and one is out of the house), the prospects of just the two of us traveling has reignited the RV discussion.  Earlier this year we did make a final decision on the travel trailer we'd like but until recently still had the hurdle of getting a vehicle with the capacity to tow it (more on that at some point in the future).  So for now, we have to start "the park tour" by tent camping.  This is fine as I had mapped out all the parks on the East Coast.  

When discussing what to do for DH's August vacation, I suggested we try to get to one of the parks.  Given the immense heat this summer, going South was NOT an option!!  So Acadia in Maine became the choice for the first trip.   

We watched a bunch of You Tube videos about other people's experiences making the same trip so we would have an idea of things we might do while there.  We have now also decided that as part of our trip to North Carolina next month to visit his mother, we will take a couple of days and visit Great Smokey Mountain National park.  This way we get two of the parks in our East Coast swing checked off the list this year!  We went to our storage unit to review and organize our camping equipment and looked forward to traveling. 

A week before we were due to leave, I saw a You Tube video thumbnail picture of a project made by a Flosstuber I've watched before named Helen D.  It was a little pillow with the words:  "Loons, Lakes, Blueberries, Black Bears".  

From the research I had done for the trip, I had learned that Maine is known for Blueberries and Loons and there are lakes in the park so could this piece be about Maine?  Not only is it, but it had been a freebie design Helen had made for a Maine Stitch Get Together!  Needless to say it immediately went on the "must make" list!  Even better, I decided it might be cool to see if there will be a quilt shop near to where we would be camping that I might be able to find "Maine themed" fabrics for finishing the little project.  It is a given for me as a quilter to make a quilt shop stop where ever I travel!

After downloading the pattern,  I was able to pick up floss for the project before we left.  I did change up some of the colors used and where I would use some of the colors in the design.  I had a choice of two different Aida cloths in my burgeoning CS stash.  One was a white 14 count and the other was a Lori Holt 10 count in "Buttermilk".  Since they were different colors, I decided to wait until I could find the finishing fabrics to determine which I would use.   I also took the supplies on the trip in the event that once I got the finishing fabrics, I might be able to start work on the project at the campsite or in the car driving home.  

The Acadia trip was a blast!  My DH and I like to say that every view in the park is a postcard!


The shoreline near our campsite at Seawall.

The view at Otter Creek

Just after sunrise on Cadillac Mountain

Hiking around Jordon Pond

Excursion ships out of Bar Harbor

Acadia is one of the top ten most visited National Parks and the Bar Harbor area in Maine is a summer resort destination so in that first week of August, it was packed!!  Since we were only able to luck up on a two night camping spot (and that was only after checking back daily to see if any spots had opened up at all), we didn't get to see and do everything we wanted to.  So our plans now are to book early next year and try to get back there again so we can visit some of the sites and do some of the hikes we didn't get to this time.

On the cross stitch front,  I was able to pick up some Maine fabrics at a quilt shop in Bar Harbor called Fabricate.  Even better, the day we went there I learned that Nessa, one of the owners and who helped me find what I was looking for, is actually a former New Yorker!  However, I wasn't able to get the project started until after I got back home.  Fortunately, I had noted in my planner that Friday 8/12 was National Cross Stitch Day so figured that would be the perfect day to get it started.  

With the finishing fabrics I found, I decided to go with the Lori Holt Aida.  This was my first time using 10 count which will make the piece slightly larger than patterned.  It was really easy to stitch especially since I've learned to stitch using the "sewing method" which works better without a hoop.   I worked on it a little each day and by month end, the stitching was finished!

Of course there is still the "Fully Finished" work to do but I am already glad I got this done as a memento of our trip to Maine.  Additionally, I saw and purchased this cute pattern which I hope will become my first attempt at a  "full coverage" piece.  

I'd love to finish this as another pillow to add to our our camping setup (or our future RV when we get one)!   

 Fat Quarter Shop Simple Zipper Bag Gift

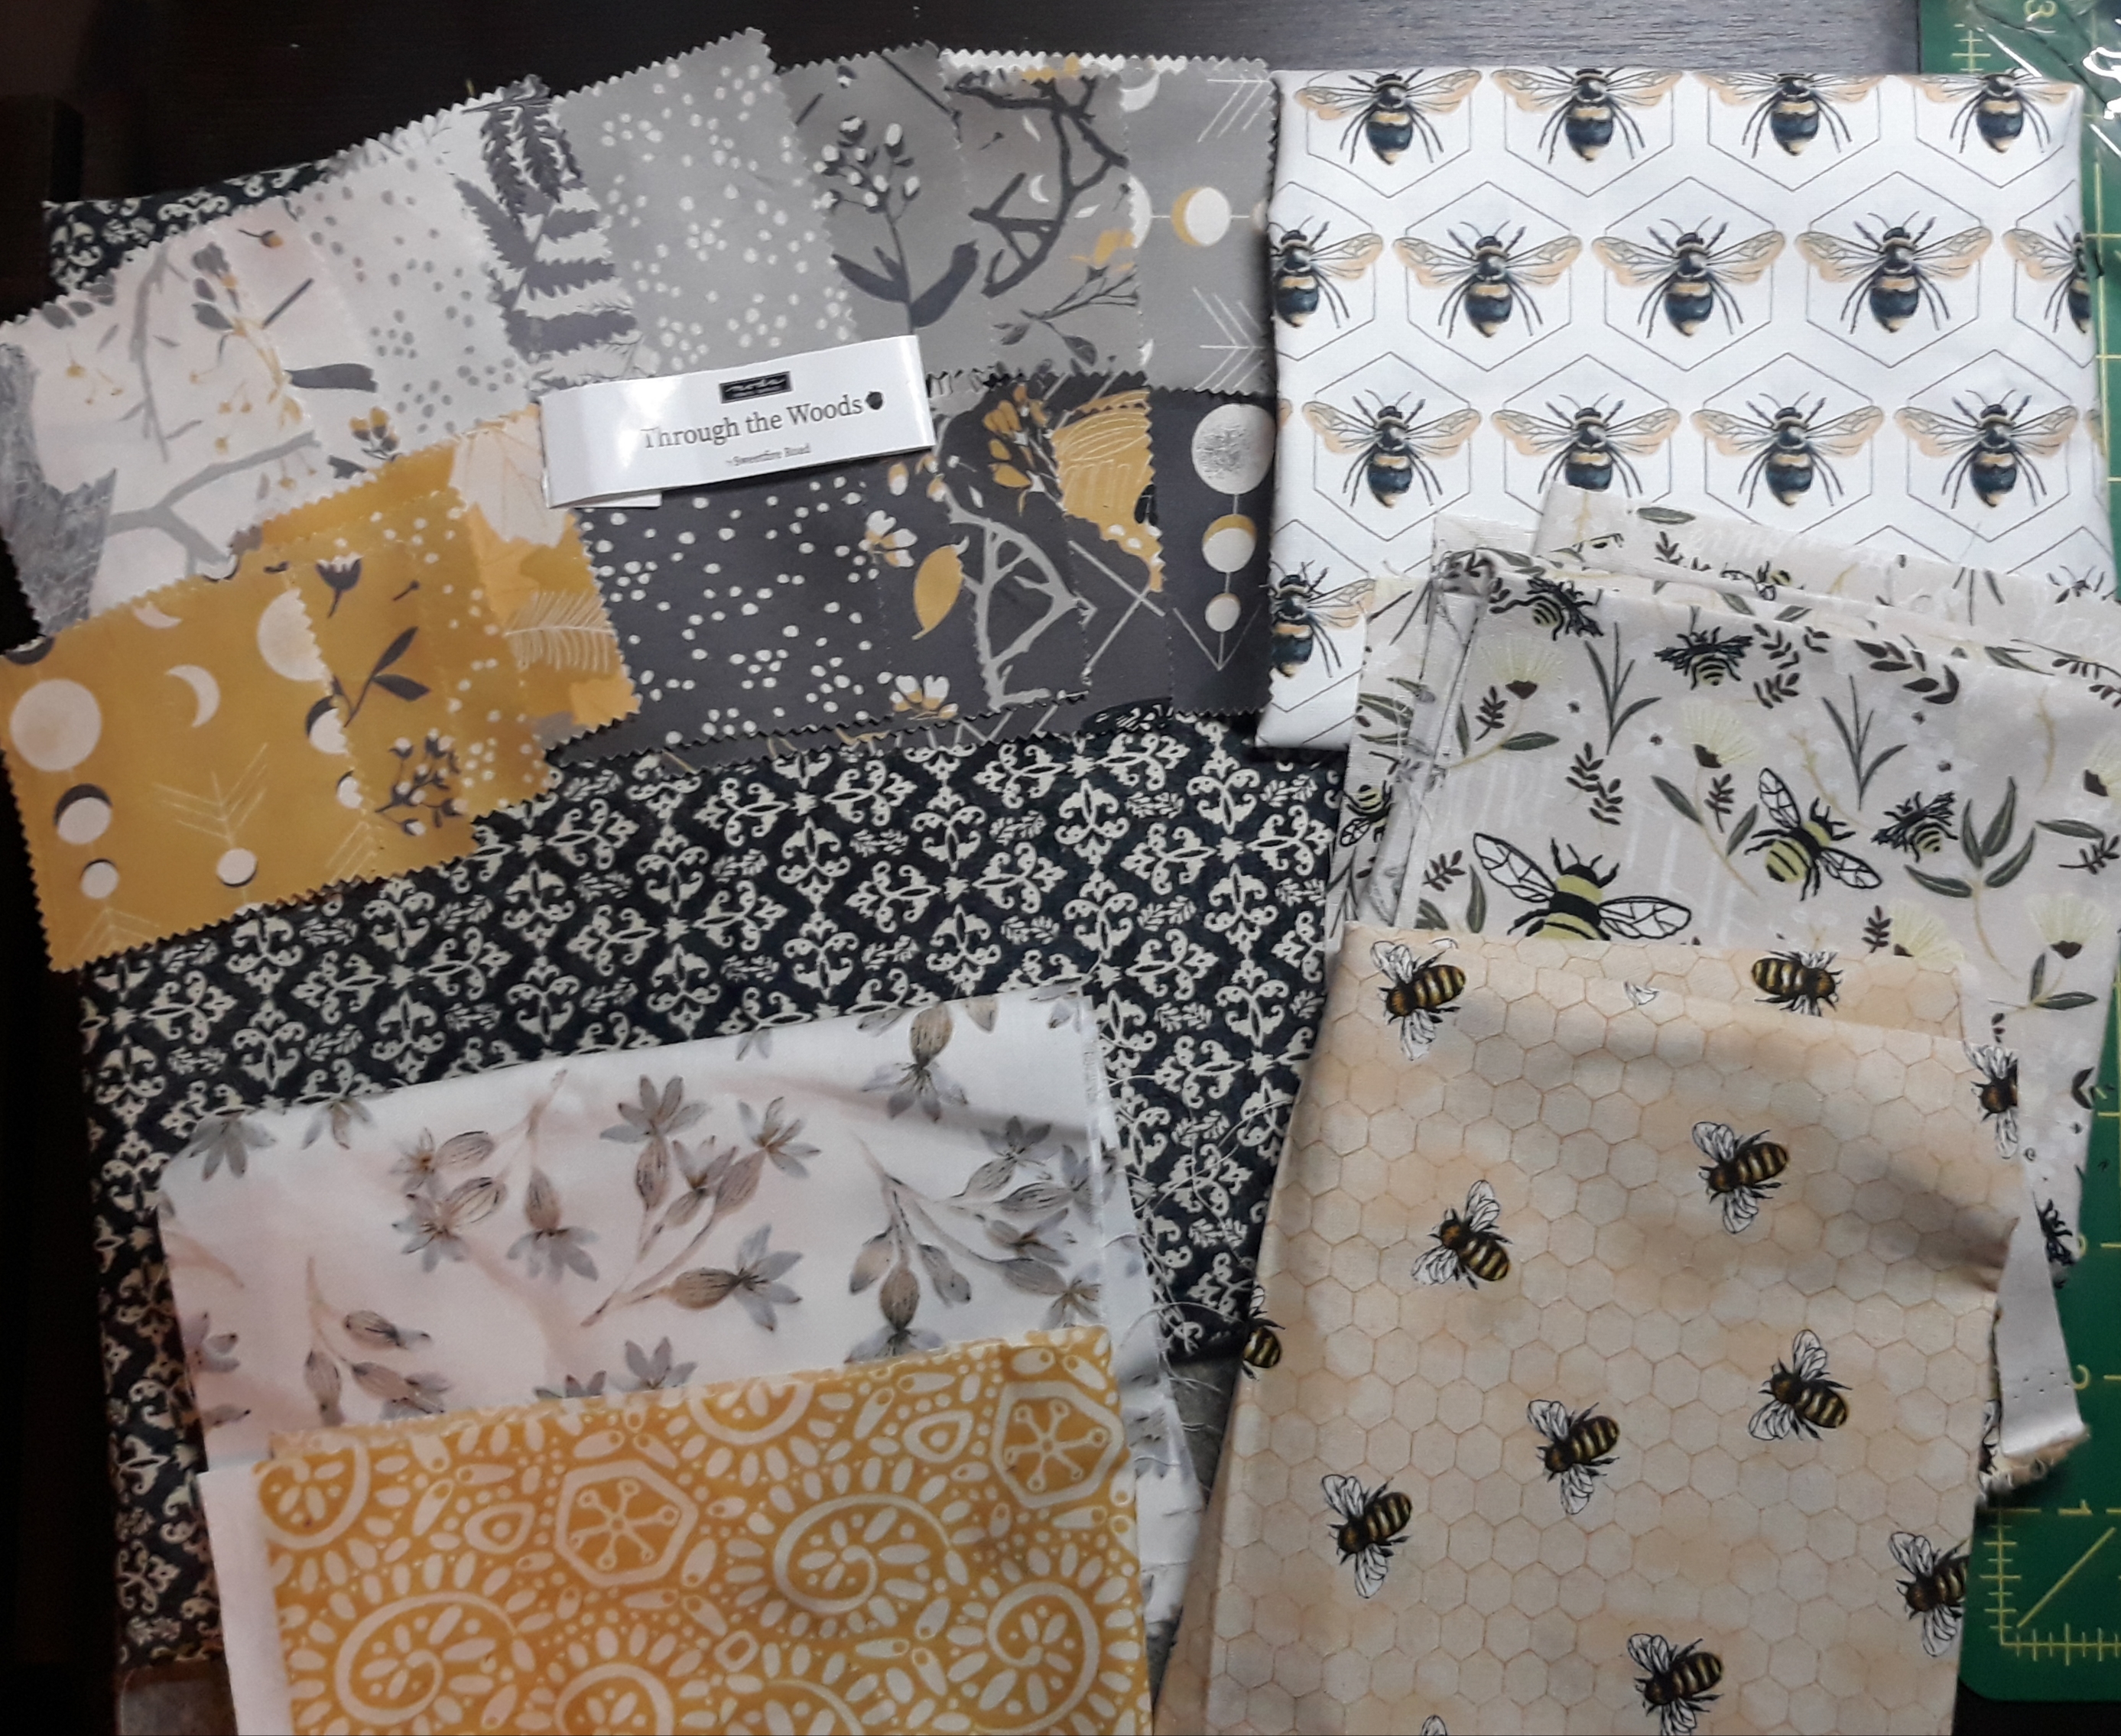
Back in 2016 the Fat Quarter Shop did a YouTube video with Sherri McConnel of "A Quilting Life" for making some "Simple Zipper Bags" Sherri designed.  I learned about it when Pat Sloan made the same bag and embellished it with a Bee applique she designed to make use of buttons she received from a FQS monthly Button Club mailing at the time.  I thought it cute and downloaded the info for a potential future project.  

It was two or three years later when one of the members of the community garden I belong to and with whom I did a lot of projects in the garden revealed how much she loved bees!  She was also always misplacing her keys and other things in the back pack she usually carried around with her so I thought it would be great to make the pouch for her using "Bee themed" fabric.  I picked up fat quarters with bees on them as I saw them.  Eventually, I lucked up on a mini charm pack that I felt coordinated perfectly with the fabrics I had already collected and would use it to create the bag front as the pattern directed.  I also added some additions from my stash to help round out the finishing.  

For a long time the remaining debate was what to use for the bee applique and whether to embellish it with buttons as Pat did.  

Then like most things in the last few years, COVID interrupted our garden attendance.  Even when the restrictions began to lift, the member was by then dealing with family issues so wasn't at the garden for all of 2021.  Then just before DH and I went on the Maine vacation,  I happened to see her and she said she expected to finish up her dealings and would soon be back in the garden regularly so I said  I'd see her again when we returned.  I then made plans to work on the pouch when we got back.  

On our way to put our camping supplies back in storage, we stopped by the garden.  The member who schedules the volunteer shifts was there and was surprised to see us since the scheduler said the woman had told her we were away on vacation.  The scheduler had re-assigned our shift to her and another member not realizing that we planned to be back in time to do the shift as promised!  So since we now had that Sunday "off",  I decided to use that time to make up the bag.


It's not a hard make so thought I could start it that same day and make it up quick enough to bring over to the garden before the member I was gifting it to left that day.  

Since I rushed to make it up, I also made some changes to the original plans.  To save some time, I decided not to do Pat's bee applique after all but instead fussy cut a motif from one of the bee prints I had collected and appliqued that to the back of the pouch on top of the bee fabric I had used there.  I did also add a mesh “pocket divider” which is something Pat did in her version.  Rather than the fabric zipper pull called for in the pattern, I added an empty clip and key ring I had so she could attach her garden keys to the pouch and also easily remove them when she needed to use them.  

Unfortunately, when I finished the bag and headed over to the garden to give it to her, I didn't quite make it in time to catch her before she left!  No matter, with the bag now done, I gave it to her the next time we were both in the garden together a couple of weeks later.    

So that's (finally) it for all the projects I worked on over the Summer!  Here's hoping I can bring some of what I reported on to a finish before the end of the year while keeping up on the current projects that are "front and center" as the Fall progresses!

Thursday, September 22, 2022

Progress on September Projects Continues.....

Scrap Happy Progress


I've been making more of the "A" Blocks and as I do I also put them together to make the "B" blocks.

So far I do find it easy to make the "A" blocks and then combine four of them together to make the "B" blocks so will probably just continue that way as it is patterned.  As I noted in a previous post, there was a suggestion in the QAL Facebook group to just make the "B" blocks as one big block but it seems like a "six on the one hand, half dozen on the other" kind of process.  Many more to go before this is all done!

Holiday Quilts Progress

Temecula Quilt Co 12 Days of Christmas

This week, I worked on picking fabrics for the sashing and borders for each holiday mini quilt color scheme.

Boy, that was a bigger challenge than I thought it would be!  I changed up the sashing and borders on the Red & Green version (on the left) a few times and even changed the fabric in one of the blocks (Day 2 block).  I decided I liked the fabric I had used in it for the side borders but it was jarring if it also appeared in the center of the little quilt.  I found the prefect sashing fabric in a small stash of Christmas fabrics I have but had to search around to find it.  Guess it's been that long since I've made a Christmas quilt in the traditional color scheme.  At this point, I think the picks shown will be the final ones.

The same was true for the Red & White version (on the right).  I'm thrilled that using the "holiday words" print for the top and bottom borders works on this one too!  While I liked the micro polka dot sashing fabric I had picked, it read a little light so I thought the center still needed "something".  Initially, I thought about applying buttons or embellishments as sashing cornerstones after assembling it.  However, some fussy cutting of one of the red prints in my stash provided just the touch I needed and would still allow a button or other embellishment to be applied on top of them later if desired.  So that layout is also final and now awaiting assembly.

The Blue & White version still needs some decision work.  That's okay since this isn't the color scheme I'll be using this year so I have plenty of time to make those choices!   

Painless Borders Christmas Ribbons (aka Trees and Stars) 

I'm almost done making all the tree blocks for this project.  These were sewn leader/ender along with the APQ scrap blocks.  I have three more to make which I should be able to finish up by Friday.   

Once I have the Temecula layouts completed, I can clear the design wall and lay out the tree blocks the way they will be placed in the quilt.  Then I can start working on the border blocks next week.  As noted previously, the star blocks will be the last things I choose fabrics for and construct.

Prepping for the garden art show 

Last year my community garden held an art show and asked members of the garden to participate by showcasing their hobbies or crafts. 

The garden's President contacted me at the start of this month to say that they wanted to do it again on the last Sunday and asked if I would participate again.  At first, I wasn't sure I wanted to as I am trying to stay on top of the many projects I have going.  Then I briefly considered that this might be a perfect opportunity to finally get to do something I've long wanted to arrange:  finish up my QOV quilts for donation and set up a station where people could die cut pieces and sew up blocks for an additional quilt.  

However, just as quickly I came to my senses:  the logistics of organizing that was too much to do in the space of a few weeks with everything else I have going on!  So in the end, I decided to just do a simple display on the theme "Scraps or Scrappy?"  I've gathered the quilts I want to use: 

Fortunately, this is the way I generally quilt so I already have more than enough examples of that!  What I wish I did have is a quilt made with limited fabrics, repeatedly used in the blocks in the same way throughout the quilt.  I would display it to contrast how many fabrics are used in the scrappy ones.  I do have one like that planned and "fabric funded".  I guess I need to get it in the project rotation at some point in case I need to demonstrate this concept again. 

Over the next few days I plan to make up signs to explain the difference between a "scrappy quilt" and a quilt made from actual scraps.  I also need to pull out my quilt stand and make sure I have everything for setting up the display.  We've already pulled our canopy out of storage so that's at the ready.  

Whew!  It's really been a busy week! 

Tuesday, September 20, 2022

Summer Recap: July

Inside the Box, Continued 

As noted in my last recap post, I had started on a project that I was setting up to use as quilting practice for an Angela Walters free-motion quilting challenge.  I spent the end of June and the early part of July cutting the parts and then piecing the blocks for the quilt called "Inside the Box".

When it was done, I loved the look!  I've always liked the "iridescence" of  Kaffe Fassette shot cottons.  I also have some Pepper Cory shot cottons as part of my stash too.  The "peppered cottons" are a little heavier and closer in weight to traditional quilt cottons while the Kaffe "Shots" are a very light hand almost like Voile.  That led me to think about a radical (for my budget) idea:  what kind of fabric matched the Kaffe shots in having a light silky hand?  Why Liberty of London cotton of course!   

Back in April when visiting my local Joann's, I saw that they are now carrying Liberty prints!  In my May recap post, I noted that I am participating in (well, more like following) the Quiltfolk "Patchwork & Prose" BOM of which one of the hosts is Jenni Smith.  Jenni wrote the book "Quilting with Liberty Fabrics" and often uses them in her projects.   I thought it would be a cool splurge to get some and use it for the backing.  

While expensive, Liberty prints are also wider than quilting cottons (56" - 60" wide) which was perfect for this lap quilt since it meant I could suffice with just two yards.  I had an idea of what type and color print I'd like but my Joann's didn't have anything along the line of what I had in mind.  That worked out great because I happened to check Fabric.com (**See Note below) and they did have a couple of prints I liked and were having a sale on some of them the week I looked!  So I was able to pick up what I needed for about $10 cheaper per yard (still a splurge though!). 

Another thing I had done with the "Shots" was to use them to make a test star point for the Americana Lone Star wall hanging I started in June.  I figured I would continue to cut strips of the shot cottons, make up a full block and use it in the back of the quilt.  It took a while to do that but it got done.  So not only is the backing done for this project, it is also Lone Star project #2!!

Already thinking about the quilting, I decided that rather than trying to find one color of thread that will work across the whole quilt as I usually do, I want to quilt this one using the color of each block.  So I decided to also try a new notion:  Angela Walters uses Glide thread on most of her quilts and the shiny polyester seemed a good fit for the "Shots" and "Liberty" cottons.  So I laid in a stash of colors to use to quilt this project.  

The two small spools on the right are Sulky thread I already had on hand.

What I wasn't as sure about was what batting to use.  So I sat on that one until this month.  Luckily, the Quilt Muses always look out for me!  Two weeks ago Connecting Threads was having a sale on batting so I decided to splurge again:  I've long wanted to try out Hobbs Cotton and Wool batting so ordered some to try with this project and which came in at the end of last week.

**10/30/22 Edited To Add:  As of 10/20/22 Fabric.com has gone out of business.

"Seeds of Glory" Pillow Cover

As noted in my June Recap post, I had two spots I felt needed something to complete the RWB summer decorating.  The second spot was our living room chair.  I continued to use the Blue and White "Indigo Weave" quilt on the chair in the living room --- a carry over from the Blue &White Christmas and subsequent Winter decorating schemes I had used. 

I love my "Indigo Weave" quilt but for a proper patriotic display, it could use an injection of red in that spot to fit the Summer season!  I had made a round pillow cover back when I had one of my CW quilts on the same chair.  

For that I used an APQ pattern called" Fussy Cut Flowers Pillow"

So I decided to make another cover for that pillow.  I wanted to find a fabric that would add red but also bridge the blue in the quilt I already had.  I looked around for something that might work and discovered Stacy West's “Seeds of Glory” line for Riley Blake Fabrics.  The line featured a hexie cheater print which thrilled me when I saw it!   Hexies have been another obsession for me ever since I was hired to teach a class on making them back in 2020 (right before the “official” start of the pandemic).  

The cheater-style print presented a perfect opportunity to make an easy cover since using this as the top wouldn't require any piecing.  Quilting it by stitching along the printed “seam” lines would be easy too!  However, I also had to think about the pillow's backing.  When I had looked around for this fabric, I  decided to also pick up a mini charm pack of the same line and make a simple back of pieced squares.  I figured that would allow me to use either side of the pillow as a front!    The only additional thing I'd need was fabric to go around the circumference of the 2” inch thick pillow between the front and the back.  I eventually found the perfect stripe that worked for that in my CW stash.   

That stripe fabric has really been a work horse having been used in a couple of my CW quilts:

Underground Railroad Quilt and one of three Civil War Mini Quilts

I did get the backing pieced but got stalled thinking about exactly how to attach the band and install the zipper and whether I'd want or needed to add piping or a flange around the pillow edge as had been done on the CW pillow.  So with other pressing things to work on, I let this sit.  So unfortunately, like with the wall hanging in June, this too did not actually get to be displayed for the summer!   

So much for July!  The next post will wrap up the Summer doings with a report on things I worked on in August.

Thursday, September 15, 2022

This week in current projects........

APQ Scrap Happy QAL

It's Week #3 of the QAL and after spending the weekend prepping HSTs....

....I was ready this week to start on making the "A blocks" for the quilt.

After that, the next step will be making "B Blocks" which will just be sewing four "A Blocks" together.  

In the Facebook group for this QAL, someone said that they found it easier to just make the "B Blocks" by sewing the six long rows of squares together first and then sewing the rows together to create the block.  I'll see how it goes when I make my first "B Block" the way it's patterned and then consider if I want to do that too.

Christmas Quilting:  Temecula 12 Days and starting the next Holiday Project 

I was also able to finish up all the Temecula blocks.

Now I need to figure out what sashing fabrics to use in each quilt.

With that done, I was ready to start on the second of the Christmas projects.  I'm always thrilled to find older books with techniques that I haven't seen before.   I'm not sure where but at some point, I saw a quilt made with the “Painless Borders” technique by Sally Schneider who had written three books on the subject.  

Essentially the technique uses pieced blocks set into an on-point setting and the design within the blocks create the look of a pieced border.  So rather than piecing a center and then adding a border, you just piece one or more blocks for the center, piece "border" blocks of a different design, lay them all out in an on-point setting, add side setting triangles and the top is complete!  

I was particularly interested in it because I believe the first quilt I saw was made with nine inch blocks and that interested me as a potential GO! die cutting project to use with my 9 inch Cube set.   The quilt I decided to make first is the cover quilt from her first book.  

I was particularly drawn to it because it had tree blocks whose "branches" I hoped I could cut with my Log Cabin die (which I always love to have an opportunity to use).  Additionally as a “Christmas themed” quilt, I could incorporate it into this year's “Red & White quilts for holiday decorating” project plan.  

Initially, I really wanted to do the outer setting triangles using a red Toile print but they are pretty expensive and very directional.  That complicated the triangle cutting and it was hard to find a print that flowed well once all chopped up.  I eventually found a cute Cardinal print that has led me to make this in a Red, White and Gray color scheme.  It took me a bit of time to collect a bunch of reds in fat quarters or half yards as I could get them (I was surprised to find I had almost none in stash!) and a smaller selection of grays. 

A review of the pattern and the size quilt needed meant I actually couldn't do this one with my Cube  since I will be making 8 inch blocks.  Fortunately, I do have the dies to make the size blocks I need.  I also had to do a little EQ8 drafting.  In order to use the Log Cabin die to cut the tree parts, I needed to make the tree blocks a little different from the way they are pieced in the book.  Once I had everything in place, it was time to make a test block!

It worked!  So over the next few weeks I will continue to cut and piece these blocks first.  I then plan to piece the border blocks and lay the whole thing out on my design wall as I do it.  

While the trees will all definitely be scrappy, I'm not sure right now if I want the alternate star blocks to be scrappy within each block, scrappy with each Star block made up of a different fabric or possibly to make all the Star blocks in the same fabric.  That last option would then likely require an additional stash injection so I hope I don't have to go that way! 

A Cross Stitch Update....

Since I had the die cutter out, I also decided to finally do something I've long procrastinated about.  Back in February, I had shown the very first cross stitch project I finished:

I already know where I want to hang it and had purchased a few "snap in" hoops on Etsy awhile back and will use one of them as a frame for it.

Although they look like wood, the outer decorative rings are actually made of a silicon-like plastic that stretches around the inserts.  In order to "fully finish" the piece (as the Cross Stitchers say), I needed to cut my completed stitched piece into a circle large enough to allow me to pull it around the edges of the frame insert.  I figured I needed about an 8 inch circle.  Well lo and behold, look what had been on my Accuquilt Wishlist for a few years now:

I was able to purchase the die a couple of months back during one of Accuquilt's sale days.  I still have the 6 inch circle die on my wishlist but that can wait for when I have a true need for it (or for a really big sale)!  So I die cut the piece and some batting to back it on the die board.

And laced the back with #8 Perle cotton to make it easier to pull the frame around the edge.   


Edited To Add:  I've also closed up the back as well!

Could be neater but it's done!

Voila, it is now finally ready to be hung!  I have another piece with a related theme that I want to hang as a companion to this one.  Hmmm, DH and I are headed to the big RV show in Hershey PA this weekend and I was thinking about taking along some handwork.  Maybe I can start that one on the trip.  

It's been a good week for crafting!  I hope you have been able to get in your studio and move some things along too!