
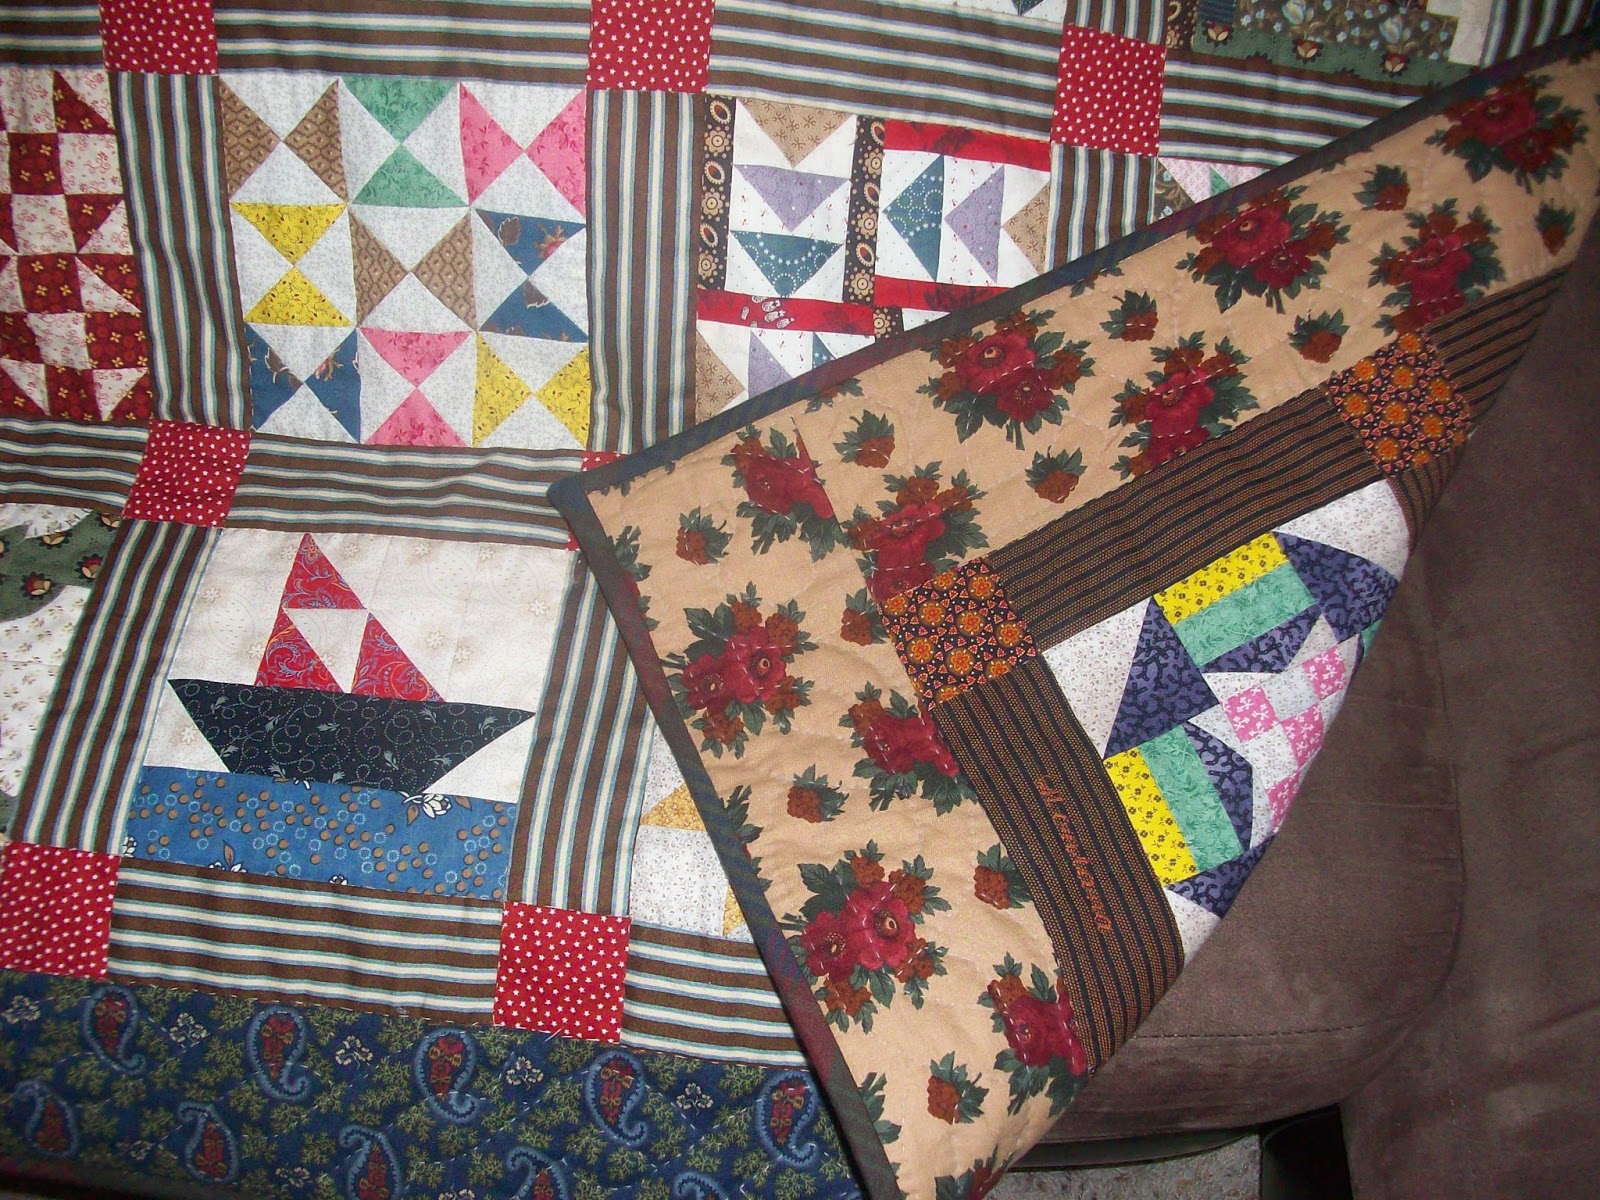
Pioneer Side


And yes, it is reversible!
So a little (o.k., a lot of) background: these samplers are from the books of the same name published by Eleanor Burns of Quilt In A Day fame. The Pioneer Sampler was the first QIAD TV series I ever saw back in 2003 (my second year of quilting). I fell in love with Eleanor's techniques and loved the shaded colors of her quilt not realizing then that it was to be "my style". That same year I heard mention that the UGRR book was also going to be released and vowed to eventually get it too.
 |
| And the episodes can still be seen on QNNTV.com. |
After seeing the UGRR series when it came on TV and once I had both books, I realized an important history lesson. Although I had always known about both of these two movements in U.S. history, I had never really taken note of the specific time period they occurred in. By the time I got the UGRR book in 2005, Civil War Reproduction fabrics were all the rage. I was surprised to realize that all of these social movements were happening around the same time! Needless to say I immediately decided that both of these samplers had to be made in the CW palette and began collecting stash.
But I also felt that these two needed to be part of the same quilt since to me they represented two sides of the same coin: a difficult and hazardous flight to a new place for a new and better life. As intense as we feel our own time is, imagine living through an age where the political upheaval of the War was going on along side the fight over slavery and the migration of thousands across country to establish new homesteads, towns, cities and states. The idea to make this a reversible quilt was furthered when I read an article in a back issue of Quilter's Newsletter Magazine. In the November, 1996 issue (#287), Elizabeth Akana gave instructions in a "Quilters Workshop" article for making a rod pocket between the layers of a two-sided quilt (“Invisible Sleeve” with Kaye Jesse).
Like most projects this one progressed in dribs and drabs. I started piecing the blocks in 2010. Wanting a wall hanging, I planned to make both with 6" finished blocks. Easy enough for the UGRR since that book provided instructions for both 6" and 12" blocks. But the Pioneer book only provided 12" blocks so that meant I had to redraft them myself to the smaller size as I went along. I got them done but didn't put the tops together until 2011.
At that time, to even out the tops so they could be made back-to-back (the Pioneer sampler is only 12 blocks while the UGRR has 15) I added text blocks with information about each that I printed on muslin that I tea-dyed and prepped with Bubble Jet Set (the UGRR text was provided in the book and the Pioneer text was information I had collected from reading while making the project. You can see close-ups of the text in this post). They got layered because I hoped to push myself to finish the project by joining Myra's PHD Challenge that year. I was disappointed when I didn't get them finished but appreciated that I managed to get them that far and was determined they would not languish forever. It also helped that Myra extended the Challenge into the new year!
By this time I decided that I wanted to hand quilt the two pieces. But admittedly daunted by that prospect (well, that and I had a lot of other projects on my plate), I let it sit until December when I started on the hand quilting in the hopes of putting this one to bed as my last finish for 2012. Didn't happen but once it was underway there was no chance of letting it flounder any longer. After quilting in the ditch around the blocks, sashing and sashing squares (and finding that rather difficult to do with all the seams), I was not sure I wanted to quilt the blocks themselves. I felt the power in the samplers were in the blocks and their story and since this was not a show quilt, it wouldn't suffer from the lack of extra quilting. Not to mention it would save me about another two months of work!
But once the centers were quilted, I felt the borders still needed something so I set out to find a stitch pattern -- nothing too complex -- to finish them off. I found two great but simple cable designs in the book "Quilting With Style" by prolific hand quilters Gwen Marston and Joe Cunningham.
Since the borders had no seams, they were far easier to quilt (a note to myself for future hand quilting endeavors) and the stitching finished off the borders perfectly.
By this time I decided that I wanted to hand quilt the two pieces. But admittedly daunted by that prospect (well, that and I had a lot of other projects on my plate), I let it sit until December when I started on the hand quilting in the hopes of putting this one to bed as my last finish for 2012. Didn't happen but once it was underway there was no chance of letting it flounder any longer. After quilting in the ditch around the blocks, sashing and sashing squares (and finding that rather difficult to do with all the seams), I was not sure I wanted to quilt the blocks themselves. I felt the power in the samplers were in the blocks and their story and since this was not a show quilt, it wouldn't suffer from the lack of extra quilting. Not to mention it would save me about another two months of work!
But once the centers were quilted, I felt the borders still needed something so I set out to find a stitch pattern -- nothing too complex -- to finish them off. I found two great but simple cable designs in the book "Quilting With Style" by prolific hand quilters Gwen Marston and Joe Cunningham.
 |
| You can see the stitching better from the back. |
By now I really wanted this up on the wall! I was willing to bind it, live with it for a while and (heretical for me) be willing to go back and remove the binding and quilt them more at a later date if it really, really, REALLY bothered me. After tack stitching the wrong sides of the two quilts together, it was on to the binding. And THAT almost didn't happen when I couldn't find the fabric I had planned to use for them, then found it but realized it wasn't going to work after all! But scraps to the rescue! Like many, I keep the leftover lengths of binding from my projects. It just so happened that this plaid binding....

....leftover from making this quilt in 2008....

....turned out to have the perfect coloring to be a good finish for this project as well. Bonus: it was already cut! This was a brushed cotton fabric and although I used the "fuzzy" side on the original quilt (which was made with brushed cottons and flannel), for this quilt I used the flat cotton side which is more in line with the fabrics used in these quilts. Although I usually add my bindings completely by machine, I finished this one by hand to insure that it was presentable on both sides. It took a little finagling to cover the join where the two quilts form the sleeve but it got done and I even figured out how to add a label!

So the first finish for 2013 is in the can and I hope it won't be the last!


3 comments:
Beautiful work, Vivian! I love the reversible quilt.
HI VIv....we could have been in the same Underground Railroad class...as that is the exact book we used too!! I love the idea of a reversable quilt! I always think the backs should be as wonderful as the fronts!
Neat idea to put two quilts together like that. (I'll have to explore the invisible sleeve idea.) Every now and again when I am reading history or historical novels, I realize two things, separate in my mind, occurred near each other. Always adds a new degree of interest. Visiting from Val's.
Post a Comment