Showing posts with label Moving It Forward Monday. Show all posts

Monday, December 11, 2023

Moving It Forward Monday: "Cotton Boll" Quilting Is Under Way!


Once again channeling Bonnie Hunter, I finally got started on the quilting of "Roll, Roll, Cotton Boll" this weekend.  Before the layering, I had auditioned a few stitch patterns for this:


Initially, with such a busy design and large quilt, my first thought was to go with an all-over pattern.  However, even though it meant doing semi-custom quilting, I really liked the last one because it emphasized what I felt stood out visually in the quilt top:  the two different blocks and the strong vertical, horizontal and diagonal lines of the design.  Interestingly, all the motifs I will be using for this come from this one pattern:


It's not surprising since this APQ quilt design has the same visual elements as "Cotton Boll".  I will also use the same inner border motif as the APQ quilt but will be doing something different on the "Cotton Boll" outer border.

I started with the continuous curve stitching along the block seam allowances.  Doing this first is a way of doing "stabilizing stitching" across the center of the quilt.  So far, I'm about halfway through stitching along the seams of the rows of light string blocks.  When I started, I debated on whether to do them free-motion or with a walking foot.  I wasn't confident about doing them evenly with free-motion since the blocks are large (10-1/2").  However, doing them with a walking foot meant marking them in order for them to look even.  I found two interesting tools in the studio for that:


This "Leaves Galore" template is normally used for making rotary cut curved applique shapes (and there are two other sizes of these templates available).  However in this instance, it provided the perfect size curve to fit my blocks.  Teamed with a Hera marker (the other end of this version is also a "point turner"), it allowed me to mark the quilt as I went along in a way that will not require removing the markings later.   

At this point, I'm about half way done with the light string block seam allowances.  I will be using a slightly different color thread on the red "Boll" blocks.  Once all the stabilizing stitching is done, I can move on to doing free-motion for the motifs to be stitched in the blocks.

As promised, as I stitch the seam allowances I had pin basted, I'm removing the pins in order to use them to baste "Tobacco Road"!  

Friday....

Today!  It's a start....

The only down side is that at the rate I'm going, I may only get through these two quilts by the end of this mystery season.  Well, better two than none!

Monday, November 27, 2023

Moving It Forward Monday: A Quilt Label and Cross Stitch


Continuing work on my "Roll, Roll, Cotton Boll" project during this year's Quiltville mystery season:  Having finished the top on Friday, I now need to make up the backing so I can then move on to the layering step. 
 
Finished Mystery Top

Backing Fabrics

However backing a quilt also means thinking about a label for it.  Early in this project, I had come across the perfect thematic design for that from an old Georgia Bonesteel "Lap Quilting" episode.  

Given the theme of the mystery quilt, this seemed like the perfect block for the label.

To make it up, that means I need to do applique.  I had considered doing this using the needle turn method but not wanting to turn the label into too much of an additional project (and spend too long a time on it),  I decided to default to easier methods.  

In the beginning, one of the things that got me interested in quilting was learning that most quilting methods could be done completely by machine.  I eventually learned that this was true even for applique.  My first introduction to that was from this book: 


Later on I learned about Beth Ferrier (on Simply Quilts, back in the day) and her methods for machine applique which called for using freezer paper templates and glue basting the turned edges:


I combined her methods with using C&T's "Wash Away Applique Sheets" (developed with Beth's technique in mind) which meant not having to remove the paper after the glue basting:


  After choosing the fabrics and figuring out the image parts....


I prepped the pieces to be sewn onto the the label background


I will say that I hadn't realized just how hard doing all of those points and curves would be to prep given the smaller size of the block I was using.  In the end,  my "Boll" doesn't look just like Georgia's but for a label, it's good enough:


So the backing is now done, next will be layering and further quilting stitch pattern considerations!

Also in the "Continuing Work" category:  I have put more stitches in my "Give Thanks" cross stitch project (last seen at the end of this post).

First reported on here.

I had hoped to get this done to hang up for Thanksgiving but am now continuing to work on it until it's finished.  This way, it will be immediately ready for display next year.   So a little hand work finished off the Thanksgiving holiday weekend --- or was it to rest up for today's Cyber Monday shopping?  You decide, LOL!

Monday, November 20, 2023

Moving It Forward Monday: Preparing For the Quiltville Mystery Season

It's almost here!!  The first clue for Bonnie Hunter's latest mystery quilt "Indigo Way" will drop this Friday.  For this year's mystery season, I'll just be gathering the clues for the new mystery because I want to spend the season working on all the mystery tops I already have finished.  The goal is to move them all into the "fully finished" category (sorry, that's the cross stitch talking!).  

I have four mystery tops and their backings already prepared:

Clockwise from top left:  En Provence, On Ringo Lake, Old Tobacco Road
and Double Delight

All I have left to add to that list is "Roll, Roll, Cotton Boll".  This project has had a looong journey that started all the way back in 2018.

I scavenged fabric from the remains of other projects to make up all the parts for the blocks for it from December 2018 to June, 2020.

At this point, the String blocks on the left were still "in progress".

All the parts in the upper right in the picture above were sewn together into blocks back in March of this year.

During the holiday season last year, I worked on the string pieced units (using strings collected from projects and cuts offs over the years).  I finished up the String blocks for this project in February this year. 


I was finally able to lay out all the blocks on my design wall in July but didn't get to sew all the blocks together to finish the center of the top until the end of October.

Since September, I added the triangles on the ends for the outer border units as "leader/enders" and just finished those up this month.  

So now it was time to trim up the edges of the center in prep for adding the next inner border which will be green.


Bonnie gives a size to cut the inner border strips but she also suggests that the border can also function as a "spacing border".  So I may find I need to adjust the width of my inner border to fit what I need to bridge the sides of the center with the length of the pieced outer border strips. 

After trimming and stay stitching the edges, I've measured the length and width through the center as I do when I measure out my borders.  However, following Bonnie's advice, before cutting the inner border, I am focusing first on sewing up those outer borders, both to make sure the number of pieces she gave for that works and then to see if the inner border width in the pattern will work with them or need to be adjusted.

Well, this is going to take a while, LOL!  Good thing I've got until the end of the week!

Monday, May 22, 2023

Moving It Forward Monday: Cross stitch May-nia leads to some finishes


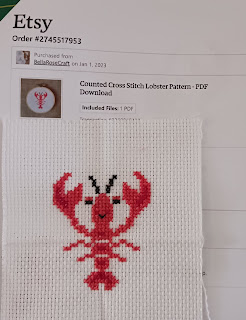
 The WIP that was on this month's May-nia project list is now (finally) complete!


As I said in my last post about this, the color change placements challenged me right up to the end!  So if mine looks different from the pattern I purchased from the lovely Peacock & Fig chalk it up to the fact that I am still fairly new to CS (and that's my story and I'm sticking to it!!).  

However, I am thrilled I got it done!  I even tested it in the hoop frame that I will be using to display it.


Next step is rinsing out the grid markings and then completing the finishing.  Perfect since the plan for the rest of my May-nia month is to focus on "fully finishing" projects.  So now this one, the new project finished at the start of this month and two other prior finishes can all get the finishing treatment.   

What also challenged me this week was my refrigerator!  The repair technicians had been here the week before last to diagnose the problem (the compressor had died) and order new parts which came in Friday.   When I logged onto my service account,  it said an appointment for installing the new parts had been set up for Saturday.  

Well, my DH and I waited around during the two hour arrival window but they were a no show!  I tried calling the service vendor but was only able to leave a message.  Yeesh!  Another call this morning confirmed that the reason they were a no show was that they don't work on the weekends!!  Why the system scheduled an appointment for then I don't know.   Now it will be another two days of living in the 1920's hauling in ice to keep things cold until our (confirmed) appointment on Wednesday.   Maybe I should be stitching this one next.....

Pattern available at 123Stitch.com

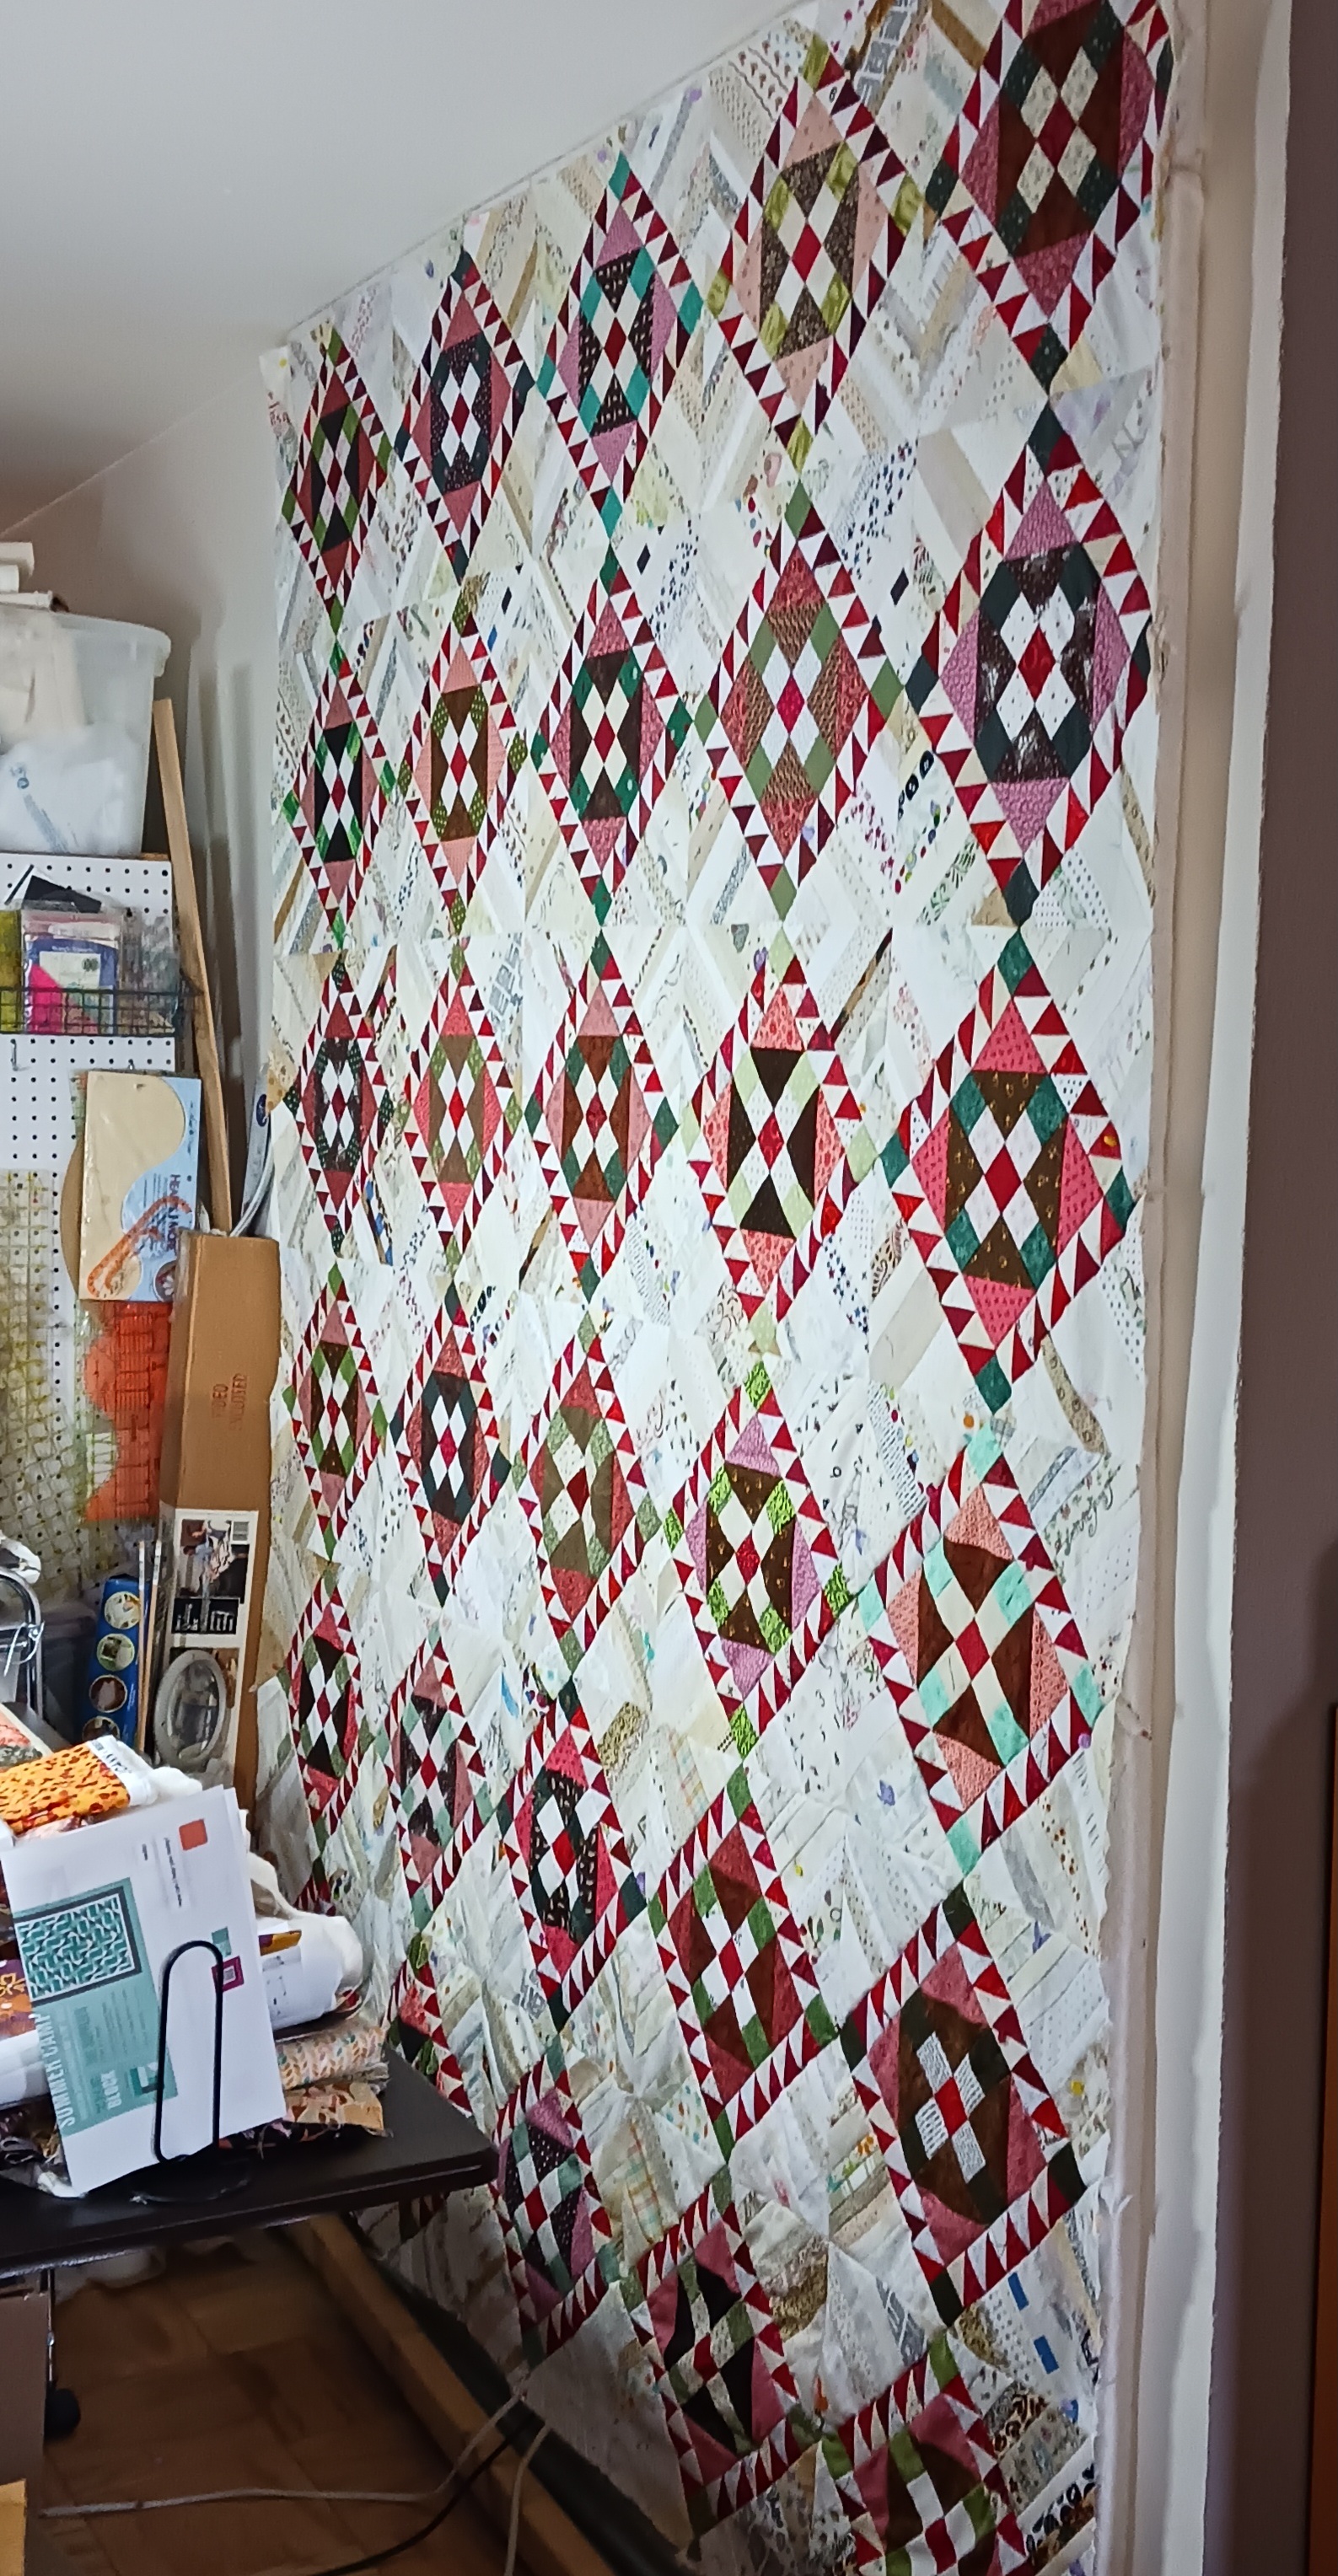
On the plus side, having finished the WIP and while waiting for the appointment I didn't know wasn't going to happen, I worked on further setting up a project I want to start on in June.  

I had purchased this pattern and kitted up the threads and fabric last summer. It will be the biggest CS project I've attempted to date as well as one with the most colors I have ever used at one time and my first "full coverage" piece.  I had waited to organize the threads until I was ready to work on it.  I only expected to get some of the threads onto drops but it turns out that waiting on technicians who will never show is good for floss preparation:

They are now all set up on a ring --- another CS tool that I now have a new appreciation for.  For a project that uses a lot of floss like this, a ring of drops is definitely the way to go!  When I started stitching, I thought I really liked floss cards, especially when designers included one in the pattern:

I even considered purchasing one of the fancy heirloom ones.

Made by WonderlandUkraine on Etsy

However, I decided I wanted a system where I could prep the floss once and then be able to move it from project to project as needed.  

As I checked that I had all the floss for the project, I thought I was missing one.  It turns out I had actually put the missing skein with another "smalls" project I had planned to stitch as an embellishment for another finish.  

I think I put that floss with that other project because at the time it was close to the "called for" color for it.  However, since then, I had kitted another project that had the actual color I needed!  So I decided to put that floss on a drop and stitch up the small project real quick so I could return the rest of the floss to the kitted project.

As noted, you can find this pattern on Etsy.

Ironically, the other two colors of floss for this little stitch were also in kitted projects so it was helpful that this little thing could be finished up quickly and all the flosses could be returned to where they will be needed in the future.

The plan for this little piece is for it to be added to the embellishments for this project finished last year:

This little piece will be a memento of our trip to Maine last summer and is one of the projects on the May-nia list for finishing.  We will be returning there in a couple of weeks and I had hoped to have this finished to take with us.  

For it I have an ambitious plan:  I saw a cute miniature lobster trap on Etsy and I'd like to figure out if I can translate it into fabric and combine it with the lobster stitchery as an embellishment.

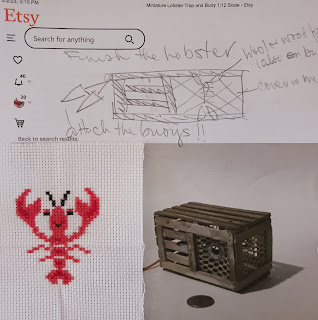
Unfortunately, this item is no longer listed.

I don't know if I will be successful but I hope to have some May-nia finishing fun while trying!

Monday, May 15, 2023

Moving It Forward Monday: Cross Stitch May-nia Progress

First off, I hope all the stitching mamas out there enjoyed a beautiful Mother's Day yesterday!  

My May-nia month has been progressing a bit.   With the only new start scheduled for May-nia completed last week, it was time to get back to the WIP on the schedule.  I was hoping to finish up my "Maybe Wine" piece that's going to be a wall hanging companion to this one:

This one was a Dimensions kit.

While I did get more work done on it, it's still a WIP at this point:

I started May here....

...and got this far this week.

When I chose this piece last year, I never really expected it to be all that hard but the color changes in the flowers have kicked my butt!!  I've done a lot of false starts and frogging when it came to filling in the flower colors.  The good news is that it resulted in the need to learn two new cross stitch techniques:  parking threads and gridding my fabric.  

I had practiced the latter on the Coronation piece I did last week and learned this week that it was also okay to just grid a difficult section of a pattern where it was needed rather than gridding the whole piece of fabric so I did that in advance of starting the bottom flower.  Even so, I'm STILL having problems getting some of the "confetti" and sprinkled color placements right as I start on it.  

I really hope to work out the kinks in the process since I will really need these skills when I get to the first "full coverage" piece I have kitted:

Pattern available on Etsy here.

Once I get the stitching done on "Maybe Wine", the rest of the month is scheduled to be focused on the "fully finishing" work for the two May stitching projects and two other projects completed prior to May-nia.  So I also spent some time looking for finishing supplies.  

For the Coronation piece I have an idea do a fancy pillow finish that I envision doing in royal purple, velvet and gold.  While shopping for those supplies, I also found the perfect backing fabric for "Maybe Wine" since it will be finished in a hoop frame like its companion.

So all the finishing things are in house for whenever I manage to get this stitching done.  And so May-nia continues.....

Monday, May 1, 2023

Moving It Forward Monday - Cross Stitch Edition

I'm doing May-nia!

Okay, I have to admit, I'm really getting into the whole cross stitch thing!  Partially because it's interesting to see the things cross stitchers do to keep themselves motivated to work on their projects.  

One of those things is May-nia.  Back in 2015 a group of cross stitchers started a challenge where for the month of May they would start a bunch of new projects.  I think cross stitchers have even more  "hussies" (HSY = Haven't Started Yet projects) they set up for themselves than quilters!  That's probably because the initial cost of supplying most cross stitch projects ranges from about the cost of a charm pack to the cost of a layer cake of fabric.  You get closer to the cost of making a quilt when it comes time to "fully finish" a project since a lot of cross stitchers have their pieces professionally framed for display.  

But I digress....when May-nia started, the goal was to start 15 different projects in the course of the month.  That's right, start but not necessarily finish!  Ahhh, it reminds me of the good 'ole days when Barbara over at the Cat Patches blog encouraged her quilting followers to report on their "New-FOs" and go ahead and pull out that new quilt project they had been dying to get under way.  

The original May-nia group has since disbanded but cross stitchers the world over have picked up on the tradition and run with it!  As time went on, the number of new starts cross stitchers were challenged to do increased until at one point the challenge was to start a new project each day of the month!  Okay, I'm definitely not trying that -- I have no desire to have my cross stitch projects equal to my quilt UFOs, LOL!!!

The goal for May-nia these days is to just set a goal of your own choosing.  For some it's all about new starts, for others tackling WIPS or UFOs (see, just like quilters!!).  Up to now, I didn't think I had enough potential projects to even consider doing May-nia.  However, looking at the cross stitch "hussies" and WIPs I have accumulated, I have definitely reached that stage!  

Initially, my Maynia plan was to stitch "patriotic projects".   The month of May usually signals the time of the year where I put out all of the red, white and blue quilts I've made in honor of all the "patriotic holidays" that will happen between May and September (Memorial Day, Fourth of July, Labor Day).  My downstairs bathroom is also decorated in that color scheme and I realized that a few patriotic pin keeps would be great to add to the little display shelf I have in there.  Right now I have two patterns in house:

Another one called "Right To Vote" had been on my wish list for over a year.  It was on sale at 123Stitch.com this past week so I splurged on getting it and it's on its way.  What helped push that along was that I already had a few of the "called for" floss for it that had been purchased when I bought the other two patterns back in January.  I was going to try doing a 2-Day "stitching rotation" for each of the three projects, something I have seen Flosstubers talk about (like Lori Scicolone of Once Upon A Stitch).  I'd then focus the other day of the week on working on finishes.  

However, I also have three projects that I really need/want to "fully finish" this month as well as a new start that is related to May.  So I changed my May-nia plans:  instead I will be stitching one new start this week for a special reason:

It celebrates the coronation of King Charles III at the end of this week.  I am not a Monarchist but after seeing Pat Sloan talk about this, I liked the idea of getting in on the fun with another piece that is specific to the year "2023".  I'm also hoping to use this little project to try out a new-to-me technique of "gridding" the fabric base of a project.  This is something that will be really helpful to know how to do for a "full coverage" project I hope to start next month.  Years ago I had purchased some London themed fabric and I thought I might use it towards the "fully finishing" part of this.  However, since then another idea popped up in my head for another way to finish it so I'll see which way I go if and when I get to that step

Each week for the rest of the month, I'll work on another project that I need to finish stitching (carried over from April) and two other finishes that need to be "fully finished" .  

This change in May-nia plans doesn't leave the patriotic projects stranded --- I've decided to work on those in June instead.  Since that month is 30 days long, I will try doing the projects on a 3-Day rotation which will give me ten distinct stitching periods to work on the cross stitching over the course of the month.  

And of course, in between all of the hand work there will also be the usual quilting projects continuing as well!  My first crafty love will not be denied nor ignored!