Showing posts with label Singer Featherweight. Show all posts

Friday, August 1, 2025

Finished Or Not Friday: Another Pop-Up Bucket!

 Hello August!  Just here to report a quickie along with everyone at Quilty Girl Alycia's for this week's "Finished Or Not Friday"!

Last year I made one of of the Fat Quarter Gypsy - Sew Organized Design "Stacking Pop-up" buckets to use as a sewing station garbage can when I visit my MIL for a mini quilting retreat.  That one was coordinated to go with the bag and supplies I use if I take my Juki sewing machine with me.  

The outside fabric is actually a recycled sheet!

The Juki travel set-up.

At that time I also had planned to make another one for my Featherweight's travel sewing kit.  As I said on the last post about my "Catch-All Cuties" sewing tools totes,  I like to have a separate set of tools for each of my sewing set-ups.  I purchased fabrics to go with the black, red and white color scheme of all things Featherweight.

I had purchased the red lining fabric for it when I Shop Hopped with my MIL back in October.  I wound up ordering the black and white exterior fabric when I got back home.  That happened because I decided that the fabric I had purchased for that on the Shop Hop would go better with a panel I already had in stash to make a future holiday quilt.

However, before I could get that one made up, I actually made another one!  On the July 4th holiday weekend, my husband and I went on a camping trip to Letchworth State Park.  Since this was a short trip, we used our small camp set-up:

On our last trip with this same kit over the Memorial Day weekend, one thing we realized was that we needed a small garbage can for our tent.  We've tied plastic bags to the little table we use inside the tent but really wanted something a little more structured.   Fortunately, when Joann's had gone out of business this year I had picked up some fabrics because I loved the bright colors of one and the camping theme of both:

At the time, I had thought I might use them to make a new roll up kitchen utensil storage pouch for my DH.  When I saw we needed the can and since I had made one of these Pop-ups before, I decided I'd use some of it for that instead!  For the sewing station cans, I had used a "Large" pop-up, this time around  I made a smaller "Medium" sized one:


And hard at work in our tent!

These Pop-ups also come in an even larger "Extra-Large" size as well as a "Small" and "Mini" size. They are easier to make than they look and full instructions for all the sizes are in the  "Stacking Pop-up" pattern which is sold seperately from the wire frames.

You only have to cut out six pieces to make it:  one side piece out of each fabric used for the outside and inside, interfacing (the same size) for both of those and circles for the bottom out of both the outside and inside fabrics (a template for that is provided with the wire frames).  

If you are going to secure the folded up Pop-up with ties, you cut two additional fabric strips to make those but you can also use a strip of elastic for that.  Note that I used a twill tape printed like a ruler for my first large one and I recycled an elastic headband from a broken headlamp for my camping version.  

With the camping one done, I figured I'd end a busy July finally making up the second Large one for the Featherweight kit.

All finished, open and closed!

This completes my set of DIY travel accessories for my Featherweight!

If you want to make things like this for your Featherweight, check out the making of my tote bag, foot controller drawstring bag and extension bed cover here (all using Jeni Baker's Sew Portable Travel Set design) and the Catch-All Cutie I made for this set here.

Want to know what else everyone is making to start off this new month?  Well then head on over to Quilty Girl Alycia's for some "Finished Or Not Friday" reports!  

Tuesday, July 29, 2025

To Do Tuesday: End of the Month Plans

As July draws to a close, my design wall is full and yet there's still a few more things to try to get done as this month ends!  So with that I'll join in with the others over at Carol's Quilt Schmilt for some "To Do Tuesday" planning for the rest of the week!

Alaska and Other Kaleidoscope Block Designs - Month 1

I'm posting an update on yet another project undertaken this month!  Despite a lot of focus on "Christmas in July" cross stitching and then participating in a Blog Hop, I also managed to squeeze in a little time to finally get this long desired project underway!  

My original plan was to focus on starting work on the Red, White & Blue version of Edyta Sitar's "Alaska" design during "Red, White & June".  However since I didn't get that done,  I've decided that now I will do this project as another of my self-styled "Block of the Months".  I will note this hasn't gone all that great in the past but you know the old saying:  "If at first you don't succeed, try, try again"!  

I'm pleased to say the blocks (on the upper right) for the first month are all done!  I am using Marti Michell's Kaleido-rulers to cut the pieces for the blocks.  As I've pulled out all the information I had gathered for this project, I am also now taking a look at other Kaleidoscope designs.  

In her book "Kaleidoscope ABCs", Marti explores many different designs for Kaleidoscope blocks.  

Since the blocks I made this month are the simple ones with just plain triangles, I picked another design using the same type of block to try making.  Those are the small scrappy Kaleidoscope blocks under the "Alaska" blocks.  I'm doing them as inspired by this design in Marti's book:

I've said it before and I'll say it again:  I am ALWAYS looking for blocks or designs that will use up scraps!  I had decided to make these 5 inch finished as the strips needed for cutting the triangles is 3 inches and I already have a lot of scraps of that size in my Scrap Users box.

Initially, I thought I could then have the option of teaming the blocks with my other overflowing box of scraps:  Charm Squares (5" cut) which would give me more design options.   Unfortunately I had to check myself when I remembered that a five inch finished block means unfinished it's 5-1/2" so actually won't work with the Charm Squares after all.  

No matter, I'd still love the quilt of just the scrappy blocks.  Since I also have a big box of scraps sitting in my space that I need to process,  now I know to also try cutting some 5-1/2" squares that I can try teaming with these blocks.  So this will be another ongoing scrap project.       

A Long Overdue Flimsie Is Now Also Done

While piecing the "Alaska" blocks (as well as the project I made for the Blog Hop),  I was also able to finally put together the top for my "Gathering A Garden" quilt project that has been laid out on my design wall since May --- that's it on the left in the picture at the start of the post.  I used piecing the rows of blocks together for that top as a "leader/ender" for the Kaleidoscope blocks and the Blog Hop project piecing.  I am glad to finally move forward on this project.  I had worked up this design all the way back in 2010 and now can finally get around to completing it.

Plans for the rest of the week:

1.  Recently I spoke to my MIL and found out that the QOV kit to make for donation that I took when I joined the guild back in February is due back to the guild in August!  Uh oh!  

This is another project I had thought I'd work on during "Red, White & June" but didn't so now it's crunch time!  Fortunately it looks to be pretty easy so I'm hoping I can get it made up over the next two or three days so I can get it in the mail ASAP! 

2.  Before we went camping over the July 4th weekend,  I made up another of the Fat Quarter Gypsy - Sew Organized Design "Stacking Pop-up" buckets to use in our tent as a small garbage bag holder.  It's the second one of these types of bucket that I have made, the first one was for my Juki machine's travel kit.  

I have another set of fabrics to make one for my Featherweight's travel kit.  They are pretty easy to make so I think I'll try to get that done this week too. 

3.  Lastly, I need to cut out the next set of "Alaska" blocks as I really want to try to stay on track with this project.

That's it for me!  Once again trying to see if a short list means I can actually get what I plan done!  If you want to see what is populating other crafters "To Do" lists this week, head on over to Carol's Quilt Schmilt for the "To Do Tuesday" linkup and check out all of the fun things that will be going on in crafting spaces this week! 

Saturday, June 29, 2024

Finished or Not Friday: A New Tote and a Wall Hanging UFO Finish

I had to do some late Friday finishing so am a little late joining in with Quilty Girl Alycia for some "Finished or Not Friday" review! 

First off, a new project:  I made another tool tote for travel sewing:  I present my Catch-All Cutie II:

In 2021, I made my first “Catch-All Cutie” for my entry in a blogging challenge on the topic of “Zippered Accessories”.  

I love this pattern and its instructions are straightforward although not intuitive – it's best to just follow them verbatim step by step and in the end is actually very easy to make.  I added a twist to it in the form of a little container with a stuffed pincushion top to hold clips and pins which was inspired by a similar gift made and given to me by my MIL.  

This little tote is ingenious and indispensable when I travel with a sewing machine. I had made the original bag out of a "sewing themed" line of fabrics from a bundle that I had in stash.  With Red, Yellow and Aqua accents, it went well enough with the Red tote bag I had made for my Singer Featherweight sewing machine.  I made a point of putting Aqua and Yellow tools in it to coordinate.  It holds all the basic working tools you need when sewing while away.  Even better, when I fold down the sides, the inside pockets hold all the tools neatly and are easy to grab and put back as you sew.  Did I mention I love this bag?!?

So when when I purchased a new Juki machine last year and wanted to take it down to my MIL's, I also purchased a bag to transport it in.  I wound up getting an aqua colored one and admit I was thrilled my little “Cutie” coordinated with it too.  

However, eventually I found that I didn't like that if I alternated between which machine I carried, I had to make sure I moved the “Cutie” to that bag before traveling.  I have always held to the practice that with the exception of my house keys and ID, if I needed a specific thing/tool/item in more than one bag, I prefer to have multiples of that item and stock each bag I use them in with their own supply.  It only took about three trips (especially one where I started out with the plan to take the Featherweight but then switched and decided to take the Juki) to realize that I'd really like another “Cutie” – this time designed specifically for the Featherweight's tote.  

So I looked around for fabric to do just that.  I would have loved to get more of the Robert Kaufman Singer-themed fabric but that line had gone out of stock years ago.  I had a few scraps left though and knew just where in a new bag I could incorporate them if I could find other fabrics to coordinate with it.  

I lucked up on that when I saw prints from the “She Who Sews” line by J. Wecker Frisch in an Etsy shop one day.  There were Black and White and Red and White sewing themed prints with an “old-timey” look which was perfect for my needs.  I checked the fabric requirements in the pattern and saw that I only needed about a half yard of each to make the bag.  Sweet!  

Eventually I also caught both red and black Lori Holt zippers that were long enough for use on the exterior and interior on sale at Sentimental Stitches.  Later, the same vendor offered a beautiful pair of small black embroidery scissors with gold sunflower motifs on the handles.  The product description said how they reminded one of a Featherweight machine!  I agreed and even though they were on the pricey side, I ordered them anyway to add to the tools for the new bag.  

With an upcoming trip that I planned to take my Featherweight along with me, I got this new bag underway appropriately enough on “National Sewing Machine Day”.  Once again the instructions were straightforward although I had overlooked one important thing when I made the bag the first time:  the instructions do say that using directional fabrics is not recommended!  That had not been a factor for the fabrics used in the first bag but of course both of the fabrics I had purchased this time as well as my Singer scraps were just that, LOL!  

To add to the complications,  I wanted to feature certain motifs from the cover fabric on the sides of the bag.  Had I purchased a yard of each fabric it would have made it easier to finagle.  Fortunately, I was able to figure out how to make it all work by adding an additional seam at the bottom of the bag and get it made up for the trip.  Here it is in action:

I also ordered more tools to coordinate with this bag and they came in on Friday so now it is fully outfitted and ready for the next trip! 


Now for the UFO:  Americana Lone Star

As often happens, I decided to make this one to fill a need:     


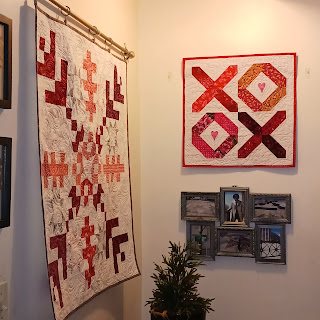
I like to hang Red, White and Blue quilts during the summer or as I call it "the Patriotic Season" from Memorial Day until Labor Day which also includes July 4th.  The wall at the top of our entry stairs is one of my prime display spaces and I had finished the "Hometown USA" wall hanging seen above for it back in 2022.  In the past when I have hung quilts in this spot, I have also made companion wall hangings for the smaller space on the wall next to it like these: 

Pioneer Sampler and Honoring the Journeys

When I put up "Hometown" in 2022,  I had decided it was time to make a companion.  I started by looking through one of American Patchwork and Quilting magazine's compilations for "Patriotic Patterns".  Well it didn't take long to find one I had downloaded years ago and had always wanted to make.  


This was a goodie in that I was more than happy to follow the pattern cues for colors and was pretty sure I had fabrics in my RWB stash to execute it.  Even better, making a Lone Star quilt had always been on my quilt "Bucket List" and even though I have "fabric funded" a few projects, I hadn't made one yet.  

It did not take long to compile a project stash but a read of the pattern presented a new problem:  the pattern was designed to make a wall hanging that finished at 43 inches square but for my space I needed one of about 25 inches.  I figured out that if I made it using smaller blocks (6 inch Leymoyne Star corner blocks rather than the patterned 10 inch), it should fit my space.  However, I wasn't sure what size strips to use to piece the center Lone Star.  I had some estimates but not enough in my project stash to run a test.  

Fortunately at the time I was also embarking on another project that used Shot Cottons and since I had a big stash of those, I tested my block size theories using that stash.  The good news there is that not only did I get that done but I used the test block in the backing for that other project which at the moment is still awaiting quilting:


Strip size settled (1-1/2”), and after strip piecing the first star points I then realized I had to replace the diamonds cut out of the stripe fabric I wanted to use in the star point tips with "fussy cuts".  This was the only way to have the stripe run pointing into the tip the way I wanted.  For the Lemoyne Star corner blocks, I used my trusty Rapid Fire Lemoyne Star ruler and Deb Tucker's techniques to make the 6 inch finished blocks needed.  


Once the top was finished it sat for the usual reason:  how do I want to quilt this?  Then it continued to sit until now for the other usual reason: the season passed and other projects became a priority.  So much for an “I can make this up quick” project!  This year however, when the RWB quilts went out on display again, I decided I really wanted to get this done.  Even better, looking at the top with fresh eyes, I also immediately came up with a very simple quilting plan.

Right before we were due to go on a camping trip for my DH's vacation two weeks ago, I figured I would try to get this layered so I could quilt it as soon as we got back.  To that end, before leaving on our trip, I had hoped to try a new basting technique:  

My MIL had seen some videos on glue basting, tried one of them and liked the results.  While I have done it for bindings, I've never tried it for a whole quilt.  Before we left, I had set up to try to get it done but found that the containers of glue I had on hand wouldn't dispense!  I picked up some new ones and once back did get the basting done.  My opinion:  the method does work but just like when using it for basting a binding, it is important to use a light hand with the glue:  you want thin lines or small dots not glops and slathers!  

I will also note that like so many I've seen described, my center Lone Star block was not exactly “flat” and bubbled a bit in spots.  The condition was helped a bit by giving it a good press.  I also decided to "double batt" it when I layered it.  I was hoping to further minimize how much of the puffiness I would have to try to “quilt out” later.

And yes, these are Franken-batts!

I also had to change machines:  I started quilting this on my vintage Singer 401 because that was what was in the sewing table and I had recently worked on another project that needed its zigzag capabilities.  However, while it started out okay, I started getting a lot thread breakage and I have found that after awhile the walking foot on that machine starts to jam up.  So change of personnel:  I swapped my Juki into the table and got it done!  I was even able to use the new add-on guide unit for the walking foot for that machine.  Good thing I had finally caved and purchased it about a month ago.

So now it's done!


Bound with more of the outer border fabric and up on the wall!

So now the side display space is filled with a permanent entry for when I decorate for this season each year!   Hmm, I had to take down the other frame I normally hang there but me thinks I need to find a little seasonal sign to add under it.  If I don't find one, that need might wind up generating a new cross stitch project, LOL!

That will be it for finishes this month but as always there's a lot on the table for July so hopefully there will be more then.  Now I'm headed back over to Quilty Girl Alycia's to see what everyone else has been up to for "Finished Or Not Friday" this week.  Won't you join me there?

Thursday, June 13, 2024

In Honor of National Sewing Machine Day

 As always a lot going on in the studio this week.  I was pleased to find out that today is National Sewing Machine Day.  

We quilters all appreciate how much the sewing machine contributes to our quilty crafting.  In my last post I had talked about wanting to switch over to my Juki machine but as of right now my Singer 401 is still in my sewing cabinet and the project it had been hard at work on was this one:

I had hoped to have finished these but I hit a snag.  I've put the project in time out for a while and then will try to take another stab at it.

In the meantime, a new project has been started:  

These are blocks for "Apple Crisp", a design that originally appeared in the October 2010 issue of American Patchwork and Quilting magazine and is now available free on their website.  

When I started quilting, "background fabrics" for me were almost always light to dark tans because I worked with a lot of shaded fabrics and Civil War reproductions.  However in recent years as I've embraced more fabrics in the brighter modern palette, I have expanded my use of backgrounds to include more whites and white-based "low volume" prints.  

In the process, the darker tans had been languishing but when I saw this lovely project on the APQ website a few years back, I loved its Fall vibe and thought it a perfect way to cull some of the darker tans from my background stash.  Although I had pulled together the group of tans for it a good while ago, the big push to start it now has to do with an upcoming event. 


 Angela Walters is getting ready to do another of her "Free Motion Quilting Challenge Alongs " this time with the theme of "How Do I Quilt It?".  She will be covering stitching designs on Chevron, Log Cabin, Curved and Snowball blocks.  I have a top ready for the Log Cabin session and realized that this was the perfect time to get "Crisp" started since half of the blocks for it are Snowball blocks.

According to the Challenge schedule, Angela will start showing designs for stitching Snowball blocks on July 16th.  If I can stick to a schedule of stitching "Daily Blocks",  I could have the top ready for quilting by then.  I really look forward to seeing what ideas she has that I might be able to use to quilt this one up quick!

However, having made a schedule for daily stitching I did have one issue:  we are going on vacation next week.  In order to stick to the schedule, that means I'll need to take my stitching with me.  Fortunately that's not a problem as I've already put my trusty Featherweight with the travel stuff:

When I took my Juki on my last two travel trips,  I realized something:  the "Catch-All Cutie" I had made a few years ago and love to bring as part of my "sewing machine travel kit" was colored perfectly to go with the Tutto bag I had purchased for toting my Juki machine.  

Rather than having to move that tote between the two travel bags, I thought about making another one that I can leave in my Featherweight tote bag.  I saw some cute "old-timey" fabric on Etsy and knew I still had a little of the "Singer" fabric leftover from making the Featherweight tote bag:

All of this would be perfect for a new "Cutie"!  Recently I also saw that Gaye at Sentimental Stiches had a pair of scissors that I thought went perfectly with my Featherweight so purchased those too (in the lower left) to go in the new "Cutie" bag.  When we get back, I plan to order one of the Lori Holt Red Olfa Splash rotary cutters to add to it as well.  

So as of right now I've cut all the parts out (although still debating between the handle choices on the lower left) and hope I  can get it made up before we leave on Sunday.      

Because it's that time of the year, the Red, White and Blue quilts have gone up for the "Patriotic Season" (May to September) so I also hope to get back to work on these in the coming weeks:

Two years ago, I got as far as quilting the front and back panels for a cover for a pillow for my living room chair so hopefully this year I can assemble and finally finish it.  I also pieced a Lone Star wall hanging that year but could not decide how to quilt it.  

Looking at a picture of it recently,  I suddenly realized exactly how I want to do that.  When we get back, I'm going to try layering it using a glue basting method from You Tube that my MIL has tried and says works great.  If it works for me too, I can get that quilted and hung up --- hopefully by month's end! 

One of the things that had attracted me to quilting was finding out that all of the construction of a quilt  can be done completely by machine.  Having grown up in the days of Home Ec training in school, I was excited to find a new use for a sewing machine.  Over twenty years on, it is still a thrill to put the "pedal to the metal" and get a quilt out of it, LOL!!  I hope you are having an enjoyable time working with your machine today and if not, pull it out and take it for a celebratory spin!   

Monday, March 27, 2023

Back Home From "Vacation".....

We returned on Saturday from our week long visit to see my MIL.  She had told us that North Carolina had some really warm (70+ degrees) days in the prior weeks so we prepared for that.  But it looks like we brought the cold from New York along with us as it stayed below mid-50 degrees for most of the time we were there and only warmed up on the last two days of our stay.   She had wanted my DH to help her with some yard work but he was only able to till a small section of her front yard when it finally got warm.  I harvested some mint that was growing there and showed her how to dry it and use "fill your own" tea bags to make mint tea which is something she likes.  

For me a trip to my MIL's also functions as a mini quilt retreat so for the purposes of this quilty blog, here's what I took with me and what did and didn't get done:

In order to sew away from home, you have to take a machine!

First and foremost, Fanny my Featherweight is my go-to travel sewing companion!  Now that we are back home, I'm cleaning her out (look at all that lint!!) and oiling her up before I stow her away until our next trip.

One of the primary projects I had planned to resume work on was the APQ "Scrap Happy" blocks I started last year for their quilt along.  I have been following Pat Sloan's "Daily Blocks" prompt for March but instead of working on the block she is doing, I've been trying to complete blocks for some of my WIP projects.  

For the first half of the month I finished up piecing the blocks for "Roll, Roll, Cotton Boll" (more on that later) and for the second half of the month, I was scheduled to work on finishing the APQ blocks.  The good news is that I managed to stay on track even though I was supposed to start them on the 15th but didn't get to start sewing them until we arrived in NC on the 17th.  I sewed two blocks for the first few days and our last day there and one block a day for the rest of the trip.  

My leader/ender for that project were my "Scrappity-Do" blocks from a long ago free McCall's Quilting pattern.  When we left home I already had 85 made and would like to get them up to 100.  While away, for every "Scrap Happy" block I made I also made a "Scrappity-Do" one.  

The squares for the bottom three on the right came from my MIL's scraps.

Bonus:  I also was able to cut parts for both sets of blocks from my MIL's scraps as well as bring some more of her scraps home with me to process and add to my scraps stash.

Okay, all of you Yellowstone fans will recognize this one:   

Blocks and top all cut and finished on the trip! 

This is my re-creation of the now famous quilt Beth Dutton wrapped herself up in while staying in the homestead cabin with Rip!  Haven't watched Yellowstone so don't know what the heck I'm talking about?  If you can get access to Season 2 Episode 7 you'll see it (or check out the scene @10:32 in this "Best of Beth & Rip" video).  In my project notes, I wrote down that the shot of it I worked from (as seen in the picture on the design wall) appeared in Season 3 Episode 7 but I haven't been able to confirm that.

Edited 6/23/23 To Add:  I've since confirmed that the image of the quilt I worked from is actually from Season 3 Episode 3 of the show called "An Acceptable Surrender". 

DH and I watch the show and as soon as I saw it, I wanted one!  Well, looks like I'm not the only one as there are people on Etsy offering patterns and/or kits for it and a couple of people selling finished quilts like it.  It's a pretty simple design so I drafted mine in EQ8 last year to get the fabric requirements.  

At the time, I knew that I had planned to stock red prints for all the Red & White Christmas sewing I was going to do.  I did manage to get all that I needed for this from the leftovers in that stash.  I was lucky enough to find the perfect  fabric for the alternate squares in the "by the pound" sale cubes at the Keepsake Quilting/Pineapple Fabrics outlet when we Shop Hopped in NC back in October.  I had a few suitable black and white fabrics in my stash but also purchased a bunch from two Etsy vendors who happened to have a lot of cuts from some of my favorite fabric designers (Fig Tree, Minick & Simpson, Primitive Gatherings, ect).

I've had everything bundled together since the end of last year and this is the perfect kind of "mindless sewing" project to bring when I go to my MIL's.  It took an evening to cut everything up and another three days to sew up the nine patch blocks.  The (diagonal) block rows and top went together easy-peasy on our last day there.  

My MIL hasn't seen the show but when she saw the blocks laid out on a "design bed", she wanted to make one too and is going to start gathering fabrics for her version!  I already have the backing fabric for it that was also purchased on the Shop Hop.  I have an idea for what I want to bind it with but still need to procure that.  I'll print out a couple of pictures of the top so  I can sketch out some options for quilting it.

I also brought three other projects down with us but only managed to get a little work done on one since the rest of time there was spent helping my MIL with some of her quilt projects, we made a few shopping outings, assisted at her church's weekly soup kitchen and visited an ill relative.   

In this bag were the two layered projects that I had hoped to try to quilt on the trip.  The top one is my too long simmering "Modern Twist" quilt.  It's an old Planet Patchwork mystery that I had been stumped all of this time on how to quilt but now think I know the direction I want to go with it.  Unfortunately, I didn't get to that one this trip.  The bottom one is "Christmas Ribbons", the last of the R&W Christmas projects I made up at the end of last year.  I had thought I might be able start the quilting on this but ran into a problem with the label area I had pieced into the back when I layered this before we left.  

I had pieced the label area into the left side of the backing but when I finished the layering, found that it extended past where the top would stop on the front.  Since it has two star blocks as part of it, cutting part of them off just wouldn't do!  Measuring, I realized it would fit on the right side just within the boundaries of the top.  So once at my MIL's,  I unpinned the area where the label area was pieced in and "unsewed" the section and replaced it with some more of the fabric used on the sides of the backing.  Then I had to unpin an area on the right side, cut out a section of the fabric used there and insert the label panel on that side and then re-baste both sections.  Whew!  

I had to wait a couple of days to do all of that because my MIL had a quilt laid out on the table she uses for layering and on our second day there we went to purchase batting for it.  However when she pulled out the batting the day after, we discovered a problem with it!  So while we waited to go exchange the batting, I was able to slip my project onto the table and make the correction I needed to do.  Unfortunately, there was no time in the days remaining to work on the quilting so that will be a job to take up now that we are back home.

The last project taken on the trip were all the string and pieced blocks for "Roll, Roll, Cotton Boll".  My MIL had told me her design wall was empty so my plan was to pop these babies up on the wall, work on the layout and maybe get that top sewn together.  However, when we arrived, my MIL wanted some help with some Drunkard's Path blocks she had learned to make at a recent guild workshop.  We wound up needing the design wall to work out an alternate layout for the blocks so I focused instead on the piecing projects I brought with me and the rest was history!

Now that I am back home, finishing up the last week of "Daily Blocks" with the APQ project and working on the raffle quilts for my garden will take precedence in the coming days.  I may even start laying out the "Scrap Happy" blocks on my design wall and see if I can't start piecing together that top even as I finish making the last of the blocks.  We'll see how the work for March rounds out by week's end!