Showing posts with label Two-Color Quilts. Show all posts

Friday, May 16, 2025

For Finished or Not Friday: One Quick Finish and One UFO

Happy Friday and welcome in for another edition of "Finished Or Not Friday"!


As always we are hosted by the lovely Alycia at Alycia Quilts, well known for her work making, quilting and showcasing quilts awarded to veterans through the Quilts of Valor program.

This week I have two finishes to show:  one that was quick and one that has been a year in the making!  Okay, maybe it's actually just been sitting around for a year but that's all water under the bridge once it gets to the "finished" stage, LOL!!

The Quick Finish:  A Mug Rug Gift

I have a friend that I have made a number of things for, most of which she had used to decorate her work cubicle at her office.  Since the pandemic, her job has retained the policy of remote work so she only has to report into the office once a week.  As such she was recently attemping to spruce up her home work space.  She mentioned she planned to pull out all the things I had made for her and put them into service there.  Of course that led to a discussion of the very first piece I made her:  a mug rug replicating a Kaffe Fassette design:


I made this because she attended her first (and only) quilt show with me back in 2013.  She is not a quilter but fell in love with Fassette's quilt "Girder" that was hanging in the show with all the other quilts from his "Shots and Stripes" book.  Unfortunately, that rug was taken from her desk some years back!  

While I did make her a "keyboard" themed one a few years later (which is pictured later in this post),  she asked me if I might happen to have an extra mug rug laying around that she might add to her setup.  I didn't but then was inspired to make one for her (in secret) when she showed me another new addition to her desk setup:


As soon as I saw this lamp I was like: "Oh, I've got to do this!"  First of all, I have never made a "stained glass quilt" although I've always wanted to try one.  What better way to take a first stab at a technique than a small project like a mug rug?  In addition, I had recently purchased these:


I had this set of Creative Grids "Crazier Eight" templates on my Amazon wishlist for a few years.  It just so happened that about two weeks before our conversation, a Warehouse "Used But Good" set came up for half the normal price.  The  prices on Creative Grids products are tightly controlled so are almost never on sale.  Needless to say as a "Gadget Fanatic",  I couldn't pass that deal up!   Now I could also immediately see trying out the templates by using them to make the stained glass piece.  So I dug through my batik stash for yellows and other fabrics that ombered to that color and came up with this:


As the name implies, there are eight templates to make a block but I split the piecing in some of the templates in order to be able to use a few more fabrics and make the stained glass effect come through a little more.  The "leading" print also came from stash.  

I also wanted to give a nod to the butterfly featured rather prominently on the front of the lamp and I knew just how to do that:

I have an old compact Bernina Deco embroidery machine that I purchased used off of eBay a while back and love when I get an opportunity to make things with it.  The great thing about the purchase was that it came with a full set of embroidery threads in a rainbow assortment of colors and so far for everything I've made with it, I've had the color threads needed.   

To give you an idea of how old this machine is, I am unable to download designs to it so have to purchase dedicated "design cards" for it.  It did come with one of those blank card readers but my laptop (which at the time of purchase was running Windows 10, that's how long ago this was) didn't support it.  So now I regularly troll eBay for low priced design cards that have images I am interested in using.  I also lucked up and was able to start the collection of ones I have when I was able to pick up a whole bunch of them at a guild destash sale from someone who had a newer machine so no longer needed them.  

The butterfly design I used came from this card:

First I ran a test of it using what I had that was close to the prescribed colors.  That allowed me to test the size adjustment I made to the design to fit the template section I wanted to stitch it on and see how it stitched out.  For the final design, I chose threads closer in color to the butterfly on the lamp.  Then I layered and quilted it and this was the finished piece:

After she received it, she sent me a picture of her set up!

You can also see the keyboard mug rug here as well!


The UFO Finish: "Roaring Waves"

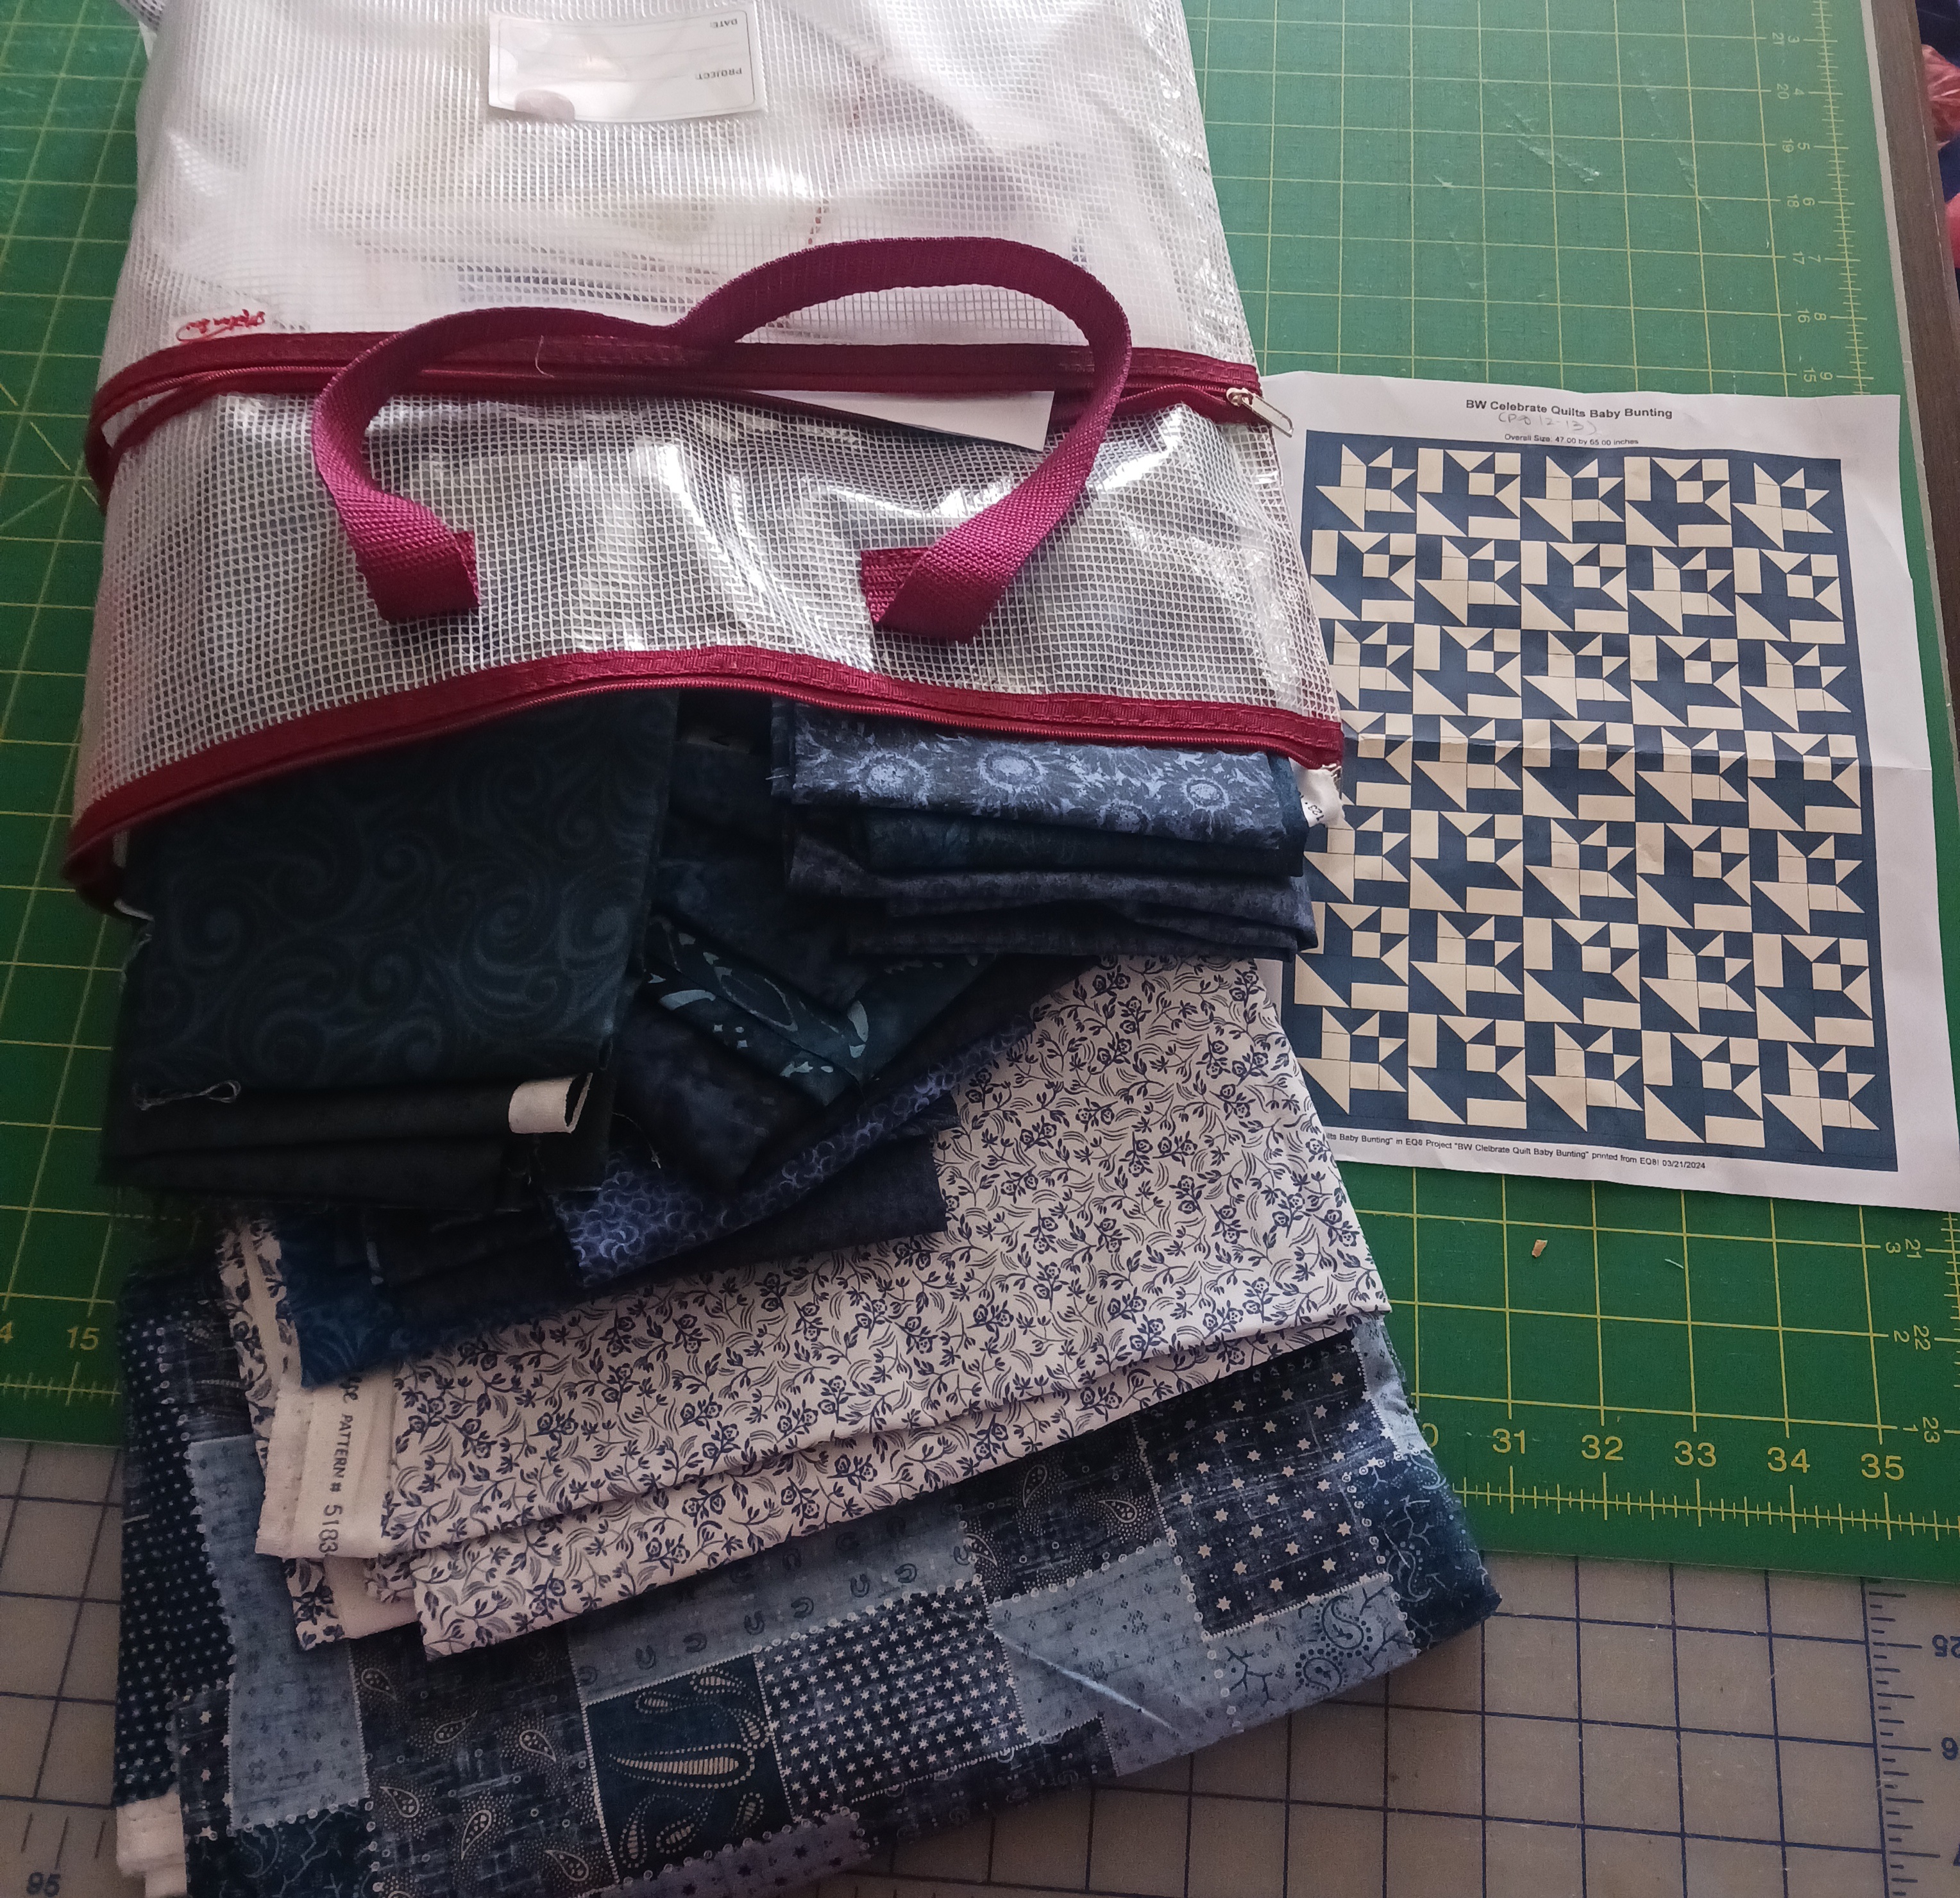
My other finish is that I finally quilted a top I made up in March of last year.  After making two blue and white quilts back in 2022 for winter decorating,  last year I decided I wanted to make a few more to use for decorating into Spring.  It started with this fabric bundle purchased on the Annie's Attic (then Annie's Catalog) site during one of their fat quarter bundle sales (and is still available now here):

After purchasing it, I happened to see this "color option" design on the American Patchwork and Quilting website:

I could immediately see almost all of the bundle fabrics plugged into the bargello-style design.  I raided my batik stash and a few project stashes to come up with this array....

...that eventually became this top!

I even layered and basted it that year.  And so it has sat until I could figure out how to quilt it.  I was definitely considering going along with the "waves" theme and did try to sketch out something along those lines:


But it wasn't until viewing Angela Hoffman quilting on the #3501 episode of the "Fons & Porter Love of Quilting" TV show that I found something I really liked.

However, I wasn't totally confident about being able to free-hand quilt the waves evenly.  Then I remembered I had a wave ruler:

However I didn't want that deep a wave and the spacing wasn't right.  Doing a little research, I found out that Handiquilter actually has a few different wave rulers and it turned out that they had another one that was perfect for what I wanted to do.  The peaks and valleys of it lined up perfectly with the piecing on this quilt.

It took me about a week to complete the quilting:


And now it's done! 

Front

Back

It's a square quilt and will be used as a wallhanging.  As usual the lesson here is that sometimes a quilt takes a while but it is always satisfying in the end to get it done!

There are many more finishes and progress reports over at Alycia Quilts for this week's "Finished Or Not Friday" so go check them all out!

Monday, December 30, 2024

7 Days of New Year's - Day 5: Finally Back To the Quilting!

After days of focusing on cross stitch, it feels good to finally get back to quilting!  In yesterday's post, I mentioned that at one point my cross stitch work got held up by work on three late Christmas quilting projects.  Two of those weren't finished, one of which was the "Letters To Santa" quilt that despite an early "Christmas in July" start, only got as far as having the borders finally added...

....and the backing made up.

I should also note here that the companion "Letters To Santa" cross stitch while further along than it was in the Summer....

Stitching done from the Summer until now....

...was bumped to work on the piece for my MIL that I talked about finishing in the last post.  I should note that my MIL's gift will be on its way to her the day after New Year's because I now need to bake up a fresh batch of the peanut butter cookies I usually send her.  My husband works for UPS and said if I mailed the ones I had baked last week today, they might wind up sitting and not get delivered until after New Year's anyway.  So I'll make a fresh batch on New Year's Day and in the meantime we don't mind munching on the ones from the batch on hand!

The second project was a new one that I actually made up surprisingly quick after realizing I needed another display quilt in what was supposed to have been this year's Red/Green/Black/Gold color scheme.  That happened because I saw this tutorial in with my Christmas stash.  I found it as I re-organized that stash into a new storage container when I set up to resume work on the "Letters To Santa" top:

Another great storage bin, this one is from Michael's.

It was easily strip pieced using a bunch of busy fabrics pulled from the stash:


The good news is that the backing for this is also already made and the binding cut.  So now it and the "Letters To Santa" quilt sit awaiting quilting in 2025.

So the one thing I did mange to finish in the lead up to Christmas was my Red & Green version of the Temecula Quilt Company's "12 Days of Christmas" mini quilt.  

This design was offered as a quilt along all the way back in 2011 and I had made up tops in three different colorways back in 2020:

In 2022,  I finished the Red & White version (on the right) for holiday decorating that year.  This year since the Red & Green version (on the left) fit my intended color scheme, I layered and quilted it and it went up on display (along with two other older quilts) in time for Christmas as you see in the first picture above.  

To get it done meant I had to quickly decide on a quilting scheme for it.  I had forgotten how simply I had quilted the Red & White one:  for that I had just outlined the blocks, cross-hatched the side borders and stitched straight lines across the top and bottom borders.  

Reviewing that made it easy to decide to quilt this one even simpler:  For it, I outlined the blocks and just straight line stitched around all the borders, following the path of the side border stripes and the lines of words in the top and bottom borders.  

When that got done in far less time than I expected,  I decided to also finish up the last Blue & White one during one of the "7 Days" sessions which was the task for today.  So like for the Red & Green, I spray basted the layering and then planned the quilting.  

For the quilting I again outlined the blocks.  Quilting the sashing was easier than for the Red & Green since like the Red & White version, this one employs sashing squares so it was easy to stitch straight up and down the sides of the sashing columns and then across the sashing rows.  For the borders I went even easier than the prior two:  I just free-motioned all the borders with loops and swirls.  

Done!  The binding had been picked out when the top was made back in 2020.  As I did for the Red & Green, I used Edyta Sitar's "Faux Double Fold" binding method that uses 1-3/4" cut strips.  The binding strips were attached to the front with the corners mitered in the traditional manner, folded to the back (see Edyta's method in her video for that) and then machine stitched in the ditch from the front to secure the folded edge on the back. 

So that's another project completed for the "7 Days" sessions!  When I checked my email today I had received a notice that Kari Shell was running one of her free EQ8 workshops for a Winter mini wall hanging.  I signed up for the evening session for today although there is another session scheduled for tomorrow if you are interested.  So with this quilt done,  I checked that out as the last thing (before posting this) for today!  

Tuesday, April 30, 2024

April Recap: Still Busy and Now Blue (and White)

Warning:  As usual since this is a month long recap, it's pretty long so strap in!

The busyness of the last two months has continued a pace.  Our community garden's Season Opening/Earth Day Celebration on the 20th went well.  

 "Mother Earth" (Our Garden President) and some happy Butterflies celebrate the day!

Being in charge of organizing the garden's set up for the day was stressful right up to the end!  While glad to have done it and with ideas for improving it next year,  I would also be more than glad to hand the reins to someone else next year!

As noted in my post for March I had started a blue and white Bargello quilt for decorating for the Spring season.  That quilt is now basted and while I have tried sketching out designs for quilting it, I haven't settled on one yet:

One other thing we were also waiting on this month was word of the health condition of my MIL's ill sister.  Unfortunately, the day after the garden event we were told she lost her battle with lung cancer so now we are organizing things for a trip back down to North Carolina for her funeral.  

My DH and I will be staying at my MIL's house and although it will not be a long trip (this Thursday until Sunday),  I am also packing for our usual mini quilt retreat.  I had gone down to comfort my MIL when her husband passed away in 2020 and had found that what time we could spend together quilting helped blunt the pain of the grief she was feeling so I want to be ready to do that again.

While I had put together the Bargello quilt, I had ideas for two more blue and white quilts.  One was based on a Fat Quarter bundle I had seen on Etsy while shopping for fabrics for another quilt (and more on that later).

Fat Quarter and Half Yard Bundles available from Neemerone on Etsy

As I have noted in the last two years, my new "go to" easy quilt design is the "9 Fat Quarter Disappearing Nine Patch" that I learned about from a You Tube video.  I have finished two so far:

The Last Dash and Lavender Love

When I saw that the FQ bundle above contained nine fabrics, two of which were Grunge, I knew I had to have it and knew just what design I'd make it up in!  However, I replaced the Grunge pieces it came with and added those to the stash I am trying to build of those fabrics.  

The light blue Grunge in the bundle was replaced with a tone-on-tone fabric that was used in the Bargello quilt.  When I realized that it would work here too, I was fortunately able to find more of it.  The white Grunge was replaced with a light batik from my stash.  So that top is now done too!

The fabric bundle was anchored by four indigo prints from Debbie Maddy's "Yukata" line for MODA.  Debbie's Shibori dyed fabrics are reproduced by MODA for her fabric lines.  Ironically,  I have a label panel of MODA designers and one of the labels happened to be by Debbie Maddy!  So of course, I had to use it for this quilt.  

To do so,  I purchased some yardage of a print from one of her other lines ("Kawa") and used that to make the backing for this quilt.    

This has now been put with the things I plan to take down with me.  I am hoping I might be able to quilt it on my MIL's longarm while there.  

It should be noted that this is actually an alternate project to take along.  Originally my plan was to take my Juki sewing machine down with me and resume the quilting of yet another FQ Disappearing Nine Patch quilt I had started as a gift for one of the Steering Committee members of my garden.  

What's funny is that I hadn't unpacked this machine since I took it with me on our last trip down to my MIL's back in February!  However, as plans for family members to attend the funeral got underway, the plans changed to having us ferry some relatives down with us in our car.  That means we would not have as much cargo space as originally planned.  So I decided that I would nix taking the Juki in favor of taking my Singer Featherweight and the new FQ Disappearing Nine Patch project both of which will take up less space than what I originally had planned to bring.

I am also taking another top that I had made after our trip to my MIL's last Fall for the All Carolinas Shop Hop.  I had expected to long arm it on the trip in February but didn't get to it.  So it and the batting for it are also packed.  

I had also planned to bring a scrappy piecing project:  Bonnie Hunter's "Shoo-Fly Shoo".  However, now that plan has changed too.  Ironically, all the recent blue and white quilt project setups had actually started with finding a blue and white fabric picked up when I had visited my MIL in 2020.

I had gotten this fabric as part of a scrap bag I purchased on our first trip to the Keepsake Quilting/Pineapple Fabrics Outlet which had opened that year.  I had come across the scrap bag in March while cleaning up my quilt space and was surprised to find that this "scrap" piece was actually a little over a yard!  After I had put out the few Blue and White Quilts I had for Spring, I got the idea to see if I could find a design that could utilize this fabric to make up another one.  That is when I found the Bargello design but then realized that I already had other fabrics in house to make it.  However, I still wanted to find a design that could use the "scrap" fabric.

In mid-April, Pat Sloan previewed "Celebrate with Quilts", the new book by Lissa Alexander and Susan Ache in one of her daily videos in anticipation of a Quilt Along.  I thumbed through the book along with her since I had picked it up when the Fat Quarter Shop ran a book sale at the end of last year.  That's when I saw this quilt using the "Baby Bunting" block from the book:

Since one of the Blue and white quilts I have on display is this mini I made back in 2017:

I immediately thought the blue and white "scrap" print would be great made up in the "Bunting" quilt and I'd love having another quilt with a basket design!  A bunch of blue fabric purchases later and yet another blue and white "kit" had been established.

With the adjustment to our travel plans, I figured that if I take the FQ Disappearing Nine Patch quilt, I'd just as soon take the piecing for the "Bunting" quilt along instead of the scrappy project.  So I've prepped the block sets for it.

The book gives instructions for making this block in four sizes and my plans are to make it in the nine inch finished version for the lap quilt size I want to make.  The good news there is that all the pieces for the block could be die cut since I have the 9" Cube set from Accuquilt:

This is the first time I've used it!

Of course I am also taking cross stitch with me for the drive down and back.  I admit with the garden work,  I had been too distracted (and pooped) to concentrate on the "Harriet Tubman" piece I had been working on.  Then I saw a You Tube video where 123Stitch.com announced they were doing a Spring Stitch Along!  Although I have shopped with them, I had not been aware before then that they A) had a You Tube channel or B) hosted Stitch Alongs.  So with the usual nod to "squirrels" and FOMO,  I had to make plans to join in!

What I liked about the design they are using is that it is a Lizzie Kate pattern and that is a designer I have not stitched before.  I also liked that they were going to use a decorative button to complete part of it.  Of course, I then decided to take it to the next level:  my plans were to do less stitching of the motifs in it and use even more decorative buttons to create it.  So I found these on Etsy:

A chance to try a new way of embellishing a CS project.

However, while I will take this with me it is not what I'll be stitching on the way down.  At the time I had set up this project, I thought I had an empty project bag to put it in but couldn't find it.  During the AC Shop Hop in the Fall, I had picked up pieces of an older line of Pat Sloan's fabric.  I had decided that I'd use it to do another popular Cross Stitch thing:  make a project bag out of it!  

Not content to just work with the fabric, I noted there had been a pattern I had seen a while back that I had liked and realized it was the perfect thing to incorporate into the project bag.  Luckily enough when I went to look for it, it was on sale so yet another cross stitch project was born!  

This is also another chance for me to practice stitching on an Evenweave fabric.  I had started doing so for last year's Stitch June and I am hoping that this even easier stitch will get me in gear to resume that project.   Actually it looks like I will be attacking this frog design another way -- I see I already need to do some "rippit, rippit", LOL!!  I am hoping that I can finish it during the trip and can start the 123Stitch SAL project during the ride back.  We'll see!  

April has once again been a whirlwind, let's see if May will calm down a bit for a change of pace!

Tuesday, March 5, 2024

February Recap: Part 2 - A Little Valentine's Day Prep

 More on the February doings:  After enjoying Pat Sloan's Red and White quilt display at the beginning of the month, I realized that my own display that was up at the time needed some enhancement: 

So at the last minute I decided to make a little Valentine's Day wall filler using Pat's "Hello Luv" design.  Although it later appeared in her "Holiday Celebrations" book, I had originally picked up the pattern when she made it for the Fat Quarter Shop's Button Club back in 2019.

Pat's Button Club version

My addition to my Red and White display!

For the block units that make up the larger four patch "Hugs" and "Kisses" blocks, I had gone the die cutting route and used my Accuquilt 4-1/2" Finished Signature die and the 3" finished HST triangles on my Churn Dash die to cut out the pieces.  That made my blocks and wall hanging a little larger than what's patterned.  

Updated 3/6/24:  Now a smaller version of this same design is one of the blocks in Pat's "Block Wednesday:  What's In Your  Your Closet" mystery quilt along! 

Where Pat had used the buttons from the club to decorate  the X's and O's,  I am only now noticing the buttons in the center of the X's so didn't do that.  I did put something in the centers of the O's though.  Continuing with the "make it fast, cut it fast" scheme, I picked a heart applique to put in the center of my O's.  Originally, I thought I'd use the 2" Heart from their basic "Heart" applique die but instead chose to go with the Heart from the “Heather Feather #2” die by Sarah Vedeler.  

To further hasten the finish, I once again decided to save some time on cutting and assembling binding and pulled out my usually trusty "Quick Easy Mitered Binding Tool"....

....to turn the simple backing (with label area added) to the front! 

I say "usually trusty" because when I tried this technique back in January for my "Old Tobacco Road" quilt, it was the first time it did not work for me.   

I had started this one a few days before Valentine's Day and finished it up right on the holiday!   However, the holiday was only three days before we were scheduled to leave so it was now time to focus on packing!

There still a lot more to February, so watch for more posts this week!