Showing posts with label 2014 Finishes. Show all posts

Wednesday, December 31, 2014

Last Post of the Year: The End of Final Clearance and a Linky Era

It turned out my "Final Clearance" push did not go as well as planned.  I had hoped to be able to focus on at least four quilt projects once Thanksgiving ended but only managed two between all the holiday doings and both were new projects for Christmas.  I had been stressing about trying to get the last one to a flimsy before the year ended until I took a "motivation break" to do some catching up on Bloglovin'.  One of the first posts I read was Barbara's Cat Patches blog post for the December NewFO link up.

http://catpatches.blogspot.com/2014/12/december-newfo-linky-party-and-giveaway.html

However, reading further I got the bad news: after three years of hosting this fun monthly get together she will be ending the run of the NewFo link ups!  I have enjoyed adding a link to her lineups on more than a few occasions because this is the one place where starting is more important than finishing!  While I hate to say good-bye to this tradition, this is also an opportunity to take some of the pressure off this last project.  I'm joining in to honor it's start since I know I can't nudge it to a finish for now. 

This is "High Strung (Plus 2)" the cover quilt from the book "Tis the Season" by Jeanne Large and Shelly Wicks, a Martingale book


I call it "High Strung (Plus 2)" because for my version, I've added elements from two other projects in the book: in the lower part of the top, the stars and circles are from "Holiday Stars Runner" and the Reindeer is from "To All A Good Night".  Right now the Reindeer looks more like a dog but he'll improve when I decide on the fabric to use to add his bell harness.  All the background fabrics are cottons from Connecting Threads and all the appliques are made from flannel scraps in my stash.

The other completed NewFo this month was a holiday runner from the book "Skinny Quilts and Tablerunners II" edited by Eleanor Levie:

 
A funny story about how I got this book:  I had added it to my Amazon Wishlist after seeing one of the runners from it in a recent Martingale blog post.  About two weeks later, I got a package which according to the note attached, someone had chosen to make a random selection from all the Amazon wishlists to gift me the book!  They asked that I not contact them to thank them but view it as a "pay it forward" opportunity.  I got to do that a few days later when I manned the evening order pickup table for the frozen baked goods fundraiser for my son's school.  One of the parents who had participated (and who was pregnant and at a midtown meeting) had forgotten to come pick up her order even though I had confirmed the date and time with her a few days before so I personally delivered the two boxes of items to her home after finishing that night. 
 
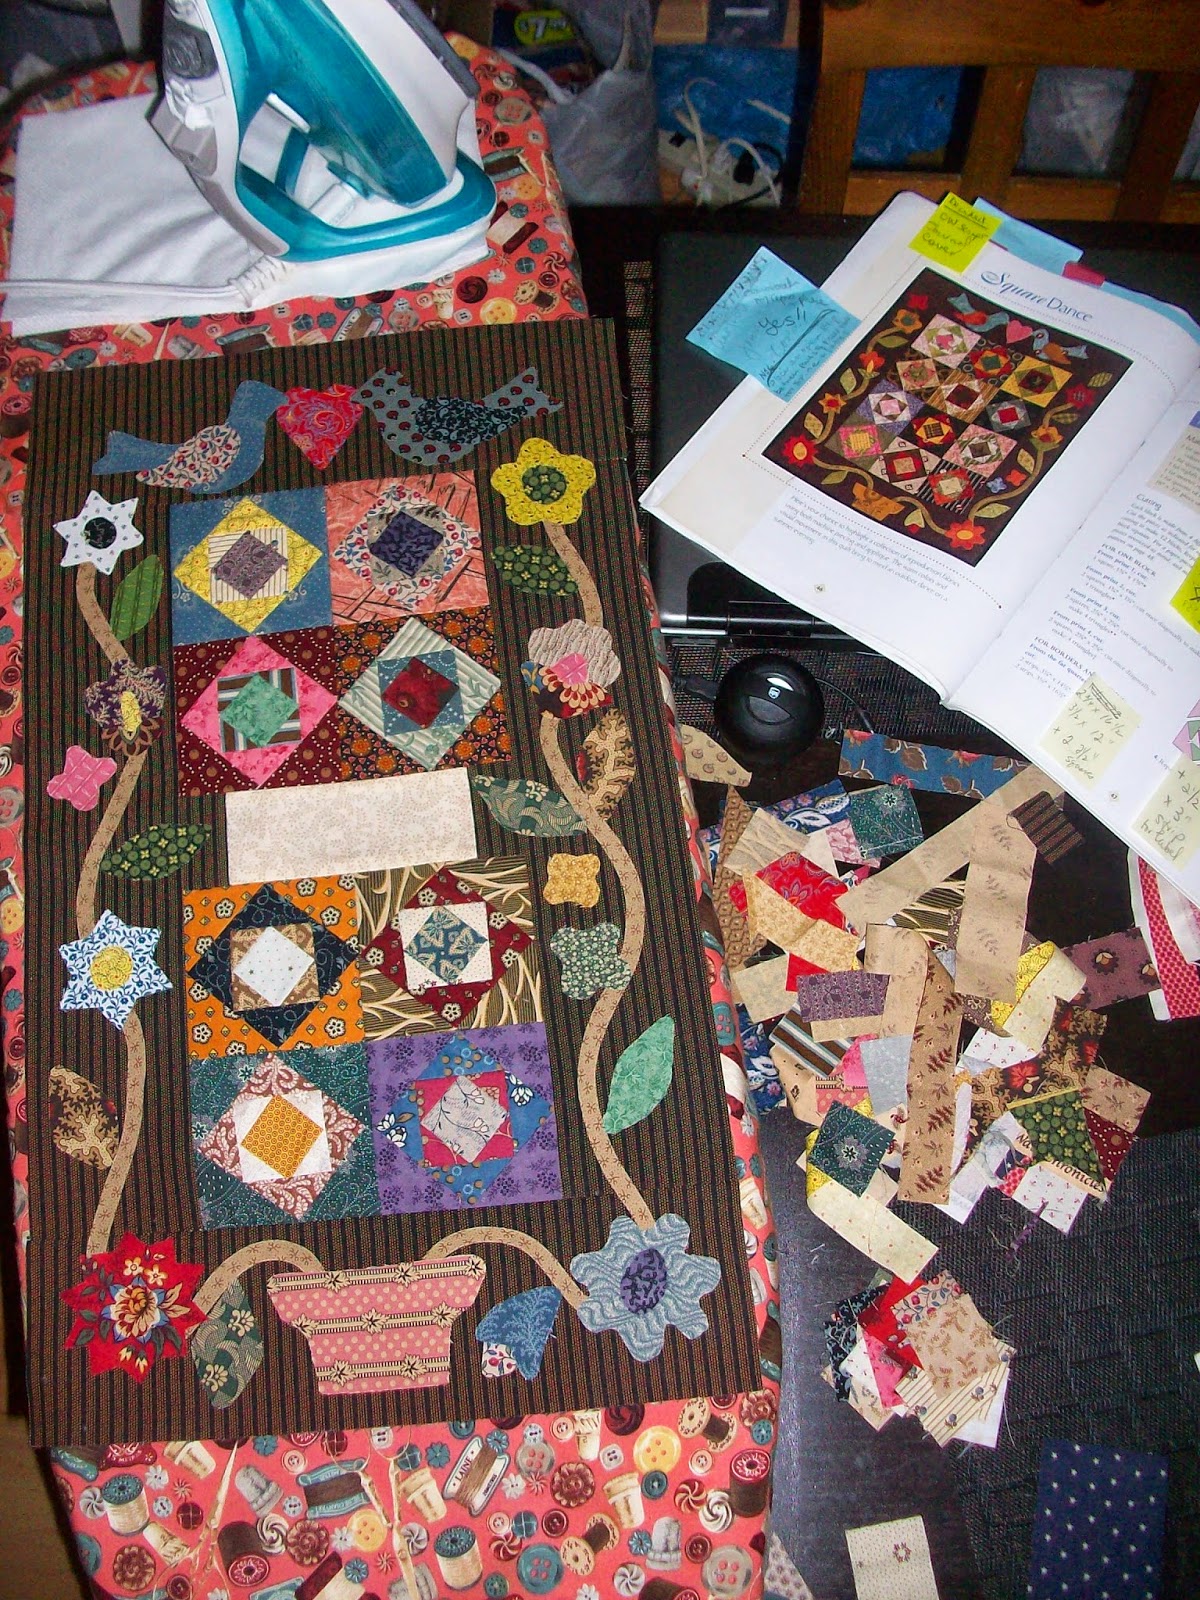
The inspiration for the project I did was Linda Lum DeBono's "Birds of a Feather":


I was looking for a quickie runner project to decorate the dresser we use as a sideboard in the dining room.  I realized that I could substitute the bird appliques with a focus fabric, in this case a lovely poinsettia print in my stash of holiday prints. The stash also provided enough coordinates for the frames around the poinsettia panels, the striped panels next to them, the shirred center strip, and the pleated ends. 


For the back, my intention was to just cover it with what I had left of the poinsettia print since it would make an nice reversible mat that way.  However, I didn't have enough to cover the whole back with what I had left of the print so needed to add something to fill it out.  I liked the idea of doing a paper-pieced candle but all the block patterns I found weren't big enough. I wound up drafting up my own pattern to fit the space. 


In the end, I wound up preferring the "back" when I put it out for display!


And as has often happened in the past, these NewFOs also make perfect "Let's Book It" entries too so I will end the year by also linking up with Sharon over at Vrooman's Quilts (and look to do so again in 2015)!

http://vroomansquilts.blogspot.com/2014/12/lets-book-it-december-2014.html
Remember, even though you won't be able to link up NewFOs,  you can still visit Barbara and her cats Smitty and Gracie over at her Cat Patches blog.  I and my family wish you and yours a very Happy New Year full of fun, friends, family and of course Quilts!!

See You In 2015!!!

Sunday, October 5, 2014

3rd Quarter Finish Along Check In

http://www.the-littlest-thistle.com/2014/09/finish-along-quarter-3-finish-party.html


The Bad News?  Despite the long list I hoped to complete for the 3rd Quarter, I only managed one finish.  The Good News?  It's a gift for my neighbors that I am very happy to be able to finish and give!


This was #4 on the 3rd Quarter Finish Along List I posted here.  It's now dubbed "The Mack's Morning Catch" from the pattern "Morning Catch" by Rochelle Martin of Cottage Quilt Designs from her book "Man Cave Quilts".  


I did it up in batiks taking the fabric cues and color scheme from the pattern but added the bobber and tackle box applique from the book "A Star "4" Every Season" by Kansas Troubles.  I also changed the names of the fish used in the pattern to the types of fish in our local waters.  While the fish applique at the bottom was also made from a batik, the others were cut from regular quilting cottons.  The words, fishing rod and bobber were made from Windham hand-dyes leftover from another project and some Cherrywood fabrics from sampler packs that I had purchased at a quilt show a few years ago.

Some detail shots:


My favorite fish....


 although these came out pretty good too.


 The "fishing line" is pearl cotton couched on to the top.


The tackle box is made of a brushed cotton plaid and flannel from my scrap stash.


You can really see the quilting on the back which is also flannel.

      
It took me a while longer to complete than I thought it would and it's been hard to get good pictures because it has been cloudy the last few days.  But I needed to get this done if I was going to make the quarter reporting deadline!

This wasn't the only thing I worked on this quarter.  They don't rank as a finish (which is why I'm not reporting them separately), but I was able to move #2 on my 3rd Quarter list, the two Civil War Repro lap quilts, to the flimsy stage:


While I'm still in quilting mode, I'm hoping to get these quilted up over the next week (although knowing me, it will probably will wind up taking a few weeks).

Now that I've checked in, it's time to go see what everyone else got done! If you want to see that too, head on over to Katy Cameron's blog The Littlest Thistle and see all the other lovely quilted goodness that was completed this quarter!

http://www.the-littlest-thistle.com/2014/09/finish-along-quarter-3-finish-party.html

Sunday, June 29, 2014

Catching Up On June - Part 4: Last of the 2nd Quarter Finishes

I present to you what will probably be the last of the 2nd Quarter finishes:  the last of the new journal covers!


As noted in the previous post, I used scraps from my Civil War Repro stash to make the "Square Dance" quilt from Lori Smith's book "Fat Quarter Quilting".


Usually, I make these covers free form but the design from this book was already almost perfectly sized to make the cover.  I just had to adjust the design down slightly to add a label area and make it fit the binder it had to go around.   As you can see from all the tabs I have in  this book, I like a lot of the designs in here and also have picked out two other designs for two more future journal covers!  I love Lori's "From My Heart To Your Hands" designs and have a bunch of her "Fit To Frame" patterns (and the frames to put them in) that I hope one day to use to do a series of  them to display in our entry staircase. 

I'm also very happy to have gotten the three binders pledged for the quarter done. 


I'll either be back next with an update on the lap quilts or the Finish-A-Long wrap up post.  In either case, see you soon!

Tuesday, June 24, 2014

Catching Up On June - Part 2: Two more 2nd Quarter Finishes

As noted in the previous post, this month the 2nd Quarter Finish-A-Long will come to a close so I am pluggin' along trying to get some of the things remaining from my list completed.

I finished this on the last day of May:


It's the companion project to my "Sweet Land of Liberty" quilt (my BQF entry posted here) and they hang in the same room.  The eagle and the star are in wools, the rest of the fabrics are cottons and all of it came from scraps or stash.


"Let Freedom Ring" was a project from the Summer 2013 Primitive Quilts & Projects Magazine.  The original design had embroidery on it, something I was hoping to get back into with this project.  But pressed for time,  I took a shortcut and stitched the words on my sewing machine with a triple straight stitch.  I also eliminated the branch embroidery in favor of adding quilted feather designs using what I had hoped would be a "slightly" contrasting thread, an idea I got from this post on the Ivory Spring blog.  The thread I finally settled on using stitched out much darker than I expected reminding me once again that I really should test my quilting threads on a practice piece before doing the actual quilting.  But once the quilting was done, I was statisfied that this little piece would hang high enough to mute the impact of the stitching a bit and more importantly to me (at least for this project) it was done!

So far this month I've also finished the second of the three journal covers I wanted to make this quarter (the first was posted here). 


It was fun to pull all the bits that went into this one.  The label on the spine was stitched onto some ribbon I had on hand using the monogramming function on my machine and the roses were all that was left from a pack I had bought six years ago to add to the label of one of my other quilts. The front block was one of the class projects from the online Hand Applique course I took back in 2010 from Quilt University (which is sadly no longer in business).


The back is a block I also hand appliqued.  The pattern for it was from this book:


When I make these covers they are a "scrap quilt challenge project" for me and I try to pull as much of the fabrics for them from my scrap bits. The ribbon over the join between the two backgrounds was also in stash and was couched with one of the decorative stitches on my machine.


Once again, it pays to pay attention when setting up a block for applique.  While I am satisfied with the result (these binders sit on shelf most of the time), I was a little disappointed that I didn't render some of the elements of the flower block accurately because I relied on memory and what the pieces looked like when cut with seam allowance rather than taking my cue from the actual picture of the block as I went from step to step.  Another lesson for the future (particularly if I ever decide to do competition quilts!) but in the end I'm more than happy to be able to log another finish.


Even the inside lining and flap fabrics were from project leftovers and the binding was a fat eighth from stash (and is now all gone).  Another thing I've got to watch is that I was afraid to crowd the applique but was then a little too generous with the dimensions and seam allowance of the cover so it is a little big for the binder.  On the last binder I actually made it a little too small and had to scramble to get it to fit that binder.  The good news, is that I have one more that I hope to get done before month's end so will have another opportunity to perfect my method for making these. 

This project also gave me some free motion practice doing echo quilting, a technique I haven't employed before.  I got to use the echo quilting foot that came with my machine and used the guidelines to control the spacing. 

Picture courtesy Janome.com


My thanks to Amy at Amy's Freemotion Quilting Adventures because I didn't know that was what that foot was for until I read it on her blog!  I thought it was just for stitching over bulky seams.  So that's all the finished stuff to date but there will be some more "in progress" posts and hopefully at least one more finish post as the week moves on.

Thursday, May 22, 2014

Bloggers Quilt Festival Entry - Spring 2014

http://amyscreativeside.com/2014/05/16/bloggers-quilt-festival-spring-2014/

I wasn't sure I'd finish this project in time to make the festival but luckily I made it!  The festival is being hosted by the wonderful woman who pioneered this festival six years ago,  Martingale author Amy Ellis.  This will be the fourth time I've had something ready to actually enter in the festival but I always make sure to view the entries because you get to see so many great projects and find great new blogs to follow and inspire you.

My entry this time is my "Sweet Land of Liberty" wall hanging which fits in the Small Quilts category.


This is the full on finished shot but here's another one so you can see the quilting detail:


The Basics:   
 My quilt finished at 34" x 39" to fit the space I want to hang it in and to best utilize the fussy cut print I used for the center.  It is based on the "Liberty Hall" pattern from the Summer 2008 "Easy Quilts" magazine issue and was designed by Jill Reid (who I was sorry to hear just passed away recently).  I recently saw this same pattern featured in the new "Best of Fons & Porter - Patriotic Quilts" book published by Leisure Arts.  The quilt was designed to be 54" x 63" so I had to adjust my block, header and letter sizes accordingly.  All the fabric used is from stash.  It is layered with wool batting (I used leftovers from another project) to help make the center motifs "pouf" up:


You can stop here if you like and if so follow this link back to the Small Quilts page of the Festival so you can check out the rest of the projects being displayed and thank you for visiting!  However, if you are interested in a little "process" blogging, feel free to continue on!    

*  *  *  *  *  *  *  *  *  *  *  *

The Process Details:  

Every quilt has a story and made a journey to its completion and this one is no exception.  The journey for this quilt started back in 2002 when I first started quilting.  Right off the bat I liked red, white and blue quilts so part of my very first fabric order was a "Lady Liberty Half Yard Sampler" from a Quilts & Other Comforts catalog.  There were the obligatory red, white and blue prints in the sampler but also this one (which I've since learned was from the "Peace & Plenty- Quilts For A Cure" line):


 At the time, I didn't know what I might use the print for but much later I saw the "Liberty Hall" pattern in "Easy Quilts" magazine.


The original quilt used a printed panel for the center but I just knew my "Liberty" print would make a great substitution.  When we moved a few years ago, I realized I now also had a good spot for this wall hanging and decided last June that it was finally time to make it.  Over time, I had collected many R/W/B fabrics.  One in particular was the Brown and Red Stripe with Stars print used in the header of the quilt which as soon as I saw it, thought it was perfect for this project since it would allow me to eliminate the appliqued stars in the header in the pattern.  I was able to pull everything else I needed also from stash.  

When it came time to add the letters in the header, I wanted something different and decided to fussy cut them from the cream stripes in this Anna Griffin fabric leftover from another project from four years ago:

 
with this result:


Unfortunately, once I got the top and backing done and layered, it sat around for a long while since I had a lot of  older UFOs that I was also trying to eliminate.  Having gotten many done in the last six months, I was finally ready to vanquish this one as well.  I had recently purchased some straight and curved rulers for quilting (based on this review) which I used on another recent project and thought I would use a lot on this project as well.  But I actually only used the curved ruler to free motion quilt the spines of the feathers and only used the straight ruler to help guide the walking foot when I was stitching over the plain fabric squares and rectangles (when I quilted over the nine-patches I just eyeballed it from corner to corner).  The hardest quilting was the close stippling done around the center "panel" motifs (as seen in the picture in "the Basics" section).  It was a lot of stops and starts since the backgrounds around all the elements weren't always connected.  

I added the red border between the header and the body of the quilt and around the center "panel" because I felt they needed the extra separation after I began laying out the blocks on my design wall.  But because I had already worked out all the adjusted measurements, I couldn't add in a traditional skinny border since it would throw everything off.  So what you see is just a thin strip of fabric folded in half (wrong sides together) and stitched between the seams.  The curved corners in the center "panel" was from a circle, faced and cut into quarters and also inserted into the seam. What you see finishes to a little less than 1/4" so as not to cover up too much of the print details.

In the end, it should also be noted that the center print inspired the name change for the quilt from what it was called in the pattern.  All the "bountiful" motifs in the print reminded me of the second verse of the song "My Country 'Tis of Thee".  I was disappointed that I wasn't able to use all the motifs from the print in the front of the quilt but I was able to incorporate the ones I couldn't use into the label area on the back of the quilt.

 
 I am also very happy to have finished this since it was also on my 2nd Quarter Finish-A-Long list.
 

If you've stayed with me this long, I thank you very much for looking back with me on the journey of this quilt.  I hope you enjoyed the visit and hope you enjoy all the rest of the Quilt Festival entries!! 

http://amyscreativeside.com/2014/05/16/bloggers-quilt-festival-spring-2014/

The Fabric Gal Finale!

**Note:  Previously Published 5/22/14, Post Edited 5/30/14**
 
I woke up last Thursday to this beautiful sight.....


....it was what was left from "The Night Before" (which of course means this popped in my head)......


I had been making my first attempts at quilting using my new ruler foot (that's the "Frame Set" in the picture, purchased from here)...


...and rulers (reviewed by Amy here and purchased from here)....


.....to do these straight line seams (well, relatively straight anyway).
 

Now it should be noted that when I "quilt whispered" this quilt I wanted to empahsize the diagonal progressions of the opposing sets of same color blocks.  But I didn't want to just stitch along the seams.  Then I realized that if I outlined the pairs of (same color) light squares by FMQing with the ruler and then created "shadow" squares on the background triangles, I would get the same impact but done a different way.

However, once I had done a few (well, a lot of them), I realized that because the squares I quilted connected,  I could have much more easily and faster achieved the same effect by straight line quilting with the walking foot between the seam lines.  Oh well, I still like how it looks and I got alot of practice using the ruler which was far easier to use than I expected. 

I added quilting in the borders using the curved ruler......


...and then bound it (in the same border fabric) and made a label area for another finish!


So now my bed can finally go from Winter........
Brrr! quilt finished in 2014.

....to Spring!

This also means I have a finished NewFO and Book It Project as well as another notch on the 2nd Quarter Finish A-Long list! 

http://catpatches.blogspot.com/p/newfo-challenge.html

http://vroomansquilts.blogspot.com/p/lets-book-it.htmlhttp://www.the-littlest-thistle.com/p/finish-along-2014.html
 
 
Edited 5/30/14 to Add:
 
I am also linking up with Amy at Amy's Free Motion Quilting Adventures for Week 4 of her Free Motion Monday posts on using Rulers. She also has more posts on different free motion techniques that you can check out by going here.

So you know I'm "Happy" (here's why)!