Showing posts with label Mug Rugs. Show all posts

Friday, May 16, 2025

For Finished or Not Friday: One Quick Finish and One UFO

Happy Friday and welcome in for another edition of "Finished Or Not Friday"!


As always we are hosted by the lovely Alycia at Alycia Quilts, well known for her work making, quilting and showcasing quilts awarded to veterans through the Quilts of Valor program.

This week I have two finishes to show:  one that was quick and one that has been a year in the making!  Okay, maybe it's actually just been sitting around for a year but that's all water under the bridge once it gets to the "finished" stage, LOL!!

The Quick Finish:  A Mug Rug Gift

I have a friend that I have made a number of things for, most of which she had used to decorate her work cubicle at her office.  Since the pandemic, her job has retained the policy of remote work so she only has to report into the office once a week.  As such she was recently attemping to spruce up her home work space.  She mentioned she planned to pull out all the things I had made for her and put them into service there.  Of course that led to a discussion of the very first piece I made her:  a mug rug replicating a Kaffe Fassette design:


I made this because she attended her first (and only) quilt show with me back in 2013.  She is not a quilter but fell in love with Fassette's quilt "Girder" that was hanging in the show with all the other quilts from his "Shots and Stripes" book.  Unfortunately, that rug was taken from her desk some years back!  

While I did make her a "keyboard" themed one a few years later (which is pictured later in this post),  she asked me if I might happen to have an extra mug rug laying around that she might add to her setup.  I didn't but then was inspired to make one for her (in secret) when she showed me another new addition to her desk setup:


As soon as I saw this lamp I was like: "Oh, I've got to do this!"  First of all, I have never made a "stained glass quilt" although I've always wanted to try one.  What better way to take a first stab at a technique than a small project like a mug rug?  In addition, I had recently purchased these:


I had this set of Creative Grids "Crazier Eight" templates on my Amazon wishlist for a few years.  It just so happened that about two weeks before our conversation, a Warehouse "Used But Good" set came up for half the normal price.  The  prices on Creative Grids products are tightly controlled so are almost never on sale.  Needless to say as a "Gadget Fanatic",  I couldn't pass that deal up!   Now I could also immediately see trying out the templates by using them to make the stained glass piece.  So I dug through my batik stash for yellows and other fabrics that ombered to that color and came up with this:


As the name implies, there are eight templates to make a block but I split the piecing in some of the templates in order to be able to use a few more fabrics and make the stained glass effect come through a little more.  The "leading" print also came from stash.  

I also wanted to give a nod to the butterfly featured rather prominently on the front of the lamp and I knew just how to do that:

I have an old compact Bernina Deco embroidery machine that I purchased used off of eBay a while back and love when I get an opportunity to make things with it.  The great thing about the purchase was that it came with a full set of embroidery threads in a rainbow assortment of colors and so far for everything I've made with it, I've had the color threads needed.   

To give you an idea of how old this machine is, I am unable to download designs to it so have to purchase dedicated "design cards" for it.  It did come with one of those blank card readers but my laptop (which at the time of purchase was running Windows 10, that's how long ago this was) didn't support it.  So now I regularly troll eBay for low priced design cards that have images I am interested in using.  I also lucked up and was able to start the collection of ones I have when I was able to pick up a whole bunch of them at a guild destash sale from someone who had a newer machine so no longer needed them.  

The butterfly design I used came from this card:

First I ran a test of it using what I had that was close to the prescribed colors.  That allowed me to test the size adjustment I made to the design to fit the template section I wanted to stitch it on and see how it stitched out.  For the final design, I chose threads closer in color to the butterfly on the lamp.  Then I layered and quilted it and this was the finished piece:

After she received it, she sent me a picture of her set up!

You can also see the keyboard mug rug here as well!


The UFO Finish: "Roaring Waves"

My other finish is that I finally quilted a top I made up in March of last year.  After making two blue and white quilts back in 2022 for winter decorating,  last year I decided I wanted to make a few more to use for decorating into Spring.  It started with this fabric bundle purchased on the Annie's Attic (then Annie's Catalog) site during one of their fat quarter bundle sales (and is still available now here):

After purchasing it, I happened to see this "color option" design on the American Patchwork and Quilting website:

I could immediately see almost all of the bundle fabrics plugged into the bargello-style design.  I raided my batik stash and a few project stashes to come up with this array....

...that eventually became this top!

I even layered and basted it that year.  And so it has sat until I could figure out how to quilt it.  I was definitely considering going along with the "waves" theme and did try to sketch out something along those lines:


But it wasn't until viewing Angela Hoffman quilting on the #3501 episode of the "Fons & Porter Love of Quilting" TV show that I found something I really liked.

However, I wasn't totally confident about being able to free-hand quilt the waves evenly.  Then I remembered I had a wave ruler:

However I didn't want that deep a wave and the spacing wasn't right.  Doing a little research, I found out that Handiquilter actually has a few different wave rulers and it turned out that they had another one that was perfect for what I wanted to do.  The peaks and valleys of it lined up perfectly with the piecing on this quilt.

It took me about a week to complete the quilting:


And now it's done! 

Front

Back

It's a square quilt and will be used as a wallhanging.  As usual the lesson here is that sometimes a quilt takes a while but it is always satisfying in the end to get it done!

There are many more finishes and progress reports over at Alycia Quilts for this week's "Finished Or Not Friday" so go check them all out!

Friday, January 6, 2023

Quiltville Chilhowie Mystery Part 7: It's Reveal Day!!

 Well it looks like the Chilhowie Mystery period is now done!  When I went to Bonnie's site this morning, I was greeted with this:

Bonnie has a picture of the finished quilt featured in her header right now and you can pick up the last of the instructions here.  Remember, now that the mystery is over, you need to download all the parts before Bonnie removes them from her blog to compile them into a pattern for purchase in her shop.  

In this round, there are still sashing, sashing squares and flying geese units to cut and sew together and then to the blocks made previously.  The blocks made in Part 2 create the finished outer border and you make some four patches from scraps for the border corner squares to complete the finished top.  

I guess all this additional sewing to be done is good for me.  I had hoped to have finished up the string blocks for my own mystery season journey on two other Bonnie designs but that has not happened.  

These are the remaining sets of the foundations I had hoped to get sewn up this week for the "Roll, Roll, Cotton Boll" and "Cherry Crunch" projects.  As the week went by I found myself busy with other things so only got to sew up one set for each.  I didn't panic about that as I thought I might have at least another week of the mystery to work through but I guess I'm on my own now!   It's all good because I've made a list for the American Patchwork and Quilting magazine "UFO Challenge" to see what I can get finished (or more likely "moved forward") this year.  I had decided that whatever was the number called for this month, I was assigning it to "Cotton Boll" as I really want to get that top done by month's end.  

So I will continue stitching the string blocks for RRCB and the "Cherry Crunch" design until I get them finished.  

Well, at least I got a good bunch done during the mystery period!

In hindsight, I realize that one reason I didn't get them done was that when I counted out the foundations, the amount I needed to do daily to finish them up meant I needed to put in a considerable amount of time each day on them.  Confronted with other things I had to do, I would hedge and say, "okay, maybe I can do the string blocks later".  Then of course as I got toward each day's end I'd say, "maybe I can make up for that tomorrow".  

What I wish that I had told myself was that even if I couldn't get the full amount done for the day, I could have committed at least fifteen minutes to the string work and whatever I got done was still a step towards what needed to be done.

Had I done that, the pile of remaining foundations might have been half the size that  it is!  So for 2023, I have to remind myself (again!) that even just 15 minutes a day can help keep me on track to finishing a project!   

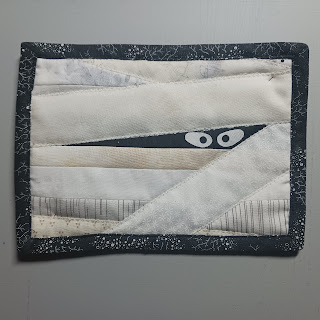
While the string blocks didn't get done, a few other things did.  I got the binding put on the little Mummy Mug Rug.

Still loving those die cut eyes!  I'm also pleased to say that I finished the quilting and got the binding on the Nine Fat Quarters Disappearing Nine Patch quilt (try to say THAT ten times fast, LOL!!).

I've named this one "The Last Dash" because this was literally the last of the Red & White Christmas quilts that I attempted to make.  And that wouldn't even have happened if I hadn't come across it on April's You Tube video.  

Also check out Darlene Michaud and Matt @ Scrappy Patch for more on this design.

Although I know this wasn't the best quilting I've ever done, I love this quilt!  This is definitely a case of a "man on a galloping horse" quilt:  as long as you don't examine it too closely, I think it it looks pretty darn good!  What helps even more is where I had planned to display it:

Since it hangs behind the bookcase, a lot of the more pesky details are obscured from getting that really close inspection.  I've got to admit unless you were judging it for a quilt show prize, it passes muster even on casual close inspection.  If thrown over your legs, it will also certainly keep your lap warm.  What was lucky too was that I had the perfect backing already in house. 

The light section in the middle is for writing in the label.

I had purchased this fabric as a discounted backing kit all the way back in 2016 for my "Across County Lines" RWB quilt.  It is wide back fabric so the good news is I only used a little of it for this so can use the rest to back the "Cherry Crunch" string quilt when that reaches the finishing phaseKeepsake Quilting had a year end fabric sale and I was able to pick up another wide back print for the "Lines" quilt.   

I've often heard people talk about certain patterns they make again and again.  Up to now I didn't have one but now this one will be mine!  I can already see making this for a few project needs I have going forward so am excited to get to make another one in the near future.

I even got a little bit of the New Year's cross stitch done:

We still have about four seasons of "The West Wing" marathon still on the DVR.  That will be a perfect time to sit and stitch and move this little project forward.  I'm feeling like this first week of the year has set me on a good course for what I hope to accomplish for the rest of the year!

Friday, December 30, 2022

7 Days of New Years --- Day 5: Quiltville Mystery Catch-up and Still More Quilting

 With Christmas barreling down on me last week, I missed checking in on the Chilhowie mystery!


In last week's Part 5, the mystery quilters had reached an exciting milestone:  they were starting to assemble the units from the previous parts to make blocks!  Always a big deal when you reach that part of one of Bonnie's mysteries. This week for Part 6 they are cutting squares that will be added to HST units previously made in Part 4.  Those pieces will be added on to the Part 5 blocks to create even larger blocks!

I used this check in period to take a break from the quilting I've been doing to go back to making string blocks for "Roll, Roll Cotton Boll" and "Cherry Crunch".


I spent a few hours and got a few more done for each project.  With New Year's coming this weekend, it also means the mystery period is almost over.  Even though I will continue work on both of these projects once the mystery ends, I would love to have the string block portions for both finished as this year comes to a close.   

That done, I also decided to get a something else I've had sitting with the string stash sewn up quick.


For the longest I had this pattern by Sandra Dennison of Gray Barn Designs sitting with my Halloween project stash.  Once I started the RRCB string blocks, I realized I could also take some of the strips to make it up.  I hit the Halloween stash today for potential backings (the spider web print won!).  It's finished quilt-as-you-go and now it's done!  Well except for the binding which is picked out and cut.  

Like the eyes?  What's cool is those are die cut (with fusible attached) from a die I had wanted for a while and was finally able to pick up during one of Accuquilt's holiday sales.  


The mummy's eyes are the foot pads and eyes of the Teddy Bear on this die.  I bought the die in anticipation of making some custom baby quilts but it's always great when a die can do double duty!  

That done, it was back to quilting the 9 Fat Quarter Disappearing Nine Patch quilt. 


I got the straight lines done on the light sections which is also the last of the walking foot quilting.  The next part is the scary part:  doing free-motion quilting on all the remaining sections.  Actually, since I have quilting plans for all of them that isn't the scary part.  The scary part is that I've never really done free-motion quilting on my Singer 401.  I've seen Karen Miller's articles and webinars on doing FMQ on my Featherweight so might wind up either changing over to that machine or just put my Brother Nouvelle mid-arm back in the table since I've done a lot of FMQ on that machine.   But not tonight!  DH took the night off from work and we've got a bunch of "The West Wing" episodes on the DVR so will try to watch a few before heading to bed.  

One more day to go before New Year's.  Are you ready for 2023?

Tuesday, December 27, 2022

7 Days of New Years --- Day 2: A Slight Detour For a Gift

Today was a little busy.  I was supposed to meet with a neighbor to get some information on potential contractors.  Unfortunately my neighbor felt a cold or flu coming on so that meeting was postponed.  This freed some time to find a box and pack up the peanut butter cookies I baked yesterday for my MIL and her sister.  It is an annual tradition that I send them some to munch on during the holidays. 

Since I'd be shipping a package, I also needed to finish up something that needed to go along with it.  Back in March, DH and I had visited my MIL and while there I had helped her make a batik version of Pat Sloan's "String Beans" Block-a-Day design.  

My MIL's "String Bean" blocks

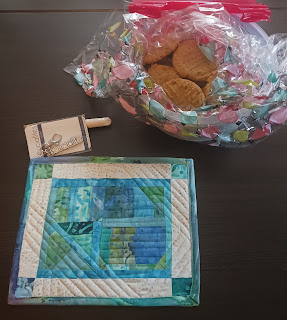
When it was done I picked up all the small aqua and cream scrappy bits and planned to make a commemorative mug rug for it.  

After that I was stumped for the longest on how to quilt it and what color threads to use (All Cream?  All Turquoise?  Change threads?).  Then as I went to bed last night, I had a brainstorm for it:  monofilament thread!  Taking cues from all the angles of the piecing, I stuck with straight-line quilting and got it done. 


Good thing the "West Wing" marathon was still on!  DH and I watched (well, I listened) while I stitched.  Stitching done, we broke to set up jerk chicken to marinate for dinner then it was on to prepping binding.  For that I got to use a new gadget:


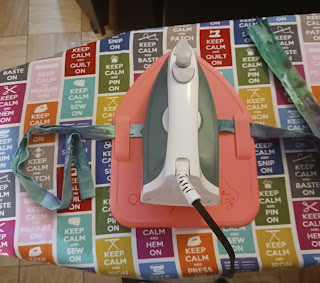
Got to admit, this "Binding Eaze" by the Quilted Heartz ladies makes for easy pressing of the binding and keeps your fingers from the hot iron.  Once the binding was attached, everything was ready to be packed up for shipping to North Carolina. 


My MIL is doing the Fat Quarter Shop "Sewcialites 2" Quilt Along.  She normally doesn't like small blocks but is trying her hand at the 9" ones so I bought her a surprise gift of the logo charm to support her efforts.  

Then it was on to making dinner and then eating and watching the "Lord of the Rings: Fellowship of the Ring" we taped yesterday (neither of us have seen it before).  I had hoped to have finished the mug rug earlier so I could also get back to quilting the Fat Quarter Disappearing Nine Patch today.  It's late now so I think that will have to wait until tomorrow!  

Wednesday, September 30, 2020

September Wrap up: The End of National Sewing Month and Mini Madness

September was National Sewing Month and for me it was a month for a bunch of mini quilt finishes!


"Lidia"

First up is a project in my continuing obsession with Edyta Sitar's Laundry Basket Quilts designs!  I learned about her mini log cabin quilt design when I saw one of her "Quilting Window" videos on You Tube.  She also offers it as a stand alone pattern and in her book "Little Handfuls of Scraps".   

I started piecing the blocks for it at the end of  July and the fabric for the block "logs" came straight out of the crumb bins.  The blocks were only two inches finished and the logs started out at 3/4".  I probably needed to block the quilt top when I finished it so the borders are a little wonky.  It didn't help that in order for it to fit the space I want to hang it, I had to make my borders smaller than patterned.  I fussy cut them from the stripe fabric pictured.  Making it with larger borders might have helped me square it up a bit more.  

What was cool was that I found a quilting motif for it in an unusual place. 


 A couple of weeks ago, I read a post by Rebecca on her Cheeky Cognoscenti blog about how she had received a bunch of old Quilters Newsletter Magazine issues from a guild member cleaning out her studio.  She had even found a solution to a piecing problem she was having in one of them.  I commented that I still love my QNM issues even though the magazine ceased publication back in 2016.  I have an almost complete collection of them and often find new things of interest or education when I thumb through them.  

It just so happens that the same week I finished the top for this project, I had received an old QNM back issue that I didn't have and found for sale on eBay.  It was a case of perfect timing since the issue from July 1976 (!) had the perfect quilt design for this little mini quilt!  Even better, all the gentle curves in the design meant it could be executed with a walking foot.  The only issue was how to mark it?  I took the "Golden Threads" paper template route although I used regular wrapping tissue paper to make my templates.


This project was another fun little Laundry Basket Quilts diversion and I look forward to getting it hung up and displayed. 


"Gertie"

 Next up is my micro-mini version of one of Carrie Nelson's Schnibble quilt designs. 


The original quilt is lap-sized and made from charm squares.  Mine is another mini pieced from the crumb bin starting at the end of  July.  This time I used 1" starting strips and scrap triangles (save those cut offs!).  Working so small, it was a bit of a challenge to sew together and I had to press the seams of the triangle squares and all the rows open.  That allowed it all to lay flatter given the tight confines of the seam allowances after the blocks and rows were stitched together. 

Ironically it was only after I had finished the top that I happened to read a blog post by Janet of the Rogue Quilter blog who is a phenomenal mini quilt maker.  Back in 2016 she made a mini quilt by using 1/2" finished gridded fusible interfacing.  If I had thought of that, it would have saved me a ton of effort!  And wouldn't you know it, I already have some here.  Hmmm, guess that means I have to do another one of these, you know for scientific testing purposes, you understand!  

This one was also quilted with a walking foot, this time using the freezer paper template techniques from Mary Mashuta's "Foolproof Walking Foot Quilting Designs" book.  I used the same technique last year on a baby quilt I made for a relative. 


The "binding" on this one was the backing turned to the front using a tool:  


"All In A Days Work"

Back in June, I had set up some hand work projects to work on while recovering from surgery.  I had started a wool piece that's been a "Hussy" (HSY = Haven't Started Yet) project for years.  

Well now it is finished:   The original penny rug pattern by Wooden Spool Designs was designed to finish about 16 inches in diameter.  For my project, I reduced that to 9 inches so it could be used as the header for a holder for my shopping list pads.  

Back in 2015 (which lets you know just how long this HSY has been hanging around!), I saw a similar penny rug design by Bonnie Sullivan called "Sunflower and Chickens".  I loved her idea to have some of the eggs on the tongues have "yolks" and decided to do that with mine as well.  And don't you just love when a plan comes together:  I had the absolutely perfect fabric in my stash to back it with:

I had always planned to make this penny rug design to hang in my kitchen because I have a few other chicken themed pieces in there and have long wanted to add more.  I have an old dry erase board for the grocery lists that has seen better days and I've been trying for a while to figure out a way to replace it.  Now I have it!  I'm thrilled to get this one done and put to use!


"The Purple Pineapple Mug Rug"

Ok, last but not least:  my best friend from high school is a grandma and faced with taking on the duties of homeschooling her kindergarten grandson.  He and her daughter live with her and her daughter works two jobs.  My friend works from home so it was easier for her to take on that task. 

 As have so many other parents during the pandemic, she is forced to learn how to manage her grandson's school days while juggling her own work.  It's an adjustment for everyone, particularly since it's the first structured school experience for her grandson.  From what she tells me, what they study in Kindergarten these days is way more advanced than it was in our day! 

Since she's working so hard to meet the challenges of teaching from home, I wanted to send her a little "pick me up".  I saw these at our local supermarket and just knew she'd love it!

Well, as a quilter if you send a mug, 'ya gotta send a mug rug right?  In a recent Skype chat with another friend of ours, she mentioned she liked purple so I rummaged through the stash and pulled as many purple fabrics as I could.  But what to make?  I've made a few mug rugs featuring inspirational panels from a June Tailor kit I have and still had some left so I started there.  

The kit has patterns to use with the panels but none would allow me to use as many fabrics as I wanted to, Lol!!  So I went looking for another design that could accommodate the panel AND a generous fabric pull.  As I was reading blogs,  I read about someone making a Pineapple quilt and I thought, that just might be the ticket!  Particularly since I knew I had this:  

Very early in my quilting journey, I wanted to make a Pineapple quilt.  Back then, most were patterned to be made by paper piecing the blocks.  I did start one using that method and quickly found that to be very tedious and that project is still a UFO (but will have its day in the sun again one day).

BTW, This pattern is in the June 2000 issue of QNM.

Eventually, I found out about the Pineapple Rule by the Possibilities/Great American Quilt Factory ladies Lynda Milligan and Nancy Smith.  The sales pitch was that you could make Pineapple blocks without having to paper piece them.  When I got the ruler, I immediately made a test block.  That "orphan block" eventually became a journal cover.

Unfortunately, I haven't used that tool since -- that is until now!  Their method uses 1-1/2" strips.  Normally the block would start with a 2-1/2" square but the June Tailor panel I was using is 4-1/2" square.  No matter, that just meant less rounds of strips to sew to get to the 12" finished size!  

I kept this one simple: I only had four light fabrics so used one in each of those rounds.  I placed the medium and dark fabrics scrappy throughout the block.  Then it was a simple pillow turn finish (no binding!)  and some simple stitch in the ditch and stitching down the center of the logs and it was ready to be mailed out!


I  still have two AQS BOM blocks to finish up for September and I had another BOM project I had hoped to work on.  I guess they will instead be early October projects!