Showing posts sorted by relevance for query June Tailor mug rug. Sort by date Show all posts

Tuesday, December 18, 2018

Two Mug Rug Christmas Gifts Finished!

There's no doubt about it, mug rugs make great gifts!  l also love that you can personalize the sentiment in them for the person you are giving it to.  You can use the rug design to express it and/or give a mug appropriate to the situation or to them.  That's what I did for the last rug I made for a friend's desk at her job:


This time around I made two rugs for Christmas gift giving.   My MIL is my Kringle giftee this year.  She is a quilter too so of course part of her gift is fabric -- a small quilt kit and the backing for it.  I had also found a cute basket to pack it up in but I needed to add a little something to fill it out.  My first thought?  A cute mug with quilty sayings!


I found this one on eBay but I've got to tell you it was really hard to choose!  There were soooo many funny ones that I also could have sent like this....


or this.....


...oh and this!


I settled on the first one because in my book 'ya can't send a mug without an accompanying rug and I already had these in the house....


June Tailor has a couple of versions of these mini panels for mug rugs and each version has a different theme.  I really wanted the set with Quilty sayings but couldn't catch it on sale so settled for the "Uplifting" set.  I felt the top sentiment in the picture below went perfect with her mug.


The great thing is the panel set had one perfect for her sister too.  It wasn't originally in the plan to send her sister a mug and rug but I think the Quilt Muses were ahead of me on this one.  You see, each year (regardless of whether or not we have them for the Kringle) I also bake and send my MIL and one of her sisters Peanut Butter cookies for Christmas.  That started on one of the last Christmas' when they were still here in New York. We were talking about cookies and the sisters reminisced about how they had loved the ones that their mother used to make.  My husband then bragged about mine so that year I sent them both a batch.  It was a big hit to the point that even if I don't feel like making them, I'd better get them out in the mail because I WILL get calls if they don't show up!

I usually try to plan the cookie drop to coincide with the Kringle gift drop to consolidate the mailing efforts.  It just so happens that this year my husband has his Aunt as giftee so the good news is that I could send her cookies along with his gift.  Then I remembered that I had found a mug related to Christmas and cookies while out shopping either last year or the year before and had saved it for just such an occasion.  So when DH said he couldn't think about what to get her, I told him about the mug and said I'd even make a rug for it.  He loved that idea and then said it'd be great if we could find a cute cookie jar to go with it.  Fortunately Home Goods came to the rescue on that one!


My MIL's favorite fabric is batiks so I bought her a batik fabric kit for her gift and then I decided to use prints from my own batik stash to make her rug.  For her sister's rug, I was told she liked neutrals.  I didn't have that in my batik stash but I do have a stash of Black and White fabrics -- the original neutrals!

The June Tailor panel kit has mug rug designs patterned in the package for each size panel offered in the kit so I wasn't going to have to think about a design for them.  However, for his Aunt's panel, the rug layout used a Card Trick block and I wasn't in love with that.  The good news is a Squirrel Moment came to the rescue:  This month, the American Quilters Society (AQS) has been offering their annual set of Christmas Countdown blocks.  This year, they are giving the daily instructions for the blocks two ways:  colored in Red and White and in Red, Black and White.  Perfect!  I decided to pick one of the RBW blocks to substitute for the Card Trick block in the pattern.  I chose Block #6 and resized it to the 6" finished size the panel pattern used.  Then I figured out where else I could insert a little more red in the design for balance.


It took me a few days to get both rugs done.  I had originally just quilted my MIL's in Quilt-As-You-Go fashion by adding the strips right onto the layered batting and backing.  But after it was done, I felt like it needed just a little more quilting so had to take some time to figure what to stitch on it and then execute it.  The idea of using the echoed "Serpentine Curves" came from Mary Mashuta's book "Foolproof Walking Foot Quilting Designs".  This was good because at first I thought about doing meandering.  I've only tried free-motion on my 401 once and need more practice on it so really didn't want to try that on this deadline project.

For her sister's rug, I did a simple crosshatch over everything but the panel.  I also decided to do a faux piped binding hoping to add just a touch more red to the mat.  I used instructions for the technique that I've used before but on larger quilts.  The piping was a little more prominent than I would have liked so if I was to do it again on a piece this size,  I'd size the piping strip an 1/8" smaller and add that to the strip that creates the binding portion.

I think they both finished up very nicely and now both sisters will have a nice mug to fill with the hot beverage of their choice and have a pretty mat to sit their cookies on while they munch!  For me, I get another notch on the year-end Challenge finish list!  That's as sweet as a peanut butter cookie!

Wednesday, September 30, 2020

September Wrap up: The End of National Sewing Month and Mini Madness

September was National Sewing Month and for me it was a month for a bunch of mini quilt finishes!


"Lidia"

First up is a project in my continuing obsession with Edyta Sitar's Laundry Basket Quilts designs!  I learned about her mini log cabin quilt design when I saw one of her "Quilting Window" videos on You Tube.  She also offers it as a stand alone pattern and in her book "Little Handfuls of Scraps".   

I started piecing the blocks for it at the end of  July and the fabric for the block "logs" came straight out of the crumb bins.  The blocks were only two inches finished and the logs started out at 3/4".  I probably needed to block the quilt top when I finished it so the borders are a little wonky.  It didn't help that in order for it to fit the space I want to hang it, I had to make my borders smaller than patterned.  I fussy cut them from the stripe fabric pictured.  Making it with larger borders might have helped me square it up a bit more.  

What was cool was that I found a quilting motif for it in an unusual place. 


 A couple of weeks ago, I read a post by Rebecca on her Cheeky Cognoscenti blog about how she had received a bunch of old Quilters Newsletter Magazine issues from a guild member cleaning out her studio.  She had even found a solution to a piecing problem she was having in one of them.  I commented that I still love my QNM issues even though the magazine ceased publication back in 2016.  I have an almost complete collection of them and often find new things of interest or education when I thumb through them.  

It just so happens that the same week I finished the top for this project, I had received an old QNM back issue that I didn't have and found for sale on eBay.  It was a case of perfect timing since the issue from July 1976 (!) had the perfect quilt design for this little mini quilt!  Even better, all the gentle curves in the design meant it could be executed with a walking foot.  The only issue was how to mark it?  I took the "Golden Threads" paper template route although I used regular wrapping tissue paper to make my templates.


This project was another fun little Laundry Basket Quilts diversion and I look forward to getting it hung up and displayed. 


"Gertie"

 Next up is my micro-mini version of one of Carrie Nelson's Schnibble quilt designs. 


The original quilt is lap-sized and made from charm squares.  Mine is another mini pieced from the crumb bin starting at the end of  July.  This time I used 1" starting strips and scrap triangles (save those cut offs!).  Working so small, it was a bit of a challenge to sew together and I had to press the seams of the triangle squares and all the rows open.  That allowed it all to lay flatter given the tight confines of the seam allowances after the blocks and rows were stitched together. 

Ironically it was only after I had finished the top that I happened to read a blog post by Janet of the Rogue Quilter blog who is a phenomenal mini quilt maker.  Back in 2016 she made a mini quilt by using 1/2" finished gridded fusible interfacing.  If I had thought of that, it would have saved me a ton of effort!  And wouldn't you know it, I already have some here.  Hmmm, guess that means I have to do another one of these, you know for scientific testing purposes, you understand!  

This one was also quilted with a walking foot, this time using the freezer paper template techniques from Mary Mashuta's "Foolproof Walking Foot Quilting Designs" book.  I used the same technique last year on a baby quilt I made for a relative. 


The "binding" on this one was the backing turned to the front using a tool:  


"All In A Days Work"

Back in June, I had set up some hand work projects to work on while recovering from surgery.  I had started a wool piece that's been a "Hussy" (HSY = Haven't Started Yet) project for years.  

Well now it is finished:   The original penny rug pattern by Wooden Spool Designs was designed to finish about 16 inches in diameter.  For my project, I reduced that to 9 inches so it could be used as the header for a holder for my shopping list pads.  

Back in 2015 (which lets you know just how long this HSY has been hanging around!), I saw a similar penny rug design by Bonnie Sullivan called "Sunflower and Chickens".  I loved her idea to have some of the eggs on the tongues have "yolks" and decided to do that with mine as well.  And don't you just love when a plan comes together:  I had the absolutely perfect fabric in my stash to back it with:

I had always planned to make this penny rug design to hang in my kitchen because I have a few other chicken themed pieces in there and have long wanted to add more.  I have an old dry erase board for the grocery lists that has seen better days and I've been trying for a while to figure out a way to replace it.  Now I have it!  I'm thrilled to get this one done and put to use!


"The Purple Pineapple Mug Rug"

Ok, last but not least:  my best friend from high school is a grandma and faced with taking on the duties of homeschooling her kindergarten grandson.  He and her daughter live with her and her daughter works two jobs.  My friend works from home so it was easier for her to take on that task. 

 As have so many other parents during the pandemic, she is forced to learn how to manage her grandson's school days while juggling her own work.  It's an adjustment for everyone, particularly since it's the first structured school experience for her grandson.  From what she tells me, what they study in Kindergarten these days is way more advanced than it was in our day! 

Since she's working so hard to meet the challenges of teaching from home, I wanted to send her a little "pick me up".  I saw these at our local supermarket and just knew she'd love it!

Well, as a quilter if you send a mug, 'ya gotta send a mug rug right?  In a recent Skype chat with another friend of ours, she mentioned she liked purple so I rummaged through the stash and pulled as many purple fabrics as I could.  But what to make?  I've made a few mug rugs featuring inspirational panels from a June Tailor kit I have and still had some left so I started there.  

The kit has patterns to use with the panels but none would allow me to use as many fabrics as I wanted to, Lol!!  So I went looking for another design that could accommodate the panel AND a generous fabric pull.  As I was reading blogs,  I read about someone making a Pineapple quilt and I thought, that just might be the ticket!  Particularly since I knew I had this:  

Very early in my quilting journey, I wanted to make a Pineapple quilt.  Back then, most were patterned to be made by paper piecing the blocks.  I did start one using that method and quickly found that to be very tedious and that project is still a UFO (but will have its day in the sun again one day).

BTW, This pattern is in the June 2000 issue of QNM.

Eventually, I found out about the Pineapple Rule by the Possibilities/Great American Quilt Factory ladies Lynda Milligan and Nancy Smith.  The sales pitch was that you could make Pineapple blocks without having to paper piece them.  When I got the ruler, I immediately made a test block.  That "orphan block" eventually became a journal cover.

Unfortunately, I haven't used that tool since -- that is until now!  Their method uses 1-1/2" strips.  Normally the block would start with a 2-1/2" square but the June Tailor panel I was using is 4-1/2" square.  No matter, that just meant less rounds of strips to sew to get to the 12" finished size!  

I kept this one simple: I only had four light fabrics so used one in each of those rounds.  I placed the medium and dark fabrics scrappy throughout the block.  Then it was a simple pillow turn finish (no binding!)  and some simple stitch in the ditch and stitching down the center of the logs and it was ready to be mailed out!


I  still have two AQS BOM blocks to finish up for September and I had another BOM project I had hoped to work on.  I guess they will instead be early October projects!

Thursday, April 8, 2021

A to Z Quilt Challenge: G = Gifts of Quilts

For the month of April, I have taken up Frédérique's Quilting Patchwork and Applique challenge to blog daily (except Sundays) on a quilt topic related to a letter of the alphabet.  

* * * * * * * * * * 

Much like with charity quilts, quilters love to make quilts and give them away as Gifts.  My favorite gift quilts are:

Mug Rugs

These are great because they are small and can be made up quickly and are a great way to use up scraps.  They can also be personalized using the person's favorite colors or a theme.  

June Tailor has themed panel and quilt-as-you-go kits that can be used to start a mug rug off.   

Jewelry Rolls


The design for these came from Kim Ritter's "Quick Quilting" book although I added the "ring roll" inside of it to the design.  I've made one of these for each of my two closest friends.  

Baby and Kid's Quilts

Of course, if anyone is immediately "quilt worthy" it's a baby or young child!  I haven't made many over the years but each one was for a special little person in my life.

Quilts made for young sibling cousins of mine.

I made these last two for my sons when they were young.  I gathered together novelty prints of things they were interested in at the time.  These quilts were made using a serger and Kaye Woods "Six Hour Quilt" design.  Since my sons are in their twenties now, I guess I owe them some new quilts!

Personalized Quilts

Some of the most challenging and fun gift quilts are those I made to acknowledge an important moment in a family member's life or to celebrate a friend's interests.

This quilt was made for my husband's aunt when she was diagnosed with breast cancer.  Every time I see her she tells me she still uses it every day!

I made this quilt for a neighbor who likes to fish and shares their catch with our family.

This was a Kringle gift for my MIL's husband who was a big fan of westerns.  This became a comfort quilt for my MIL when he passed away last year.

This quilt was for a friend's husband who is a fan of Golf and the NY Mets baseball team.

(Truly) Gifted Quilts

Then there were those quilts originally made for myself but later passed on to someone else as a gift because it was admired or to comfort in a moment of illness.


Have you gifted many quilts to family or friends?  Do you like to make them a particular size?  Who in your life is considered "quilt worthy"?

Linking up with Frédérique and the other Challengers at Quilting Patchwork and Applique.  Bonne journée!

Sunday, June 30, 2019

Another Once A Month Update....

Summer is officially here and I'm still struggling to get in gear for Spring!  Both my sewing and cutting tables were pretty piled up and it took me a long time to cut through them.  They're still not totally clear but at least now there is some space for working on a few projects.

As usual all the new and exciting Squirrel sutff that comes in through the email and Bloglovin' had me filing away ideas fast and furious.  I also made another new aquistion.  I've long fretted about whether to replace my Euro-Pro and Janome electonic machines.


I wanted something with a wide harp space like the Horizon but given the issues I've had in the last few years with those machines, I longed for a simple and reliable mechanical machine like the vintage Singers I have.  So I was once again back to researching machines and honed my choices down to either a Juki TL 2000 series or a Janome 1600 or a Brother PQ-1500.  New, all were still a bit more than I had to spend right now even though they are all far cheaper than a comparable electronic machine with all the "bells and whistles".

I was hoping to luck up on a good condition used one of any of the brands.  I did eventualy find one --- an older model Brother Nouvelle 1500 which seems to be the precursor of the PQ series.


Purchased from a sewing machine repair shop over eBay, it cost about the same as what I paid for my Euro-Pro back in 2004 which had been a bargain priced "bells and whistles" machine back then.  Admittedly the Nouvelle is a bit doudy and when she first arrived she gave me fits by not responding to the foot pedal!  However she eventually came around and I've got to admit she stitches like a dream and can go really fast!  It came with all the necessities:  quarter inch foot, walking foot, free motion foot, zipper foot, knee lift, extension table, a few bobbins and the high speed needles it takes.  I have a ruler foot and additional bobbins on the way.  I also ordered a new brighter LED light for the machine which I've gotten used to having on all my machines including the Singers.   As a I did my research, I was glad to see that the Grace Company has quilt frames that wide throat domestic machines like this can be loaded on to and used like a long arm.  I expect to be an empty nester in a few years and might then have an extra room for such a set-up.

I have plans for a community sewing event I'd like to try to launch next year.  I will still need my electronics for that so for the time being I have put them in storage and will pull them out and invest in repairing them then.  For now, me and Nova the Nouvelle will spend some time getting to know each other!

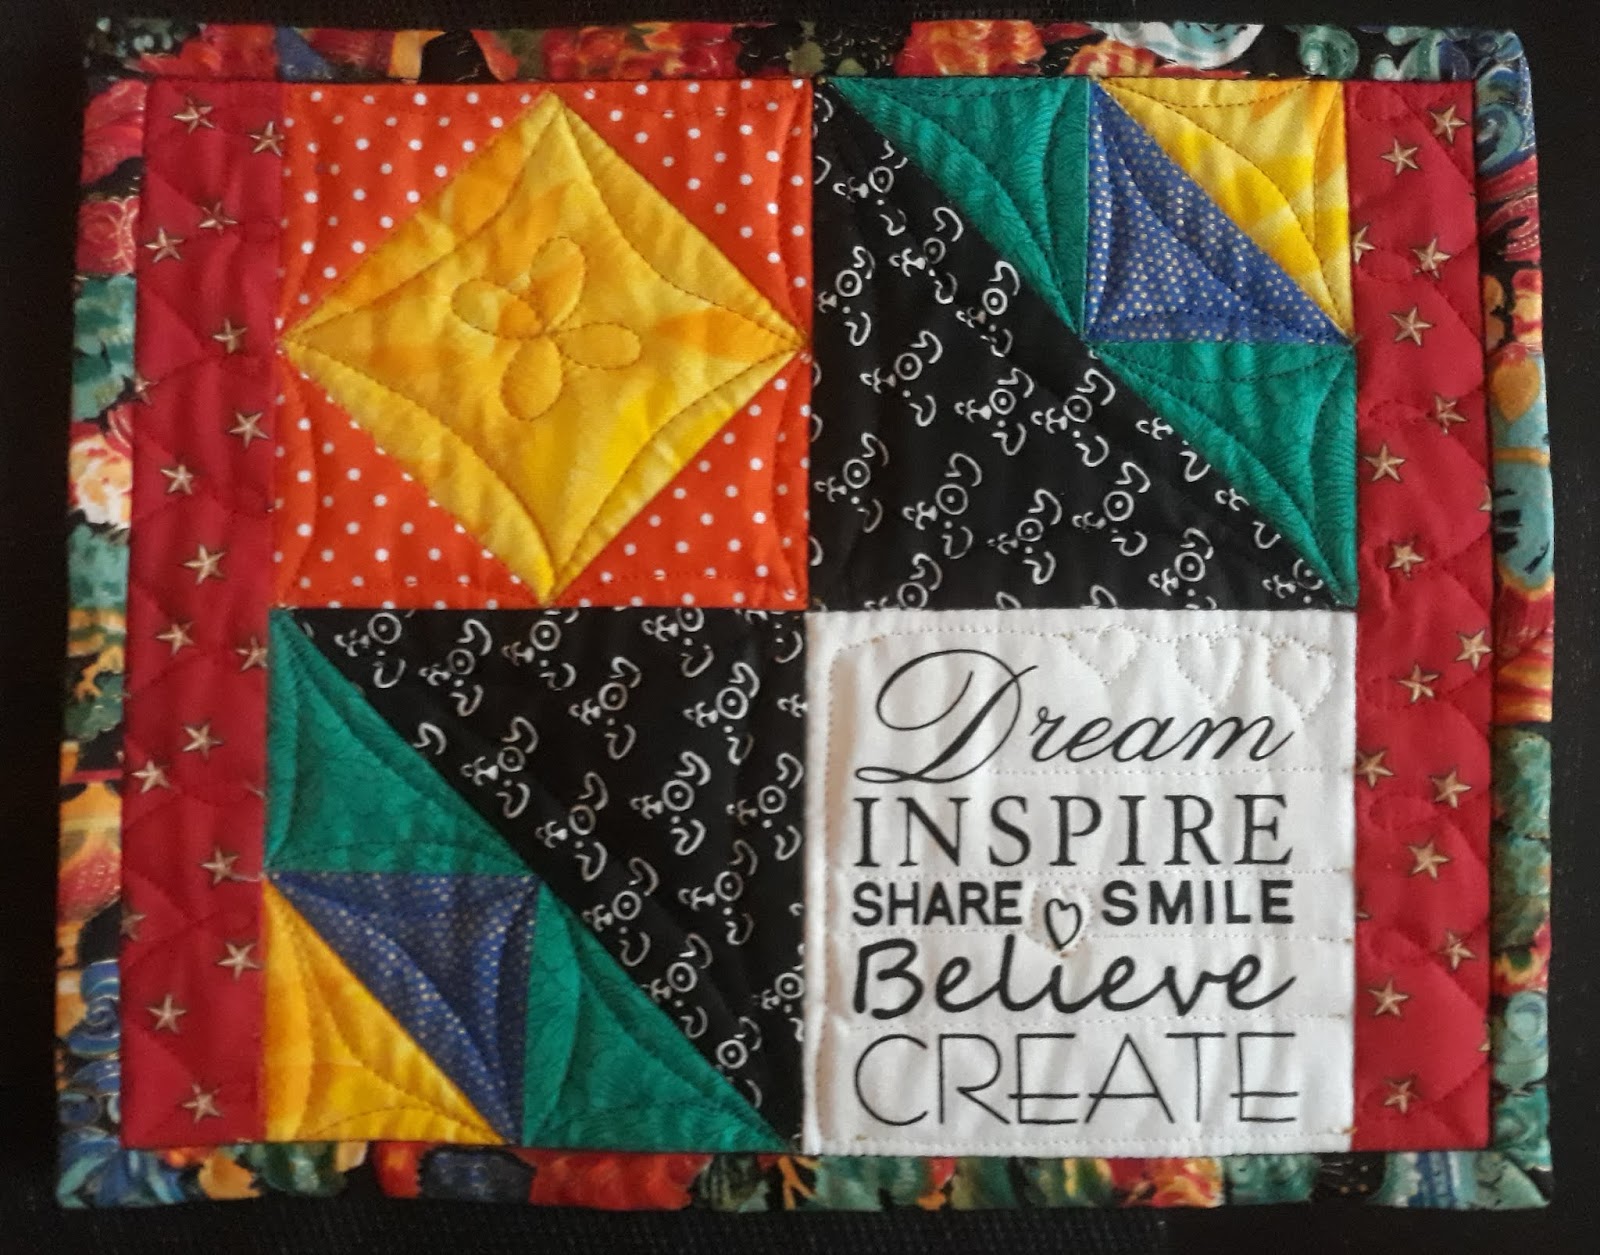
We started off our relationship by piecing and quilting a quick mug rug gift for a friend's birthday.


This was made from the same June Tailor printed panel pattern kit I used to make the mug rugs I gifted for DH's family Kringle last Christmas.  Her next test will be finishing up the quilting on my Cobblestones and Scrappy Trips projects.  If she can successfully tackle those, I've got a whole line of TBQs (To Be Quilted) we can continue to work on togther through the end of the year.  I'd love to clear my shelf of tops and partially quilted projects to make room for some new projects!

In my last post I also talked about wanting to make another QOV top.  I finally had some time to sort through the seven potential projects I had picked out last month and make a final decision.


I've made good progress on this quilt and hope to finish sewing the top over the next few days.  I orignally saw this quilt on the Katy Quilts blog.  If you are looking for QOV ideas, you have to check her blog out -- she quilts for a local QOV group and there are always so many great looking designs that come through her feed for this purpose!  The only downside is she often doesn't have pattern information for the designs so be prepared to do a little research or quilt math or fire up your EQ software if you want to make any of the designs she showcases.  I did find the info for this one  (although admittedly that was after I had already figured out the piecing design) and found out that this is the "Patriotic Patchwork" quilt by Debra Finan.  It appeared in the July/August 2012 issue of Fons & Porter's Love of Quilting magazine (which I know I have a copy of around here somewhere) or can be purchased as a stand-alone digital pattern from The Quilting Company website. 

This one got the thumbs up because the same outer border fabric used in the quilt Katy showcased I actually had in my stash.  I also had enough of a scrappy mix of R/W/B prints to make the rest of it completely from stash.  So I finally made good on a "One Thing Challenge" these last two weeks and because this project is relatively easy, I might still make the deadline of having the top done by July 4 as originally planned.  To completely finish it, I'll only need to add backing and possibly binding if nothing in stash works for me when I get to that point.  Once I jumped in on this, I felt the way I do when I'm in Quiltville Mystery mode because I quickly cut out all the squares and borders needed for it and then went right onto the production line of making red, white and blue four patches.  Guess I'll be nimble and ready when Bonnie Hunter sounds the annual mystery siren call after Thanksgiving!

Still so much to do but I'm glad that now I am actually working on things rather than just THINKING ABOUT working on things!   I'm hoping I can keep up a steady momentum and get some more things completed.  Let's see what the next "Once A Month" post brings or if I can get back here before that!