
Since 2009, Amy Ellis formerly of the "Park City Girl" blog and now blogging at "Amy's Creative Side" announced recently that there will be changes to the format of the biennial "Blogger's Quilt Festival".
When it started Amy was only blogging. Now that she is also a quilt designer, book author for Martingale and fabric designer for Moda needless to say she has a lot of commitments! Given the amount of work it takes to host the festival, she has needed to change her approach to keep everything running smoothly.
In sum, the spring BQF will move to Instagram and become the IGQF. The Fall BQF will remain as is (with blog link ups) but will be held in September rather than in late October/early November when the big Houston Quilt Market is held. You can read about the changes in detail on Amy's blog here.
I have participated in the BQF since it started although not in every year (click here to see my entries) but I always check out all the links. It's been a great way to show my work and an even better way to discover the work of other quilters. I'm not on social media and haven't decided yet whether to dip my toe in with this. Amy notes that even if you aren't on social media, you'll still be able to view the entries and I can certainly settle for that.
As always if you've never checked out the festival, all the links to the past shows can be found on her blog here.
Sunday, January 31, 2016
Slow Sunday Stitching 1/31/16 -- In 'Da Hoop!
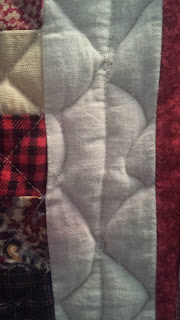
This Sunday finds me continuing with the Big Stitch quilting of "High Strung +2".

I had started on it last weekend during the snowstorm and continued during the week until I had finished quilting the header. I had hoped to get the whole thing done before the end of the month but I'll settle for getting at least a quarter of the bottom section done today.
The original plan was to stitch the header background with a scattered seed stitch. After the first few stitches, I felt the small stitches weren't working for me visually so ripped them and began doing them as big "dashes" instead. In the bottom of the quilt, I've already outlined all of the applique motifs and am now stitching across the squares with lines that will follow the curve of the "trail" of appliques.
As I sit and stitch, I'm understanding more and more the comforting feel of the "rythmn" of stitching. It forces me to mediate on the work itself and not the amount of time it's taking. It also helps to have a lot of shows loaded up on the DVR and few back episodes of Pat Sloan's APQ Quilting Podcast to play in the background!
If you didn't already come here from Kathy's, head over to her blog at "Kathy's Quilts" and see what other lovely hand work is being worked on around the web today! Happy Quilting!
Monday, January 18, 2016
Recapping Some Odds and Ends
I had expected to be posting a "Slow Sunday Stitching" post today but I didn't do any stitching on Sunday! However, there was some quilting (and related) activity over the last week.
First off: She's Back!!
Usually when I put my machine in for service she's gone anywhere from a few weeks to a month. I expected the next call from the service shop to be to give me the diagnosis for what ailed her and to talk about what would need to be done and the cost to fix her up. So I was surprised when the call that came last Thursday was actually to say she was ready for pickup! Turns out she just needed a new bobbin case because the old one was "chewed up". Have I been working it that hard?!? I picked her up on Friday and welcomed her back into the fold!
However, this also threw my rhythm off a bit because I had settled in for spending the rest of the month doing hand work. I had finished hand basting "High Strung +2" two days before:

...and had begun thinking about how I was going to baste the wholecloth quilt I plan to work on this year.

Well, basting means layering and layering means I need to decide on a batting. The first debate is cotton or polyester? I have to admit, I usually prefer the "hand" (texture, weight and drape) of cotton battings in finished quilts. But I've also long heard that polyester battings are easier to needle for hand quilting.
Looking in my batting cabinet, I only had one queen size polyester batt on hand, a package of Hobbs Poly Down. Since this is meant to be a summer quilt/spread and I want to try to attempt some trapunto effects, this could be a good choice. However, I'd also like to compare it to a cotton batt but all the queen-size cotton batts I have are "natural" colored (oh, and one black batt for a future Amish project already stashed). The good news is that Connecting Threads had sent an email that they had batts on sale for 30% off and when I checked, they offered Hobbs 80/20 Bleached, something I have not seen in the local shops. So I put in an order for that.
The next step on that project will be to think some more about the additions I want to make to the stitching designs, get them marked and then test out my ideas for executing the trapunto effects.
With the machine back I'm now debating about how soon to get back to machine work. I already know of a couple of projects I want to tackle. I decided that before I did that, I really wanted to finish up one more bit of outstanding hand work. Last year I had finished up this little redwork embroidery project:

It was made to be added to one of my early quilts but the update never made it to the top of the "To Do" list last year. I picked it up and decided to finish it:

However, whereas usually a finish is a good thing, in this case it may not be! I'll go into a little more into detail on that in a separate post. I think the "turn of events" may have turned me off a little to doing any more hand work over the weekend. But I do want to keep up the momentum for hand work as well as organize the machine work projects and ease them back into my daily rhythm. So time to embrace a new week and see what it brings!
First off: She's Back!!

Usually when I put my machine in for service she's gone anywhere from a few weeks to a month. I expected the next call from the service shop to be to give me the diagnosis for what ailed her and to talk about what would need to be done and the cost to fix her up. So I was surprised when the call that came last Thursday was actually to say she was ready for pickup! Turns out she just needed a new bobbin case because the old one was "chewed up". Have I been working it that hard?!? I picked her up on Friday and welcomed her back into the fold!
However, this also threw my rhythm off a bit because I had settled in for spending the rest of the month doing hand work. I had finished hand basting "High Strung +2" two days before:

...and had begun thinking about how I was going to baste the wholecloth quilt I plan to work on this year.

Well, basting means layering and layering means I need to decide on a batting. The first debate is cotton or polyester? I have to admit, I usually prefer the "hand" (texture, weight and drape) of cotton battings in finished quilts. But I've also long heard that polyester battings are easier to needle for hand quilting.
Looking in my batting cabinet, I only had one queen size polyester batt on hand, a package of Hobbs Poly Down. Since this is meant to be a summer quilt/spread and I want to try to attempt some trapunto effects, this could be a good choice. However, I'd also like to compare it to a cotton batt but all the queen-size cotton batts I have are "natural" colored (oh, and one black batt for a future Amish project already stashed). The good news is that Connecting Threads had sent an email that they had batts on sale for 30% off and when I checked, they offered Hobbs 80/20 Bleached, something I have not seen in the local shops. So I put in an order for that.
The next step on that project will be to think some more about the additions I want to make to the stitching designs, get them marked and then test out my ideas for executing the trapunto effects.
With the machine back I'm now debating about how soon to get back to machine work. I already know of a couple of projects I want to tackle. I decided that before I did that, I really wanted to finish up one more bit of outstanding hand work. Last year I had finished up this little redwork embroidery project:

It was made to be added to one of my early quilts but the update never made it to the top of the "To Do" list last year. I picked it up and decided to finish it:

However, whereas usually a finish is a good thing, in this case it may not be! I'll go into a little more into detail on that in a separate post. I think the "turn of events" may have turned me off a little to doing any more hand work over the weekend. But I do want to keep up the momentum for hand work as well as organize the machine work projects and ease them back into my daily rhythm. So time to embrace a new week and see what it brings!
Another Hand Work Finish?
This little embroidery piece has been sitting around since I finished it in February of last year.


I came up with the idea to do it back in 2012 when President Obama was running for re-election. At that time there
was much talk about the historical precedence of his presidency and how he was inspired by Lincoln. It was also interesting to reflect on the significance of his presidency in tandem with the commemorations of the 150th anniversary of the Civil War that were going on at the time.
I got Bonnie Browning's "Designs on Freedom" book when AQS was offering it as a gift with purchase. The book has patriotic line drawings perfect for rendering in embroidery or applique. The prior year I had downloaded a free Obama drawing they had offered that is not in the original book (and they offered it again on President's Day this year which you can get here).
I combined the Obama drawing with two others from the book: one of Lincoln (on page 15 ) and the elements from "Give Me Liberty" (on page 25 but also available for free on the AQS website). My plan was to add it to a quilt that I made back in 2002 called "Spontaneity" that was displayed in my downstairs bathroom which is decorated in a Red/White & Blue theme.

Testing, testing.....

At this point, I thought two things: wash the quilt since when it was originally made that first border was much whiter! Second was that the embroidery needed a border -- maybe some trim? Something that reminded me of turn of the century political banners. I did eventually find a trim I liked:

I also did wash the quilt. Yeah, about that....


Yes, the reds ran and it didn't help that they were all next to the white border! The little squares on this quilt were fabric swatches that I had received back when I belonged to a subscription fabric service. I never expected to wash this wall hanging so never gave any thought to the color fastness of the swatches. Even after that, I thought I might be able to fix it by hitting those spots with a bleach pen. So I went ahead and trimmed and turned the edges of the embroidery so I could add the trim and put it on the quilt.

Edited to Add: Always love an opportunity to use another gadget! I actually trimmed the edges of the embroidery with the Creative Grids Corner Cutter using the edge with the 3" radius.

Surprisingly this is the same tool and edge I used to trim the corners of my (much larger) "Re-piecing the Past" sampler lap quilt.
I whipstitched the trimmed out piece to the little quilt and hung it up. I was pretty happy to finally have it done and in place.

However, my DH was not! While he liked the embroidery and the original little quilt he was not as jazzed about them together. He also thought that hanging it in the same room as my "Sweet Land of Liberty" quilt took away from the larger quilt.
 |
| Sorry, hard to get a shot of both in this small room! |
I do respect his opinion as he has offered good visual insight on my quilt projects before -- not to mention he has to also use this bathroom!! So I'm probably going to take the embroidery off and try to figure out another way/place to display it. Still counting it as a finish though!!
Monday, January 11, 2016
Slow Sunday Stitching 1/10/16
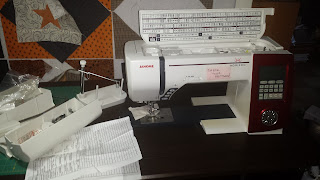
Well, over the past week things have been moving along. The Janome went in for service....

You've heard of "empty nest syndrome"? Well, I have "empty sewing table syndrome"! The treatment? Continue with the hand stitching adventures! So it was on to the next project -- finishing my "High Stung +2" Christmas quilt. After I had readied the machine to go into the service shop, I pulled the top out of its storage box. Only then did I remember that I had never bought the backing for it. Fortunately when I took the machine in, I found something I liked for it. In the days following, I prepped it by piecing together two strips of fabric and adding them (by hand again) to one side of the backing cut to make it wide enough for the top and allow extra all around for quilting. I also had to finish stitching the embellishments onto the top, adding a harness for the reindeer and some button "berries" to some of the leaves on the trees. The only batting I had that was close to the size of the top was a crib batt so I had to "Frankenstein" some other scraps to it (also by hand) to bring it to the size I needed.
Working on this project is allowing me to do two additional aspects of hand work: hand quilting but also hand basting. I know that often when I've seen people hand quilt, they hand basted their quilts so I figured this was the way to go.

This is not the first time I've done this. Back in 2010, I discovered Sharon Schamber's method of hand basting a quilt. She did a two part video on it that you can view here and here. Back then I used her techniques to baste my "Flying For Cover" flannel quilt.

Sharon says the process is faster than pin basting but I find it takes me about the same amount of time. That might be because before she basted this way, she basted on the floor while I have always table basted. While I do like the process, I can't do it for every quilt. The barriers for me doing it with large quilts are that you need to have wooden sticks the full width of your quilt and be able to spread it completely out on a table. I'm limited in my space to doing lap size or smaller quilts this way but I've found it to be a very, very effective method.
I've still got some more basting to do before I can start the quilting. I'll be linking this with the rest of the Slow Sunday Stitching crew over at Kathy's Quilts blog and checking out what others were hand stitching (or knitting or crocheting) this week.
Monday, January 4, 2016
Slow Sunday Stitching: A Hand Piecing Finish
Meet Tucker!

Back in October, I started collecting fabric squares for Pam Buda's last Pocket Patchwork Sew Along called "Tucker". As noted on the reveal post, she was inspired by antique doll quilts to design this little quilt to "tuck into" small decorating places that needed a little filler. I was attracted to the "scraps" and "mini quilt" aspect of the project and finished collecting what was needed after the reveal in November:


I found some good tips on both Jinny Beyer's website and the Hand Piecing With Crispy blog (see the links on her sidebar) and found that doing this all by hand wasn't as hard as I anticipated. My Bee In My Bonnet design boards not only made great project holders but they also doubled as great lap work stations. To stitch the seams I was using thread that was already wound on a bobbin and found I could stick a pin through it and through my pin cushion to tether them in place on the board while I lay out the pieced and unpieced rows to be worked on.
I finally sat down after the holiday to start on the hand work. It took me four days to get the two main sections done so I could start on the center section flying geese. I have to say looking at the back, this looks like an antique quilt!

Note to self for the future: I used the yellow Clover Chaco-liner (chalk) marker (which I love) to mark the seam allowances but see that I need to use a lighter touch on lighter fabrics because there's a bit of show through on them on the front (you'll see it better if you click on the picture to enlarge it):

I finished the last of the geese and sewed the top together on Friday. In the original design, Pam did a strip of FG in the center of hers. On some of the revealed quilts, people did various layouts of the geese and I liked that option. I decided to do mine in a "staggered" formation. As noted in the beginning, this top is meant to be "tucked" so as designed, wasn't meant to be quilted. However, if you check out the reveals (posted here and here) you will find that some people did quilt them. For me, I was glad not to have to quilt it since it would get done that much faster! I also then decided that rather than doing a separate back and binding, I hoped I had a piece of fabric big enough to both back the quilt and turn the edges of it to the front to also bind it. I narrowed the choices down to two fabrics:


So all I had to do now was make the final backing/binding decision and would be ready to finish this...or so I thought. I kept looking at the top and couldn't shake the feeling that some of the"sky" pieces of my geese did not have enough contrast to make the geese stand out leaving the staggered layout looking too "muddy". Mind you, having already sewn the whole top together, I was REALLY reluctant to take it apart. I thought I could live with it (mainly because I really wanted to get it finished) but I finally "bit the bullet" and took it apart yesterday. I made a two new geese (although only used one of them), played with the arrangement, rearranged some of the original ones and ended up with this:

A little better (although I also still lost a few geese points) and enough to move me on to the finish. I sewed everything back together again, made the decision to go with the purple fabric and cut the backing accordingly. As a Gadget Fanatic, it also meant that I got to use a tool I've used before: The Quick Easy Mitered Binding Tool.

I had previously used it to do the same technique on a Schnibbles quilt (seen here). I prepped the edges and marked the corners per the tool instructions, stitched the mitered corners, turned the edges to the front and hand stitched it down for the "binding". I made a simple label out of a square of leftover Aged Muslin fabric and stitched that to the back to finish this off.


I always say that for me it helps to have a "need" to help motivate me to keep a project on track. When I had set up my Christmas decorating, I realized that when this little quilt was finished, I too would have a space to "tuck it":
Before (during the holidays)

After (now)

Shameless plug: I love these battery operated candles from Leisure Arts! They feel like real wax, come with a remote control and can be set to many different colors and to "flicker". I had hopes for this to be the last finish for 2015 but am just as pleased for it to be the first finish for 2016! I hope this bodes well for all the other hand work projects I have planned for the year!
Linking this up to Kathy's Slow Sunday Stitching for this week. You can check out other hand work projects by clicking on the link above. Happy Stitching!
Friday, January 1, 2016
Get It Done! January Goals
Towards the end of last year, I had decided to keep doing these monthly "Get It Done!" posts because they helped me realize that I've got to be more efficient (my word for the year) in terms of the goals I set and how I approach what I do. As you get older, it's all about working smarter not harder!!
In my previous post, I laid out what my interests are for 2016. There may be more as the year goes on but I'm trying to keep my lists short this year. Although dumping out the contents of the "To Do" list in my mind was good for seeing my vision, it didn't help my productivity at all! The thing is, I like finished quilts. They don't have to be finished quickly but they do have to get done. Over the last few years I've found that putting too many irons in the fire meant that all I did was get burnt!
Last year I sorted the monthly lists by what type of quilting or project I was doing (ex: hand work, UFOs, Wool projects, ect.) but I think I need to change it this year to focusing on the actual projects I want to work on. I can talk about the what type of quilting I'm doing when I report on the actual project.
Normally these posts begin with a recap of the previous month's goals and what did or did not get done. However, the same thing that happened with the November recap happened in December, none of the stated goals got done! I did get some things done in December (and you can see those here), just not the things I planned. So since there's no use crying over (or posting about) spilt milk, I'll just move right onto what I hope to get done for January.
The January Goals are:
1. Finish the Tucker mini Sew Along project: This one should get done either today or (Plan B) by the end of the weekend. I have four more Flying geese units to make up and then can attach them to the previous two sections (pictured below) to complete the top. This one doesn't have to be quilted so once the top is done it can be backed and bound.


3. Start on the Wholecloth project: I'll go into more detail on this in the actual project post but for now, know that the plan is to get this layered and on the hoop by the end of the month. I'll be using a pre-printed top but want to add some details to it too so have to think about what those will be. This will be an ongoing project until whenever it gets done which could be mid-year, year-end or next year.


5. Start on the Featherweight: In addition to sending my electronic sewing machines in for service, I also want to get my Featherweight machine up and running. Last year, I bought a book on servicing it and now need to sit down with it, take a close look at the machine and purchase the supplies I think I'll need to get it up and running. I'll settle for that for now although if I get to actually fixing the machine this month that will (again) be gravy!


That's it and I believe it's doable. The end of the month will tell! Happy Quilting!
In my previous post, I laid out what my interests are for 2016. There may be more as the year goes on but I'm trying to keep my lists short this year. Although dumping out the contents of the "To Do" list in my mind was good for seeing my vision, it didn't help my productivity at all! The thing is, I like finished quilts. They don't have to be finished quickly but they do have to get done. Over the last few years I've found that putting too many irons in the fire meant that all I did was get burnt!
Last year I sorted the monthly lists by what type of quilting or project I was doing (ex: hand work, UFOs, Wool projects, ect.) but I think I need to change it this year to focusing on the actual projects I want to work on. I can talk about the what type of quilting I'm doing when I report on the actual project.
Normally these posts begin with a recap of the previous month's goals and what did or did not get done. However, the same thing that happened with the November recap happened in December, none of the stated goals got done! I did get some things done in December (and you can see those here), just not the things I planned. So since there's no use crying over (or posting about) spilt milk, I'll just move right onto what I hope to get done for January.
The January Goals are:
1. Finish the Tucker mini Sew Along project: This one should get done either today or (Plan B) by the end of the weekend. I have four more Flying geese units to make up and then can attach them to the previous two sections (pictured below) to complete the top. This one doesn't have to be quilted so once the top is done it can be backed and bound.

2. Quilt "High Strung +2": This one was supposed to have been quilted and done by Christmas. That plan got changed when my sewing machines went on the fritz right before that. The good news is that I immediately saw an opportunity to try something new that I've wanted to do: "Big Stitch" (hand) quilting. I also saw the perfect set of Valdani threads for this quilt at the Craftsy year-end sale. So while I'm waiting for the thread to arrive, I can layer the quilt and decide on how I want to quilt it. I'm hoping that they'll get here quick enough to leave me time to stitch this up and call it done by the end of the month.

3. Start on the Wholecloth project: I'll go into more detail on this in the actual project post but for now, know that the plan is to get this layered and on the hoop by the end of the month. I'll be using a pre-printed top but want to add some details to it too so have to think about what those will be. This will be an ongoing project until whenever it gets done which could be mid-year, year-end or next year.

4. Start on the Baby Quilt: For this month I definitely want to finally get this in gear. At minimum, I'd like to finalize my plans for which quilt I want to make and stash the supplies for it. If I'm lucky and can also get it made up, that'll be gravy.


That's it and I believe it's doable. The end of the month will tell! Happy Quilting!
Happy New Year! What To Look Forward To in 2016

A New Year has started and so do the quilty hopes and dreams of quilters everywhere! Val over at Val's Quilting Studio has done a new twist on this week's "Tuesday Archives". Rather than sharing an old post, she has asked everyone to share a new post on their plans and goals for the year. Perfect since that had been on my agenda anyway so let's get started!
First off, the Word of the Year: Efficient
Over the past few years, quilters have been starting off their plans for the year by picking a word that they hope will define their approach to their quilty life. For me, the chosen words have been centered around helping me overcome obstacles to finishing my projects and this year is no exception. The new tool I hope to put in the belt is the ability to be Efficient in my quilting. The first few definitions that popped up after doing a definition search say it all:
I've got the all the tools (both physical and mental) but it's managing them all so that I can get from Point A to Point B as smoothly as possible. Many times I think the process part of a quilt will be smooth but I feel I need to better manage how to do that so that it can actually happen! Part of that will be making smaller goal lists and trying to better estimate both the time I have to do stuff and what I can reasonably (key word) expect to get done within it. It also means making sure I have a number of different things queued up (a Plan B so to speak) so that if my time is not as generous as expected, I can still accomplish something. Speaking of which did you see Pat Sloan's post about planning for UFO-busting? It was pretty good and definitely has some tips I want to incorporate. Check it out here.
The Big Picture: The Main Themes This Year
As always the year will be about tackling the ever growing "To Do" list. However, in the interest of being efficient, I know I'll need to focus (one of the past years words) on some priorities if I want to get anything done.
1. Hand Work
Since I'm already starting off the year without any working machines (for details on that, scroll down to the bottom of this post), it looks like this will be easy to get to for a change. I'm already set to finish up a mini sew along project today and hope to layer my Christmas quilt UFO for "Big Stitch" quilting by the end of the week (while I await an order of some new Valdani Perle threads). The biggest project of the year (and it will probably take the whole year to do) will be to work on a really big Bucket List project: hand quilting a bed-size wholecloth quilt.
2. Staring Down the Bucket List
Speaking of the Bucket List, in addition to the wholecloth quilt, I hope to make good on last year's plan to finally finish up my Double Wedding Ring project. If I can get these two done this year I will only have two more items left on my original Bucket List which I blogged about here.
3. UFO Busting -- Get It Done!
I'll be continuing my monthly "Get It Done" Posts in my ongoing attempts to stay on top of both the UFOs and any new projects. I actually want to try, for once, to limit the new stuff and keep the focus on the UFOs since there are already projects in the previous two categories that fit that bill.
4. Charity Quilts: Quilts of Valor
I feel bad that I've been slack on getting to this in the past so if I do start any new projects, I want it to be for this. Since this one is dependent on getting my machines back on line, that will need to be a priority this month too.
5. A Functioning Featherweight
While my electronic machines will have to go out for service, I'm actually hoping to finally get to learn about the Featherweight machine that I've used just for display. I'm looking forward to both getting it up and running, trying it out for piecing and becoming knowledgeable/proficient at maintaining it.
6. The Baby Quilt
This one was on last year's list all year and is now (too) long overdue. I want to get it done if only to get it out of my head! Again, bowing to efficiency, I've got to make time for this, set up a plan and knock it out!
I think that's a big enough list for now since I'm in danger of already breaking my first resolution to not make big lists!! If you're reading this before January 2, then maybe you'd like to add your quilty task list over at Val's too! However, even after that, you can check out what other quilters have in store for 2016 by clicking over here.
Wishing everyone a Happy, Healthy, Prosperous and Productive New Year!!!
Subscribe to:
Posts (Atom)


