Friday, December 31, 2021

The Seven Days of New Years 2021 - Day 6

We're almost there.....


So this is the last check-in for 2021.  The good news is that one more "Snowflake" is done!


Hopefully by the end of the weekend, I can get the last block done and have a winter wall hanging well before January ends!  

On the quilting front, I started on the green "Wine Glass" sections today and got three done.

I played with two more feather types today, one from Angela Walter's Fabulous Feathers Challenge and one from a book by Sue Nickles.  So at this point I have about a third of the quilt done and look forward to getting to the finish line on this one soon too.

Also, let me say this:  An important gadget that has helped keep the stitching going without interruption:  my Sidewinder Bobbin Winder!

So, I'll be spending the rest of the evening waiting for the ball to drop.  Hoping you are either celebrating with friends and family or relaxing and waiting for another New Year to start.  In either case, I look forward to seeing you on the other side!

Thursday, December 30, 2021

The Seven Days of New Years 2021 - Day 5: Another Snowflake and More Quilting.....

 Another busy day!  This morning there was work on the "Snowflake" from yesterday while DH and I watched a little TV.  

The center is stitched together and I should get the last outer ring done while watching tonight's Accuquilt Live in a little while.  They are once again looking at quilts currently displayed at the Boston Museum of the Arts.

On the quilting front, I got a few more panels stitched using the feather designs from Angela Walter's Free-motion Feathers Challenge (Week #2).  

Today I used the "Basic" and "Wonky Feathers" in two purple panels, the "Ferny Feather" in a brown panel and the "Feather Meander" in two white panels as well as continuing the practice of stitching the "Custom Feathers" along both sides of the vertical seam allowances of the panels I've stitched.  They are hard to photograph at night due to the matching thread so I look forward to getting a better shot during the day when this is all done.

Gotta run, the show's starting!

Wednesday, December 29, 2021

The Seven Days of New Years 2021 - Day 4: Quilting Has Commenced!

Before going to bed last night, I laid out the next "Snowflakes" block:

I had to make a few extra of the textured medium blue hexies since I had changed the color placement in the patterned layout a bit.  Wanting to get started on the quilting, I decided to save the "sit and stitch" on it for this evening's Accuquilt Live event and I'll work on it then. They will be viewing quilts from the Boston Museum of Fine Arts both tonight and tomorrow night.  

I'll update this post with the actual video links once they air since the videos live on You Tube and Facebook for good.  Actually if you like quilt museum visits, you can also check out the ones they made at the International Quilt Study Center back in July and September.

Today's focus project was quilting the "Serendipity" quilt.  It took me a while to review all of Angela Walter's Feather FMQ Challenge videos again and make some decisions about what to quilt where.  One thing I had decided last week was that I wanted to use Angela's "Custom Feather" (seen in this video) to quilt along all the vertical seams that run the length of the quilt.  

It is the one motif that doesn't work from a pre-stitched center stem and she used it to quilt along block seams.  The twist for me is that I'd need to watch how the feathers transition from one rectangle to another since I'll need to change the thread color then.  I also decided to take her advice and mark the outer line that the feathers needed to meet to help keep the stitching even (I'm using 1-1/2" away from the seam as my guideline).

I started in the middle of the quilt with the blue rectangle and once the feathers were stitched on that side, I decided to continue with the same thread and stitch the feathers in the center of that rectangle. I really debated for a while about what to use here as on close inspection of the print I used, it actually has a sort of feathery/frondy motif in it already.  I decided to use those as a guide to stitch along.  Initially, I sketched out on preview paper Angela's "Basic Feather", then thought her "Curly Feather" would look better.  However, I have a few other books on stitching Feathers that I decided to consult and found another option that I liked even more.


Patsy Thompson's book "Feather Adventures" always intrigued me with her technique of layering colors when stitching feathers to make them pop.  I won't be going that far this time but I did find a feather motif that when sketched out on preview paper, really picked up the underlying motifs on the print so I went with that.

Oops!  While I marked the right side of the rectangle for the seam feathers, I forgot to mark the left side before stitching the feathers in the center!  Not a big deal, fortunately I realized it before I had stitched the rest of the rectangle.  I just fill stitched by the seam around those bottom two and resumed the feathers along the seam further up the rectangle.  

It's a little hard to get a good shot of it at this hour but it all stitched out pretty good!  Needless to say, I know I was pretty tense because I was starting off so, I'll break from this for tonight.  I am pleased with the good start and hopefully tomorrow, I can continue and get a good deal further now that I've warmed up!   

Now back to the hexies for the rest of the evening!

Tuesday, December 28, 2021

The Seven Days of New Years 2021 - Day 3: Continuing with Hexies and Setting Up for Quilting

Not a lot done for the "Snowflake" project this morning beyond finishing the prep of the dark blue hexies that I didn't get to last night and starting the center of the third block.

Re-purposed food containers make the best organizers!

The main focus for the day was to be on setting up the "Serendipity" project for quilting.  I had decided last week that I'd probably change threads over each of the different colored sections to help highlight the different motifs to be used in each.  Of course that meant picking and auditioning threads.   

These are the final choices.  It worked out that I can use the same thread on the peach and cream print as well as the wine bottle print.  Unfortunately, the closest I had to the purple print was a brown that sort of blends.  I'll settle for that as I have two spools of it so don't have to worry about running out during what I expect to be a lot of intense stitching.    

I interrupted the quilt work to watch today's Accuquilt Live during which I had lunch.   I also had received word today that Kari Shell was giving a free special Techno Quilters workshop on creating Snowflake designs in EQ8 and of course I had to see that!  I had signed up for the classes back in August but have only completed one module so far.  I have to get back in the flow with those in the (soon to be) New Year as I have a commission project that I want to design using the program. 

That accomplished, this evening I did the stabilizing stitch-in-the-ditch on the quilt using smoke monofilament thread on the top.  For this project with just flat expanses to be quilted, I removed all the pins now before I move on to doing all the decorative quilt stitching.  

Tomorrow, I'll preview the motifs and hopefully can try to get a significant portion of it done! 

Monday, December 27, 2021

The Seven Days of New Years 2021 - Day 2: More Hexies and Some Layering

A full day to say the least!  Despite some interruptions, I've almost got what I wanted to accomplish today completed.  

For the "Snowflake" project, this morning I picked out the fabrics for the next block and die cut them.  I started prepping them while watching the two You Tube shows that I spoke about yesterday  that aired this afternoon.  

I'm going to finish up the rest of the dark blue and gray ones while watching the late night news shows. 

Something I had hoped to start on last week was quilting on two projects, one of which needed to be layered.  I had a call to return that I expected to take a while so after finishing the shows and then having lunch, I decided to work on layering the quilt.

The quilt top that needed layering is called "Serendipity" and was made back in December 2020.  

The only batting I had closest to the size of this top was some Hobbs Tuscany Silk in a Twin.  

This will be the first time I've used this batting formulation.  I have another one in Queen size and I think I got both years ago during one of Connecting Threads big batting sales.  I'd love to also try a cotton/wool batt which they also carry under the Tuscany brand name.  It's a small lap quilt with no blocks to pin around so the easy layering is all done!

Backing is a Kim Diehl wide back print called "Spiced Pomegranate".

Here it is with "Hometown USA" which is the other quilt I want to get done.  What has energized me to get started on quilting both of these is Angela Walter's recently completed free motion quilting challenge that focused on "Feathers" .  She ran the last tutorial last week and there will be an additional wrap-up video to follow on the 30th.  I am looking forward to trying out all the various motifs she demoed and can see some possibilities for some fun filler stitching practice too.  

Edited 12/29/21 To Add:  Turns out Angela actually did one more tutorial today on quilting Feathers in borders.  Check it out here!

I'd love it if I could get them completely done by New Year's but I'm not holding my breath on that one!  Ok, now I can relax (?) with the news and the remaining hexie prep and then head to bed!  Tomorrow's another day!

BTW:  For those of you that like the "Accuquilt Live" events that air on You Tube (and also on Facebook), there's going to be another one tomorrow called "Squared Away" which will be demoing their "Cubes".  The special guest on the show will be Eleanor Burns!  More hexie sewing time for me, ha, ha!

Sunday, December 26, 2021

The Seven Days of New Years 2021 - Day 1: Hexis and a Slow Sunday Stitching Day


Well, Santa Is Ready to Relax, How About You?

It's time again for my own special holiday crafting celebration:  a Quilt-A-Thon from the day after Christmas leading up to New Years!    It was another quiet and subdued Christmas which seems to be the hallmark for our family of how holidays are celebrated during this pandemic.  

At the start of last week, I had the usual ambitious plans to try to get my "Hexie Snowflake" project wrapped up and done.  At the time, I had one block done with hopes to make three more:

Of course,  I soon learned I was crazy to think that on the last big week of the holiday, I'd be free to just sit and work on a project, Lol!  Pretty much every thing I had mapped out got upended by unexpected calls or changes in when or how I'd get the things other than quilting done.  Not to mention that after spending most of the holiday season not shopping in person last year, it was a shock to the system to see how busy the stores were back to being this year!   

There was very little stitching accomplished over the last two days so I spent today catching up and have managed to finish up the snowflake for the second block:

The great thing about this project is it can hang for the whole winter, so I'm still excited to get it finished.  Now I have two more blocks to make for the four block wall hanging I want.  

The good news for some additional stitching time is that tomorrow there are two "live" events to sit and watch!  As a Gadget Fanatic, for the last year, I've really enjoyed viewing the twice weekly (usually Tuesdays and Wednesdays)  "Accuquilt Live" events that air on You Tube (and also on Facebook).   There are usually special purchase deals promoted and the chance to win gifts or reward points if you register in advance to view the events.  During the holiday gifting season they really upped their game and have run three or four events each week!  On Christmas Day, I saw that they had scheduled another new event for Monday called "Countdown to the New Year".  

Barbara Black of "My Joyful Journey" announced on her last blog post that she will be doing a live broadcast on The Quilt Show's You Tube channel to discuss choosing fabrics for the 2022 TQS Block of the Month:  Irene Blanck's "Garden Party Down Under".  I'd love to finally get to do one of the TQS BOMs.  These are just the kind of shows to provide a little more "sit and stitch" time!   

Are you doing anything special in preparation for the New Year or are you blissfully relaxing and waiting for the clock to turn the dial on 2022?   Sounds like a sweet way to spend the week either way!

Linking up with:


Kathy and all the lovely stitching going on over at Kathy's Quilts 

Monday, December 20, 2021

Make A List Monday

It's the last week before Christmas!  Having participated in whooping it up for a finish at "Can I Get A Whoop Whoop?!?" with Sarah over at Confessions of a Fabric Addict on Friday, this morning I want to follow her example again by setting up a "Make A List Monday" To Do list for this week.


This is one of the rare times that my list is short for a change, Lol!  Here's what's on board for this week:

1.  "Hexie Snowflake" Project 

I started on this one while basting and quilting the "Civil War Strippie" quilt.

This is the next to the last of the Blue & White Christmas decorating projects.  It was (as usual) supposed to have been started long ago but a viable crafting window didn't open up until two weeks ago.  What you see above is only the first block.  As of right now, the snowflake is finished but the papers have to be removed and it has to still be appliqued to the background.  With how long it took me to get that far, I've already switched methods for how I prep the hexies and the project has now been downsized.  Rather than the nine blocks as the pattern shows, I'll only be doing a four block wall hanging.  The blocks are big enough that a quilt of that size will perfectly fill the space I want to display it in.  

I was inspired to try this for two reasons:  First is that it is yet another project on the Edyta Sitar/Laundry Basket Quilts obsessions list (pattern available from Paperpieces)!  Second, ever since I taught an English Paper Piecing class last year, I've wanted to do a more complex project using the technique.  While this isn't as complex as what I really want to do, it is a definite step up from the simple projects I made up as demos for the class.  

Even though it's been slower going than expected, I am really enjoying the chance to try EPP again and am shooting for getting this completed by week's end.  Fortunately, both this and the last of the planned Blue & White projects can also be considered "Winter" quilts so it's fine if this doesn't get done as quickly as hoped and the other definitely won't get started until after Christmas. 

2.  Quilting with Feathers

Back in November, Angela Walters (noted quilt industry long armer of "Quilting Is My Therapy" fame) began another of her "Free-Motion Quilting Challenges", this time on the topic of quilting Feather Motifs.  It's called "Fabulous Feathers" and she has hosted a series of tutorial videos and follow-up live chat discussions on You Tube.  In the videos, she demonstrates how to stitch various feather motifs and how to apply them to a variety of spaces within or around quilt blocks and tops.  

When she announced this, it was a case of perfect timing for me!  Back in the summer I had made this top:

I had envisioned doing feathers in the diagonal dark and light log cabin areas.  However, I wasn't totally sure how to proceed.  At the time I was making the quilt, Angela had another Challenge Series going on called "Flora and Foliage".  I tried using the feather motif from that challenge (the "Paisley Feather") but found it to be a denser stitch pattern  than I wanted to execute (a.k.a. it would take me forever to stitch out where I wanted to use it).  I also tried to do a less dense feather on my own but it wasn't looking the way I hoped.  At that point I put the project aside to "simmer" for a while until I could figure out a better plan.

As always the Quilt Muses look out for me and when Angela announced the new series, I knew this would be my path to completing this project.  Busy with other projects, I watched the first few weeks of videos and immediately saw ideas for applying her motifs to my quilt in a way that suited my taste and time.  Additionally, I had made another quilt top from the leftovers from my "Modern Bohemia" project when I was away at my MIL's back in December of 2020 that I figured would make a great "practice piece" with space to road test all the motifs!

Prior to now, I had no formal plans for the quilting on this project.  I decided that using each of the different colored panels to try out Angela's various motifs and fill techniques would be a fun way to get this one completed as well.   

So looking forward to maybe adding another couple of notches to the WIPS-B-GONE list before the year ends!

Friday, December 17, 2021

Whooping it Up for FONF, a lot of FMQ and a WIP Gone!

 It's time for "Finished Or Not Friday" but I also need to shout a big "Whoop Whoop"!  Why is it the supposedly "easy" ones that give you the most trouble?  


I my last post, I was here with this project:

Then earlier this week, I finally got to here:


The quilt I call my "Civil War Strippie" is D-O-N-E!  This was a squirrel moment project that started back in September because I've been obsessed with Edyta Sitar's Laundry Basket Quilts designs since last year's pandemic.  This one is her quilt called "Cinnamon Stix".  I've also made these:

"California" 2020 Mystery Quilt (top), "Lidia", "Snow Day"

"The CW Strippie" is a queen topper made up of simple Uneven Nine Patches and Rail Fence blocks with wide and narrow sashing strips between them.  I saw the design and loved it!  Then I saw the brown stripe (with enough for the back too!) and the coordinating large pink leaf print and thought this would be an easy, quick quilt to make to use up more of my Civil War repro stash.  So of course the piecing took many more weeks than I thought (helped by the fact that I was working on multiple other projects at the same time).  When I finally had the top done in mid-October, I thought I'd baste it quick and quilt it even quicker when we returned from a trip at the end of that month.  Yeah right!  I didn't start the basting until late in November (those other projects again) and spent almost three weeks pinning and re-pinning when the continuous border/backing I decided to use would just not lay flat!


The fabric I had purchased was pre-washed and I had decided that rather than piecing a separate front top border and backing, I would leave it as one continuous piece.  I won't do that again!  Fortunately, after starching the backing and re-pinning it again, I managed to get it smooth enough to start the quilting.  In fact, I only managed to pick up one very small tuck in all of the back quilting, not bad considering where I started with this.  

And fortunately it is hard to find in the sea of brown stripe!

At this point, it's time to talk about the quilting, so I'm also joining in with the "FMQ Mavericks" over at Muv and Andree's at Lizzie Lenard Vintage Sewing!

I had come up with what I thought was a simple quilting scheme about mid-way through making the top.  I used my usual threads too:  for pretty much all of my CW projects, Aurifil #5011 blends in perfectly for the lighter fabrics (and was used here across the whole top) and #2370 for the darker ones (used here for the back and "binding").  I am still trying to get back to the comfort level I once had when it comes to free-motion quilting.  I figured I'd employ some help to get there:

I used the "Line Tamer" straight-line ruler with the channel when I needed to make sure I hit the corner block intersections when stitching across the Uneven Nine Patches and the side rails of the Rail Fence blocks.  After trying free-form waves on a quilt earlier this year, I decided to get some rulers for those times when I need the waves to be even and precise.  I used Angela Walters "Elvira" ruler  to stitch them over the wide pink sashing.  For the grid quilting in the top "border", I used a regular straight-line ruler by Accents In Design which I've had for years (this is the only link I could find to one and here is a great review of it).  It has markings that allowed me to evenly space the grid lines without having to mark the lines in advance.

In the centers of the Rail Fence blocks and the narrow tan and pink sashing, I relied on a narrow fill stitch (#4 in the picture above) that I've used before and love.  Dawn Cavanaugh wrote about them in the article "Bitty Border Quilting Ideas" in the March/April 2012 issue of Fons & Porter's Love of Quilting.

Edited To Add:  Good news!  If you don't want to buy the whole magazine, APQS has posted a copy of that same article which you can pick up here.

The rulers both helped and didn't:  it took a bit to get the stitching smooth especially when I was trying to stitch backwards from the bottom of a column back to the top.  There is also something to be said for taking breaks.  At least two times after struggling with lots of thread breakage, I came back to it the next day and it was smooth as silk.  Go figure!  Once the quilting was finally done, the finish for this was simple:  backing turned to the front using the Quick Easy Mitered Binding Tool as always when I do this kind of "binding" and then machine stitching it down.

This was at the top of my WIPS-Be Gone list for this quarter as I considered it the closest to being finished.  I am glad to see it done and I think I'll take one more "Whoop!" before moving on!  

Linking up with:

Alycia at Alycia Quilts for "Finished Or Not Friday"

Sarah at Confessions of a Fabric Addict for "Can I Get a Whoop Whoop?"

Muv and Andree at Lizzie Lenard Vintage Sewing for "Free Motion Mavericks"

Friday, December 3, 2021

How I Replace My Ironing Board Covers

In my last post, I showed my new ironing board cover.  I got a question about what technique I use and since it has worked pretty good for the last few cover changes, I figured I'd share it here!

I have used a shortcut for making the last three board cover replacements I've done.  It all started with a cover I had a good while back.  I had one of those canvas covers with the measurement markings on it like this one: 

Golden Hands Measure-matic available at All Brands.com

Here it is when I was working on "Floribunda" back in 2011.

The one I had was made out of a nice sturdy canvas but I can't vouch for the kind of fabric they print it on now.  

When I was ready to replace it, I had looked at a lot of ironing board cover tutorials and wasn't looking forward to doing the string casing.  I like those better than elastic around the edges which can stretch out over time.  So what I decided to do instead was to cut away the casing from the canvas cover (leaving the string in it) plus leaving about an extra half inch of the cover attached to the casing. 

Then I just cut the new replacement fabric in the same shape as what I cut out of the cover + an extra half inch for seam allowance.   I sewed the new replacement fabric to the old casing using a zigzag stitch to overcast the edge.

Now each time I've need to replace the cover, I just separate the casing from the old cover:

.... and use the old cover as the "pattern" for a new cover since it already includes the seam allowance.

The only challenge this time around was that before I cut out the new cover, I had to lay the new fabric on the board to make sure I was getting the word panels I had attached to the ends to line up right where I wanted them.  I also had to make sure that there was enough extra cut beyond them to pull around the ends of the board.  After that, I lined up the old "pattern" on it to position it for cutting.


Fini!

As I said, the fabric the casing it is attached to is pretty sturdy and so far it has held up to me adding three new covers.  I was thinking that with the next change, I might either reinforce it with some fusible interfacing or even attach the casing and the new cover together by using bias binding tape to surround the edges. 

If you know of some easy ironing board cover tutorials, please share!

Thursday, December 2, 2021

December Is Now Underway!

Now that Halloween and Thanksgiving are behind us, it's time to embark on the final stretch of the holiday season!  As I move towards the end of the year, it's also time to once again re-organize my plans and priorities and figure out what I think I can get done.  

New Ironing Board Cover and Shop Hop Stash Dive

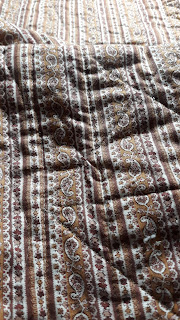
Well, one thing that has already gotten done is to replace my ironing board cover.  The old one was pretty dingy and what better way to head towards a new year than to make your ironing board cover new, shiny and pretty!

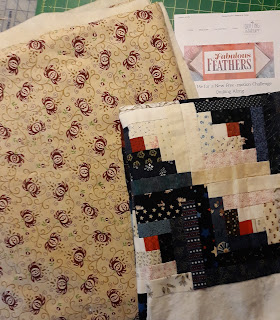
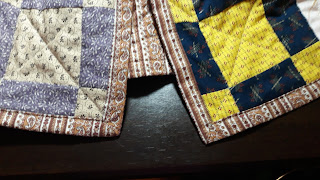
Much better!  The old cover had been made up four years ago so it was definitely time for a change.  This little project was helped by the Shop Hop I attended in NC when we visited my MIL back in October.  I had purchased a pretty collage print on the sale rack at Cary Quilting from the MODA  "Sew & Sew" line by Chloe's Closet from a few years back.  

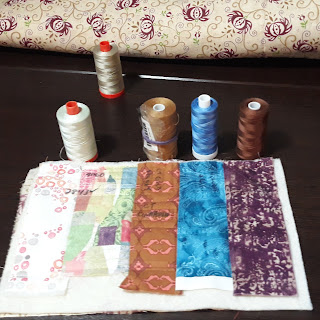
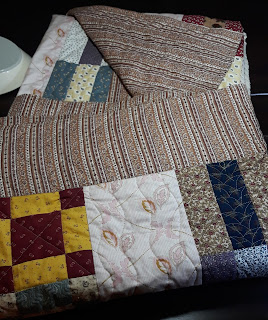
My plans were to use it to make a "sewing/quilting themed" collage-style quilt by fussy cutting some of the sections with sayings on them and surrounding them with other coordinating fabrics.  The additional prints shown here were also purchased at Cary and I picked up a few more at some of the other stops on the Hop.  

However, when I lay the fabric on my ironing board, I realized that a couple of the sayings panels would also fit perfectly on the tapered and wide ends of it and a plan was hatched!   Then while shopping the web for fabrics for another project (more about that later), I came across another "sewing sayings" print by Timeless Treasures.  I thought it would make great inserts in the collage quilt but also realized that it could be used to complete the ironing board cover plans too! 

From this....

....to this!

Definitely brightens up the quilt space!

Blue and White Christmas Decorating Is Ready To Start

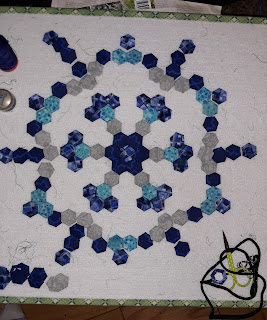
Now that December has arrived, I'm pulling out what I have so far for this year's Blue and White Christmas decorating. 

Normally we buy a small natural tree but given the problems we had last year and the new color scheme, I decided an artificial tree was in order for this year.

After some assembly, we'll be good to go!

The plus is that I've now decided to do a red and white scheme for next year so this tree will work for that too!  

The only problem now is that I haven't been able to get the lights I want for it.  I want blue or blue and white lights on a white string.  I've checked a few stores locally and so far haven't found any in that combination.  Also it's only a four foot tree so I really don't need a long string of lights -- only a 50 count set or smaller.  I have a few more local places to check and then to the web it might be!  

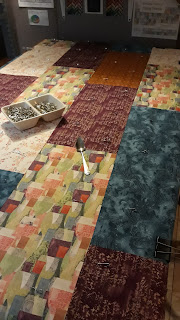
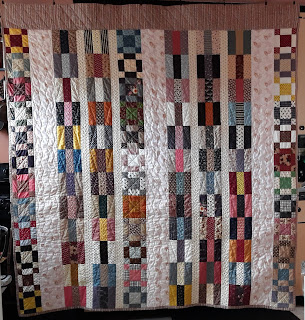
WIPS-B-Gone and the CW Strippie


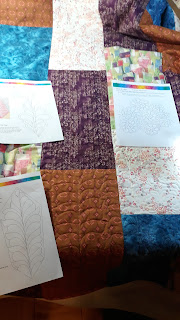
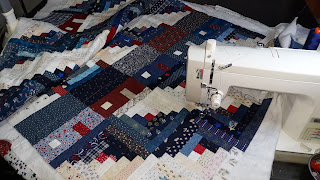
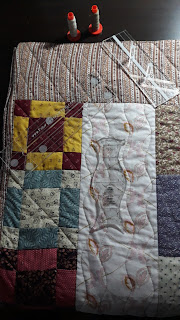
It took two weeks (!) to get this one basted and has taken another week to get it on the sewing table but I'm finally getting to quilting this.  The basting took so long because of my "design decision" to use a continuous length of fabric for the top border in the front and the backing.  That made it a lot harder to baste than expected!  The first two times I tried basting this, I had so many significant  pleats on the back, there was no question that the basting had to be re-done.  

I chalked it up to the fact that the fabric I had purchased had been pre-washed leaving it very stretchy when trying to secure the layers.  For the third round of basting, I decided to starch the backing fabric and now have a new appreciation for those that do that with their fabrics.  This step was also helped by another NC purchase:  when my MIL's guild friend had helped us with our "By Annie" bags, she had also recommended using starch and dispensing it out of one of those beauty supply misters.  My MIL already had her starch in one so I purchased one while down in NC and now transferred my Best Press to it.  

Ironically, I already had one of these for dispensing water when ironing but it does work great with the starch too!  The starching helped a lot on this round of basting -- this time there was only a small section on the upper right side that still had some pleats.  I distributed the remaining excess by unpinning just that section and adjusting only the backing, forming a tuck near the top of the back.  After it was whipped stitched down you could barely see it.  

I called that done and have now moved on (albeit interrupted by the Thanksgiving holiday) to the quilting!  Note to self:  There's a very good reason for using a separate backing!

A New Gift Project

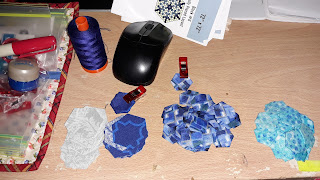
Earlier I noted that I had been shopping for fabrics for a project.  A few weeks ago, I had a watch party with a friend of mine.  We both enjoy a lot of the same popular shows and she had been telling me about "Bridgerton" which aired earlier this year and thought I'd enjoy it.   We finally got together and had fun watching the whole season.  She also gave me an early Christmas gift:

She knows I quilt, had seen my quilts at this summer's Art Exhibit and I had worked with her some years back when I provided my Featherweight for an event she held in her building.  So sweet of her!  For right now, I have it displayed in my quilt space but it will have a prime position on the tree for next year's Red and White holiday!

We've done watch parties before and when we do we plan a menu.  This time around we decided on having chili for the main dish.  She's a big fan of Stagg's canned chili which she gets at Costco.  I made cornbread to go with it and had brought some additional fixings thinking it might need to be punched up a bit but no, it really was delicious straight out of the can!  I took some home to DH and we both agree that we need to get some and add it to our camping chuck box food list.  

When we heated the bowls of food in the microwave, she noted that she had to remember to be careful because sometimes the bowls are hot to the touch once heated.  Bingo, Quilt Gift Alert!!  I knew immediately what my next gift to her would be:  Bowl Cozies!!  Next to Mug Rugs they are the hot quick gift item in the quilting world these days.  Of course, that made me wish I had the space for an Accuquilt Go! Big so I could use their die:

Accuquilt Die #55208

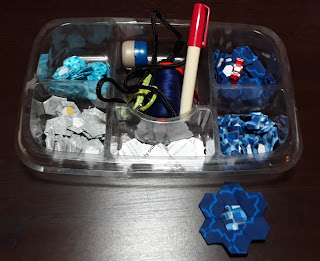
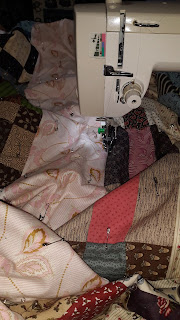
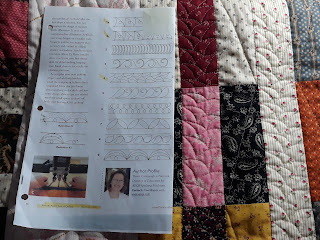
Fortunately there are also many tutorials on the web for making them that don't use die cutters.  I'm going to try the one by Vanessa the Crafty Gemini.  This one works for me because I was only able to get a "tumbler cut" (9" x 14" and a new-to-me pre-cut) of one of the fabrics and that is just the width I need for her method.  And what fabrics will I be using you ask?

Material obsession for all the shows!

I've got fabric related to all of our favorite shows:  "Downton Abbey", "Game of Thrones" and "Bridgerton"!  We also like "Call the Midwife" but so far I haven't seen anything for that translated into fabric --- well other than the usual nursing themed prints.  I already had the DA fabric in house as I had picked up a fabric bundle waayy back in 2015 (!) to use for a BOM project I wanted to do at the time.  I guess that's been curing for a good while, eh?!?  I will have to figure out which prints in addition to the logo print I will use and how I'll incorporate them into the bowl cozy design.  

Our next watch party is going to be for "Sanditon" which I've seen and she hasn't and is pretty much along the same setting and thematic lines as "Bridgerton".  Once I get these made up, I'll set a date with her for that viewing.  Hmmm, maybe I should wait until March 2022 when their new season starts?

Bonnie Hunter's 2021 Quiltville Mystery Has Started

And last but not least, this year's Quiltville mystery began last week!


It's called "Rhododendron Trail" and reflects the colors of the spring and summer flowers that Bonnie sees when she hikes to see the wild ponies near where she lives.  Much like last year, since I have so many prior mysteries that still need finishing, I'm not going to make this one up --- yet!   What I will do after I download the weekly instructions is continue work on the last of the mystery tops I have in progress. 

I started on Roll, Roll, Cotton Boll (Bonnie's 2010 mystery) all the way back in November, 2018.  In the time between, it's been leader/endered with more than a few other projects and I have Parts 1, 2 and 4  completed.  I have the pieces for Part 5 cut but they still need to be sewn.  Over the last two years I have foundation pieced more of the string squares for Part 3 (also leader/ender) but need to trim, sub-cut and re-piece them to add the resulting block to the pile of blocks I already have made for that part.  Even then, I still need to make more! 

The mystery instructions drop weekly and I look forward to seeing the link-ups of people posting what parts they have completed for the new mystery.  I'm hoping that checking in on those will be the perfect prompt for me to give some focused attention to my own project during this mystery season.  The goal is to try to get RRCB to a top by the time "Rhododendron Trail" finishes in January.  

As always, so much to do and so little time!