Showing posts with label 2019 Finishes. Show all posts

Tuesday, December 31, 2019

The Seven Days of New Year's: Day 4, 5 and 6

I continued work on projects in the days between the Day-After-Christmas and New Year's Day.  Although I still have some more blocks to make for my "Make It Scrappy" quilt, I needed to change things up a bit.  I have some workshops coming up and needed to get some hand work done for them so figured now was a good time.  One of the things I want to do more of next year (so weird to say that when it is only a few hours away!) is to do more "Slow Stitching" through hand work.  So that is what has been on the agenda for the last three days.

Three weeks ago, I, my community garden President and another garden member did a workshop with a troop of Girl Scouts.  We had them decorate fabric squares that are going into a banner quilt for their troop.  This is an idea I got from Val's Quilting Studio and an article on Storey.com by Amy Petronis Plumley.


The other two ladies live in the same building and are also officers of their Building Association.  Their Association regularly sponsors community art workshops (which during the summer months are often held in our community garden) so brought their experience to work with the girls.  They had them draw, paint and stitch their ideas onto muslin fabric squares I had prepped with freezer paper backing.  One group of girls had an idea to add a picture to the crazy quilt style block they designed so the garden member is printing up the image they chose on fabric and we will help them sew it in and finish the additional embellishment they want to add to the block.

My contribution was to bring my Accuquilt Go! cutter and provide dies that they could use to cut felt we had brought to add decorative shapes that they would stitch down onto their blocks.

The Hearts were very popular!

The troop has two leaders, one of whom is also the Community Relations Director for our co-op's management.  She has made a quilt in the past so she and I discussed what the layout of the quilt would be. The quilt uses 10" blocks in a 4 x 3 setting and we plan to sash and border it.  For that part, we'll use Girl Scout fabric purchased from Joann's.


I know, some of that is 4-H fabric.  When the garden President and I went to buy the fabric, all of it was sitting together.  It was only when I brought it to the workshop did the troop leader immediately recognize it as 4-H.  Well, the goals of the two organizations --- to encourage and develop self respect, skills and youth leaders ---- are similar.  At the least, we can use the 4-H fabric for the back.  The troop leader also wanted to incorporate this year's Girl Scout leadership mottos.  So I formatted them in a wordprocessing program and we purchased printer fabric sheets to create those panels.  I suggested that since I had letter dies, we might add another 3-D element to the panels to spell out "G.I.R.L" on each panel.


I had set my task for Sunday to be to print the panels and stitch the letters down with some variegated Perle cotton thread I had purchased to add to the project stash. However, after getting the fabric printouts done, I realized the garden President had taken all the thread we brought to the event home with her.  I had to wait until Monday to connect with her to get it and then sewed them down today.


I'm glad to get these done since we are returning to work with the Troop this coming Friday to finish up their blocks and the layout.  As of now, the plan is for the adults to put the quilt together once the girls finish the blocks and then have a reveal ceremony in the coming months.

Edited To Add:  You can see work on the top being laid out here and the finished quilt here.

The other workshop related work:  for this same Building Association, I've been hired to give a quilting workshop.  They had secured a grant to do craft workshops with the theme of "recycling" and they have already held a few in the Summer and Fall.  Of course, quilting fit right in with that theme!  

However, the limitation was that their Association room doesn't have the capacity (in space or electrical outlets) to accomodate a bunch of sewing machines so it would have to be a workshop using a hand work technique.  I suggested to them that we do an English Paper Piecing class since it is both a historically and currently popular technique in the quilting world.   While I was familiar with the technique, admittedly, I had only made one EPP rosette prior to now.


So I've spent the last few months gathering a lot of information and books about the subject and familiarizing myself with all the popular ways to prep them.  I gave a "hands-on" demo of the various techniques to the Association's Class Committee back in October.  They all got a big kick out of prepping the hexagons and fabric I provided and were excited about the design possibilities.   We had planned on holding the workshop in November but they had a scheduling snafu so it was moved up to January.

In the mean time, I've tried to find and make a few easy projects of varying complexity that the workshop participants can choose to make once they have tried the various techniques to prepare the shapes.  I had these two ready for the session planned for November:


The Hexie Hot Pad only requires participants to make one rosette.  If they get their fill of trying the technique from that, it will be simple (I hope) to show them how to applique it to a circle of fabric and then layer the circle with batting and stitch it closed.  The EPP Organizer is my variation on a Pot Holder Organizer project I found on the web. This one will be a more advanced project for those who really get into prepping and joining hexies.  I figure if they like it a lot, they will love the opportunity to make a pouch that will allow them to carry their stitching supplies for future projects.

However now that I had more time to prepare, I decided on adding at least one more mid-level project.  I'm trying to keep the projects relatively simple since many of the people who have expressed interest in the workshop have not quilted and some have not even sewn before.  I also wanted the projects to have practical use in the hopes that will encourage participants to want to finish whichever project they choose to do.

I had an idea about making what I thought would be a simple Key Chain Chapstick holder.  When I couldn't move forward on the Girl Scout letters Sunday, I worked on cutting fabric for that EPP project.


However, as I laid them out, I realized my original plan wasn't going to be as simple to execute as I thought.  So I had to trash that idea (although not the hexies!) and come up with something else.  That killed the momentum for that day.

As I said, I went to see our garden's President on Monday and wound up staying way longer than planned.  She is a crafter too so we started "talking craft" between reviewing and packing up the items she will be bringing for the return session on Friday.  When I finally got back home, I did manage to pick another EPP project:  I decided on a Hexie Pincushion project that had been part of a hexie project blog hop.  Like the Hot Pad project, it only requires prepping one rosette plus an extra center hexie.  I managed to get the fabric cut before calling it a night.


I got them all prepped today before needing to run out to pick up some things.  While out, I had hoped to find the crushed walnuts suggested for stuffing the pincushion.  The tutorial noted that either Craft or Pet Stores carry them --- in the latter they are used as Reptile bedding.  

However, the nearest craft store to me was a Michael's and they didn't have any.  There was a pet store next door but they also didn't stock it.  I went to a second mall only to discover the pet store there had closed!  When did that happen?!?  I called a third one that was in driving distance but they don't carry it either.


So for now, I've completed the pincushion up to the part where I'll remove the papers and then fill the pincushion.  I had planned to shop on line for my new sewing chair tomorrow so I will order the walnut shells while I'm at it.  That's it for me for tonight.  We're headed out in a little while to go see a late night showing of  "Star Wars: The Rise of Skywalker".  A great way to welcome in the New Year!

Friday, December 27, 2019

Finished Or Not Friday: The NewFO is Gifted!

Welcome to another edition of "Finished or Not Friday", hosted by the lovely Alycia of Alycia Quilts!


This week I'm linking up with the follow-up to my earlier FONF post.  At the beginning of December, I had embarked on making a quilt that was to be part of the gift I was giving my MIL for Christmas.  I ultimately named that quilt "Scrappy Inspiration".

Front

Back

This is the MODA Bake Shop Pattern "When Life Is Scrappy Quilt" designed by Vanessa Goertzen of Lella Boutique.  Back in 2016, MODA did a "Spell It With MODA" Quilt Along using letter blocks designed to be made from Jelly Roll strips and this was one of the patterns offered during it.  I had downloaded the letter patterns when the QAL was going on but thought I had just discovered this pattern recently when I was on the site looking for something else.  Being a scrappy quilt loving girl, I immediately went to download it only to then discover I had already done so back in 2017, Lol!  The letter block patterns are still available on the web and if you download Vanessa's pattern, she explains how to access them.

I'm completely happy with the finished quilt.  It was also completely made from scraps and stash, further supporting the theme of the quilt.  The downside:  I TOTALLY didn't meet ANY of the deadlines that I had set for finishing this!  When I mailed the package, I was told that it wouldn't arrive until Saturday.  However, I've got to give credit where credit is due:  my MIL called me last night and said the USPS delivered the package yesterday!  Woo hoo!  If you're interested in all the gory finishing details, then read on my friend....

So to start:  I had decided to make this for my MIL (who is also a quilter) because when we visited her back in October, she and I had a conversation about scrappy quilting.  She is just getting warmed up to the idea of making a quilt with more than just a few fabrics.  Although the original pattern is designed around using Jelly Roll strips to make a large lap-sized quilt, I made this version half size to finish as a wallhanging.  I had made a wallhanging for my MIL's sewing space waayy back in 2008 (which she still displays and can be seen in my previous FONF post) so wanted to give her another one that will hopefully encourage her to continue to explore working scrappy.

My original plan was to get this finished to make the USPS early holiday mailing deadline on December 14 and I thought the piecing was simple enough to do so.  I have to to say, this turned into a much harder project to bring to completion than I expected although the piecing was the least of the issues I dealt with.  For starters, I also want to make one of these for myself in the original lap quilt size so my plan was to start by making blocks for both of us.  I figured that once the letters and star blocks were all made, I'd then switch the focus to finishing her quilt to meet the mailing deadline and then finish mine right afterward.


Not! Oh, it started out well but I erred in not mapping out, in detail, what blocks I'd make on each day and whether my production plans actually worked for meeting the deadline I had set for myself.  Add in a couple of unexpectedly busy holiday prep days and it soon became apparent I wasn't going to make the original deadline that was set.  By the time I reached that mailing deadline, I knew I had to switch gears and only continue to work on her blocks if I was going to get this thing done!

Then of course, Murphy's Law showed up!  My quilting chair broke so I had to switch from stitching on my mid arm machine (glimpsed in the lower right of the picture above) to stitching on one of my vintage Singers.  Not a problem in and of itself.  I figured I'd use my 401 since it had a wider throat space than my Featherweight which would help when I got to the quilting part of this.  I also realized that since this top was constructed in rows, this would be a good time to employ the "Quilting In Sections" technique.


I know about this from Marti Michells's book but she also has a Craftsy class on the subject as well.  I figured that planning to quilt each row separately and then putting this all together would make it easier to work with the smaller throat space of the machine.  Once the rows were all pieced,  I was ready to move to backing them.  I had chosen some "Mrs. Bobbins" comic novelty prints to fussy cut and use as the backing for each row.


Ironically I had purchased these last year on a whim (well, and a sale!) while shopping for a quilt kit for my MIL as her gift.  As opposed to the stripe print (which was WOF), the actual comic panels were not wide enough to span the full width of the letter rows so I had to add filler (in the form of a black on white micro polka dot print) to the ends of those rows to make them wide enough to work as backing strips.   However, after I decided on my free-motion quilting plan for this, I realized I didn't want the stitching to obliterate being able to read the comic panels.  So I revised the stitching plan and decided to layer and back each row with muslin first, quilt them and then secure the comic panel rows to the back by only stitching in the ditch between the letter and star blocks from the front (there are pics later showing how that turned out).

Except, when I started trying to free motion quilt the rows as planned on the 401, I was having problems with it.  Since I was working on the dining room table (so the machine is raised up) and not with the machine recessed into my sewing cabinet as I'm used to (which I can't do since the chair broke),  the FM quilting did not go well.  Ok fine, maybe I can change my stitch plan to one that utilizes a walking foot instead.  That would be a little more forgiving with the set-up I was using.  Except that the 401 is a slant shank machine and I don't have a slant shank walking foot for it!  I've had one on my "Quilt Notions Wishlist" ever since I got the machine but it hadn't been a priority to purchase it up until now.  Guess I now know what will be one of the first quilt purchases in 2020 that I'll be making!

Ok, but I was already past my first deadline and the late mailing deadline for Christmas delivery was by now quickly coming up, what was I going to do?!?!  Go figure:  my Featherweight came to the rescue!  It just so happens that I do have a walking foot for my Featherweight machine which is a regular low (straight) shank machine.  And the "Quilting In Sections" set up is just as forgiving on that machine as it was in the 401.  So at this point I made another machine change!


This is how the back panels looked after being attached. 

Whew!  Well that saved me on getting the quilting done.  However, the walking foot quilting was waayy more time consuming than I expected the free-motion work to have been.  Did I mention I had a looming deadline?  Yeah, time consuming was not what I was looking for right then but at this point, I was committed to getting this finished --- no matter when!  Needless to say, I also missed the late mailing deadline (ok, breathe, it was not going to be the end of the world if she didn't get it by Christmas).  Even once I got the quilting all done and the rows all connected, the "Finish-finishing" also presented its own problems.

Of course, it starts with wanting to use a specific fabric.  I've had this fat quarter set sitting in my quilt space for a long while now.  It was originally purchased to make a sewing/quilting themed piece for display in my own quilt space.


I thought the turquoise tape measure print was perfect for either a border or wide binding on this project.  However, I calculated that it would only be enough for a regular binding.  Ok, at this point I'd settle for that.  I had also by now envisioned that I'd like to  give this to her with a scrappy mix of top tabs with the idea that she could hang the piece from a rod or dowel.  (Note To Self:  Past due deadlines are NOT the ideal time for "Design Decisions"!)  So the top "binding" would be attached last and applied as two separate strips with the tabs sandwiched between them.

So I cut the strips needed for the top of the quilt and then cut the binding strips for the bottom.  When I connected the bottom strips together and laid the prepared binding around the edges of the quilt --- wait for it -- it was just-not-quite-long-enough!!   Even though I only had to go around three sides, I was about six inches short of what I needed.  Akkk!  Of course I could add the remaining top strips to this to finish it off but then what to do for the top?

Fortunately, this is a scrappy project so "Scrappy Is As Scrappy Does"!  I had another turquoise print with large polka dots that I had used to make one of the letters for my quilt.  I hadn't used it in hers because I felt the scale of that print wouldn't translate well in the smaller strips I had to use for her letters.  However, the color coordinated well with the tape measure print and for a binding -- already past deadline -- it would work just fine!  So I added the former top strips to the binding to go around the bottom of the quilt and cut new strips for the top as well as pulled more scraps to make the tabs.


Sheesh!  What I hadn't figured on when I started this journey was to be sewing right up to the Monday before Christmas!!  Yet F-I-N-A-L-L-Y in the wee early morning hours (yes, I was up all night!) this project was D-O-N-E done!  Even then I still had to do some clean up work.  I had not caught the edges of some spots of the between-row sashing strips in the back when I stitched in the ditch from the front so had to go back and hand stitch those loose spots down.  I had pieced in some muslin strips on the back (to make the comic panel on the back of the gray "Scrappy" word row equal in height to it) and those served as my (pieced in) label area.  So once I wrote that information in, the quilt was now ready for transport!

I had purchased a vinyl project bag (Quilt In A Day frequently has major sales on these) and I packed the other quilt tools and the folded quilt into it, wrapped it and -- because I had kept the box the rulers I had purchased for her came in -- had an appropriately sized shipping container all ready.  One last thing:  I also bake peanut butter cookies for my MIL and her sister every year and usually send those with their gifts.  Fortunately, my MIL's sister was in New York for Christmas and my husband had her for the Kringle so we didn't have to mail her gift this year. My husband dropped it off to her Christmas Day since she was in the midst of holiday cooking for the elderly relative she was visiting.


So the second to last thing I did was to bake a big batch of cookies and Foodsaver them to be included in my MIL's box.  The last thing I did was to head to the post office STAT!

If you've stayed with the story this long, bless you!  Now, if I haven't monopolized all of your blog reading time, why not head back over to Alycia's and check out what everyone else got done this week.  I'm sure there are a lot of gifted quilts in the finishing queue!

Saturday, September 14, 2019

The Latest Gift Quilt: Have Some Moscato At Work!


I'm happy to go to Alycia's  Finished Or Not Friday link up this week with another finish.  Woo Hoo!  The desk mat for my friend is finally
D-O-N-E!!

That didn't take too long did it?!?

Reiterating the back story (and if you've read this before, please feel free to skip ahead):  I have a friend that I've made a number of projects for.  She has taken most of the things I've made for her to decorate her cubicle at work.  For years, Melinda Pirone's "Moscato Di Asti" pattern was on my wishlist waiting for just the right combination of desire/need/fabrics to make it happen.  My friend's request at the end of 2017 was for a quilted mat for her cubicle desk.  Leftovers from that year's Quiltville mystery project presented the perfect combination of need and the resources to get it started!

My first attempt to actually start working on this was in 2018 when we had planned to travel together to visit another friend of ours.  This was one of two projects I "kitted" up to take along on that trip.


However, even after the trip plans got pushed back, I kept the two "kits"packed up so I could grab them at a moments notice of travel.  Fast forward to this year and my friend was coming to attend a music event in the community garden I belong to that was held back in the Summer (sigh, yes Summer is as good as over!).  I figured it was a good time to start working on her mat and maybe get it done to present to her.  Of course, the usual "best laid plans" (and the fact that I was working on three other projects at the time) meant that I only pulled it out and started on a bit of the piecing.  It took a lot longer than planned to finish up the other projects so only then did I get to really work on this.  Once it became the focus project, it was full speed ahead!


Last week when I posted I had shown my progress (above).  Only problem was that I had pieced some strips in advance and when I put up the blocks already made on my design wall, I also put up ALL the strips already prepared.  What I DIDN'T DO was check back on my plans for the layout. The strips I laid out filled out five rows of seven blocks and I thought that meant I needed to add enough additional strips to complete that many blocks.  At this point, I had to struggle to have enough of some of the fabrics that I started with to do that.  I did get it done (with a few fabric substitutions and some "poverty piecing" of small scraps) and got it finished.


Except --- Yikes! --- it was now TOO BIG!!  I had only needed FOUR rows of blocks!  The good news is that only meant taking a row back off  and fortunately doing so didn't wreck the balance of the colors in the design.  Whew!  The other good news was that I put some of the extra blocks together to use to  make a small quilt stitch sample for that step in the project.


I had a pretty "marbled" (thanks, Rebecca!) print I planned to use for the backing.  I had planned for the finished top to be 20" x 35" (5" finished blocks set in a 4 x 7 layout).  I had measured the backing piece and it was just about that size, possibly only needing a few extra inches in strips around the edges to widen it a bit.  Yet when I finished the (re-sized) top and held up the backing to it, it was not as wide as the top by a significant amount.  What gives?


Yeah, turns out you have to read the measurements on your mat correctly!  Tip:  when measuring from the short side of the mat, DON'T read the numbers at the end on the long side,  LOL!!
So this of course meant my backing piece though tall enough was not actually wide enough to make a one piece back.  No problem, leftovers to the rescue!  I  had enough of some of the fabrics and decided to try something I hadn't done before --- I cut 2-1/2" strips and created a panel for the middle in the style of a "jelly roll race" quilt!


BTW, in my last post I had said that I thought I had used up all of the original light (white on cream) fabric I originally worked with.  Wouldn't you know it, now I found some more under the pile of the other fabrics!  It wasn't that much (only enough to provide two strips for the backing panel) but it would have been more than enough when I was piecing more block strips. Those strips will also serve as my label area.  Even so, I still needed to add some extra strips on the top and bottom to give me extra for the quilting.

As I did with another project this summer, I used preview paper to decide on the quilting.  I wanted to highlight the "stars" and wound up doing a combination of a swirl and outline quilting on them.  For the background the best thing was the simplest:  stippling (fast and easy).


As usual, I didn't really want to change threads too much.  I found a nice medium gray that worked on the dark areas however, it was too dark for the stars.  I was going to use white thread on the stars but realized that using a light gray actually worked better --- it made it all look like it was stitched with the same thread and giving the subtle contrast in color a nice overall balance.


Last was the binding.  For myself, I probably would have gone with a dark purple or burgundy but my friend likes lavender so I went with that for her benefit.  And clearly there's no question that the fabric I used is 100% cotton:


So my friend will have hers and I put a binding on the stitch sample and now have a little mug rug as a momento of working on this project!


My friend has two projects for her home that she wants me to make, but both will require design work.  I bought EQ8 last year so working on those may be an opportunity to get familiar with that program.  No time soon though, I've got QOVs to get to next!

With this project and post done, now I can go see what our gracious link up host Alycia is up to and check out what everyone else worked on this week.  Got a Finish?  Even if not, link up and let us see what's inspiring you this week!

Saturday, August 31, 2019

Three Cheers For the Red, White & Blue! --- Part 6 and The Finale!

As August comes to a close, so does my Summer of Red, White and Blue Projects!  This is the third RWB project to make it to the "Finshed Or Not Fridays" Link Up, now hosted by Alycia over at her Alycia Quilts/Quilty Girl blog.


After spending so much time on my last project, the "Star Spangled Runner", it was a relief to get a quicker one completed.  I had hoped to get this done to post yesterday but I still had some quilting to do on it today along with all the finishing stuff.  So the "Salute To Stars" Table Mat made it just under the wire for the end of August!


Like the runner, this is another free pattern from American Patchwork and Quilting magazine.  As the pattern notes, it is easy to make the original design larger or smaller by adding or subtracting blocks.  The free pattern is actually the "color option" of a larger lap quilt that appeared in the magazine.  I made mine with even fewer blocks in order to fit the 18" square table I want to use it on:


I also recently saw a pattern  made up of the same basic blocks but in a larger size and laying them out in a way that creates a long runner.  A very versatile design indeed!

I opted to make a slight change to the design.  The original quilt used Flying Geese blocks to create an outer border around the center of the top.  I opted to go for a 3-D substitute and use a Continuous Band of Nesting Prairie Points instead!   I've only used this technique once before as the "binding" finish for a Feathered Star wall hanging way back in 2003 in my early quilting days.


I learned about the technique from a pamphlet --- one of those "Free with Subscription" gifts I got back when I started my Quilters Newsletter subscription.  I still miss that magazine!!


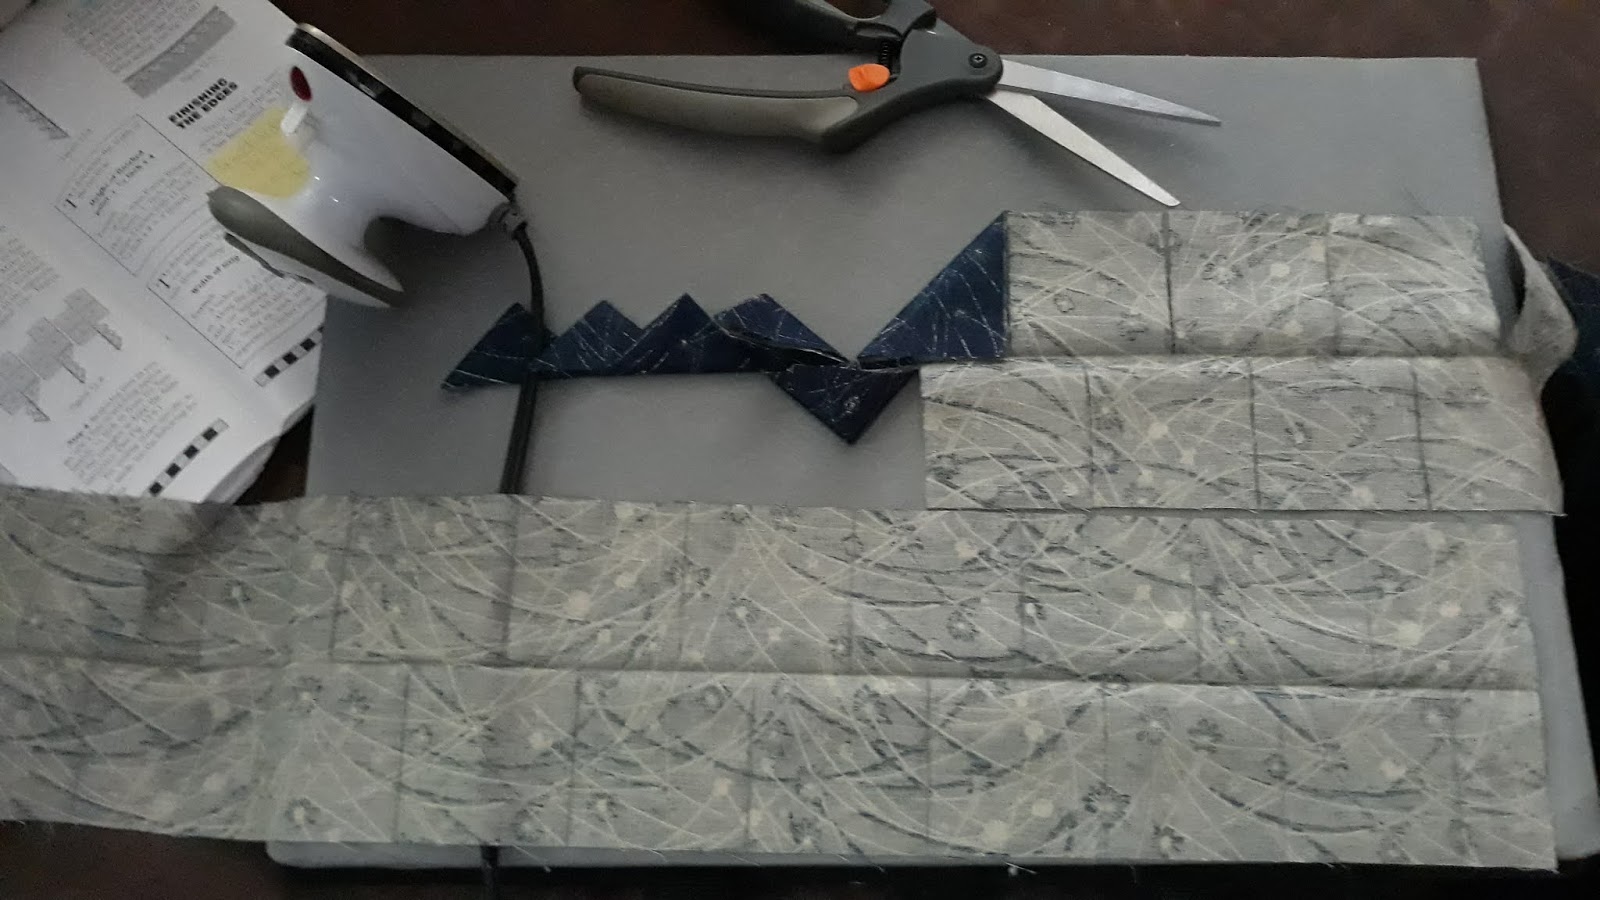
Even though Flying Geese are my absolute favorite block, I liked the idea of being able to make the triangles float above the striped outer border.  They are easy to make too -- only requiring a strip for each set of points, some marking and cutting (with scissors for a change!), folding and pressing.


There are a number of videos around the web showing how to do the technique.  I also found a PDF from the Utah State University Cooperative Extension (!!) showing how to do two-color and piped variations.  The two sides of the finished band get folded together and the band gets sewn in between the turned under edges of the top and backing.  In my case, I sandwiched it between the center of the top and an outer under-border.  

I had to "Frankenstein" some batting scraps for this and then decided to quilt it with some simple, straight forward grid quilting.  It was easy to do since I just had to follow the lines or edges of the piecing and the striped border print and it could all be done with a walking foot.

When it came time to finish the quilt edges, I was going to bind it with a traditional binding but then this week, Bernina's "We All Sew" blog put out a bunch of tutorials on various binding techniques.  One of them was for an "invisible faced binding", a technique I've seen but haven't tried before.  In addition, the way they did it, it provided a convenient label area and hanging sleeves (in the form of triangle corners) as part of the process so I was definitely in for that!


This was one of those RARE times, I was willing to hand sew down a binding!  If I want to hang this up in the future, I only sewed down the center edge of the triangles --- I left them open at each corner so I could slide in a dowel rod for support to hang it.  Of course, this won't be completely done until I write in the label information on the triangles!

I've been playing in my RWB stash all summer so all of the fabrics for this have been sitting on my cutting table while I worked on each project.  Needless to say repeats abound in the fabrics I used for all of my last few projects.  I had cut the squares for the star fabrics from the some of the same fabrics used for my last QOV top and the blue Prairie Point fabric and the striped print underneath it were also used for the corner squares and borders on it too.


And speaking of QOVs, now that my RWB Summer is done, it's time to focus on the other things I was supposed to be working on this summer --- namely, getting them quilted!  Well, I have that and another small (not RWB) desk mat to finish for a gift.  I admit I also have a new project that I want to embark on this weekend.  Thank goodness it's a long weekend!!

But before all of that, I'm heading back over to Alycia's to finish checking out what others are working on or celebrating finishing this week.  Link up and show us what you got (that we will want to make too)!!

Friday, August 23, 2019

Three Cheers For the Red, White & Blue! --- Part 5

First off, it's appropo that I get to post this finish this week because Alycia of the Alycia Quilts - Quiltygirl blog is picking up the reins for "Finished Or Not Fridays" today from Myra over at Busy Hands Quilts!


If you have not visited Alycia's blog before, I encourage you to do so --- especially if you are interested in Quilts of Valor.

Alycia is a longarm quilter who also serves as the Colorado Coordinator for the QOV foundation.  On her blog you will see so many great QOV quilts.  Heartwarming pictures (taken by Alycia who is also a photographer!) of the ceremonies when the quilts are awarded are always in her blogging queue.  You are also just in time to start picking up the instructions for Alycia's latest QOV mystery quilt series called "The Lone Rider"!  The fabric requirements are posted here and the first clue will be posted on her blog on September 4th.  Thanks to Alycia for picking up the link-up mantel for all of us!!

As for me:  Woo hoo!  My "Star Spangled Runner" is finally finished!!

s


Backing and Label Area

This is the "Star Spangled Banner", a free pattern from American Patchwork and Quilting magazine.  I made it with four blocks instead of the five used in the pattern because that was all I needed to fit our diningroom sideboard (really an old dresser).  The logs were cut with the Accuquilt Go! Log Cabin die.  As I like to do, the backing has an area pieced into it for me to write in the label information.  The stars appliqued on the front and on the label area were also die cut with fusible web attached using an Accuquilt die.

I should have been finished with this one a couple of weeks ago but it was held up by the quilting --- or more correctly, the decisions that went into choosing how to quilt this.  In my previous post about this I had previewed some quilting designs and was set to look through a few more books for ideas.  That led me to scrap all of my previous ideas and come up with a new one.  The log cabin blocks are so linear and I really wanted to "quilt against type" and try to either incorporate or just use designs with curves.  My finished stitch plan for the blocks and borders ended up to be this:


Up to now I had been sketching on the preview paper with a dry erase marker I keep in the kitchen with a board I use to make grocery lists.  The great thing about the Back-To-School period is that everyone has great sales on office/school supplies.  I was able to pick up some new dry erase markers at Dollar Tree that can now be dedicated for use with my preview paper and be kept stored with it.  Sweet!

With the stitching plan done, it was time to layer it.  The batting choice was simple:  about this time last year, Jinny Beyer had a sale on Quilter's Dream Select batting, precut 18" wide and on sold by the yard.  This is one of my favorite battings and my preferred loft (although she also carries it in the thinner Request loft).  At the time, I was comtemplating making a bunch of runners for the sideboard and since they need to finish 17" wide, this was a perfect fit for my plans!


So with batting already in house, it was a quick layering especially since as a smaller quilt, I could spray baste it.  Next up was to decide on which threads to stitch it with.  I started with stablilizing and additional rounds of decorative stitching in gold around the stars, ditch stitching with red around the borders and with blue between the blocks.  All of that was done with white in the bobbin.  However, when it came time to decide on what to use across the top, I was stumped.  I generally don't like to change thread color if I can help it, especially if I'm quilting a continuous design.  With every color I looked at, I felt that the contrasting thread along with the contrasting curved stitch design would overshadow the log cabins too much.  It took way longer than it should have to remember that I had another option: (invisible) monofilament thread!


I keep a supply of monofilament thread primarily for use to attach bindings but I have used it for the general quilting in cases like this where you need to stitch over a lot of different colors.  There was a time when experts like Harriet Hargrave and Diane Gaudynski promoted the use of monofilament as your primary quilting thread (although now,  Diane primarily uses silk thread).  I had purchased cones of  Superior's Monopoly in both clear and smoke a while back during a sale because I heard it was a great "low sheen" brand of monofilament.  I have another project that I had been considering using it for so was glad to get a chance to try it out on this extensively.  Nova the Nouvelle, which is a fairly new-to-me machine, stitched really smooth this round and had no trouble with the monofilament thread.  I'm pleased with her performance!

Close-up on the quilting


Edited To Add:


Close-up on how I stitched the Stars

Once the quilting was done, I already had the binding picked out -- the same red print used on the short side borders.  This was also another chance to put a new quilty gadget to use!


I had purchased this little ditty a couple of months ago when Green Fairy Quilts had it on sale.  After I press my bindings, I usually would wind them around empty toilet paper rolls.  I could then hang them on the lever that raises the seat on my quilt chair and feed the binding from there to the quilt while I applied it.  The challenge was to not pull the binding too fast otherwise the roll would slide off the lever.


This handy gadget helps wind it up when I make the binding and then can be attached to my sewing table and feeds it way more smoothly than the chair system did as I apply it to the quilt.  I also bought couple of extra winding rolls in the event I want to make up a few bindings in advance.

Glad to have cleared this project bottleneck and now can get the quilt traffic flowing smoothly again!  So with this one done, I want to get going on the other RWB Table Mat I have fabrics picked out for and a gift quilt that's already in progress and that I promised to finish by month's end next week.  I hope I can keep things moving!

Head over to Alycia's to see what else everyone has brought to the finish line this week as August soon comes to a close!  Even better, post your finished or not-nearly-finished-project and let us see what's occupying your quilt studio right now!

8/24/19 Edited to Add:  Also linking up with Amy Ellis through email for her "One Thing Challenge" Follow-up.  I had started using her weekly prompts to help keep me on track when making my most recent QOV top.  When that was finished this project was reported on (almost a month ago to the day) when I had finished this runner's top.  So now I can check in and say that it's competely done and in the can!