Saturday, December 31, 2022

7 Days of New Years --- Day 6: New Year's Eve and All is Well!

I was hoping to finish up the quilting on the Fat Quarter Disappearing Nine-Patch today.  As noted yesterday, all I had left to stitch were parts of the quilt I planned to free-motion quilt.  However, I was nervous about doing it on my Singer 401 as I have never done that extensively on that machine.  

I have seen Karen Miller's articles and webinars on doing FMQ on a Featherweight so figure that if it proves difficult on the 401, I could change over to that machine.  A second fall back would be to put my Brother Nouvelle mid-arm back in the table.  After doing Angela Walter's "Fabulous Feathers" free-motion quilting challenge from late 2021 to the beginning of this year, I am now also more comfortable doing FMQ on that machine.   

So I started by setting up the machine with a (slant shank) free-motion foot and put together a test sandwich.  Good news, it went well!  

The free-motion foot I used.

Tested a lot of different motifs and all went well!

Edited to Add:  It should be noted, that on the Singer 401, although the feed plate can be raised to "lower" the feed dogs (which is intended to allow for darning in a hoop with a darning foot):


...I actually kept the plate down and feed dogs up while doing the FMQ.  This is something Leah Day used to espouse early on in the days when she started doing her year of doing daily free motion designs.  I also found a high top tension -- set at 6 or 7 -- worked best to limit the "pokies" on the back.  

So with the successful test, I moved on to quilting the remaining nine sections I needed to stitch.  I got six of those done before calling it a night.

I only have the two large floral sections and the large red holly leaf print section left.  I'm not sure I like the outlining I started to do on the first large floral section.  I needed a break from it to continue working on it and think I might try just doing feathers on the remaining section.  I was stitching holly leaves and berries on the holly print but the thread I was using kept breaking.  Since I had quilted other sections with the same thread (although with a walking foot), I chalked it up to both me and the machine being tired.    

So that's it for the quilting for this year!  So now we're ready to celebrate the New Year coming in:

Sparkling Apple Cider and "Taste-Like-Fruitcake Cookies"

I hope everyone has an enjoyable time watching the New Year ring in!  May we all get to celebrate 2023 as a year for new beginnings and wishes fulfilled!

Friday, December 30, 2022

7 Days of New Years --- Day 5: Quiltville Mystery Catch-up and Still More Quilting

 With Christmas barreling down on me last week, I missed checking in on the Chilhowie mystery!


In last week's Part 5, the mystery quilters had reached an exciting milestone:  they were starting to assemble the units from the previous parts to make blocks!  Always a big deal when you reach that part of one of Bonnie's mysteries. This week for Part 6 they are cutting squares that will be added to HST units previously made in Part 4.  Those pieces will be added on to the Part 5 blocks to create even larger blocks!

I used this check in period to take a break from the quilting I've been doing to go back to making string blocks for "Roll, Roll Cotton Boll" and "Cherry Crunch".


I spent a few hours and got a few more done for each project.  With New Year's coming this weekend, it also means the mystery period is almost over.  Even though I will continue work on both of these projects once the mystery ends, I would love to have the string block portions for both finished as this year comes to a close.   

That done, I also decided to get a something else I've had sitting with the string stash sewn up quick.


For the longest I had this pattern by Sandra Dennison of Gray Barn Designs sitting with my Halloween project stash.  Once I started the RRCB string blocks, I realized I could also take some of the strips to make it up.  I hit the Halloween stash today for potential backings (the spider web print won!).  It's finished quilt-as-you-go and now it's done!  Well except for the binding which is picked out and cut.  

Like the eyes?  What's cool is those are die cut (with fusible attached) from a die I had wanted for a while and was finally able to pick up during one of Accuquilt's holiday sales.  


The mummy's eyes are the foot pads and eyes of the Teddy Bear on this die.  I bought the die in anticipation of making some custom baby quilts but it's always great when a die can do double duty!  

That done, it was back to quilting the 9 Fat Quarter Disappearing Nine Patch quilt. 


I got the straight lines done on the light sections which is also the last of the walking foot quilting.  The next part is the scary part:  doing free-motion quilting on all the remaining sections.  Actually, since I have quilting plans for all of them that isn't the scary part.  The scary part is that I've never really done free-motion quilting on my Singer 401.  I've seen Karen Miller's articles and webinars on doing FMQ on my Featherweight so might wind up either changing over to that machine or just put my Brother Nouvelle mid-arm back in the table since I've done a lot of FMQ on that machine.   But not tonight!  DH took the night off from work and we've got a bunch of "The West Wing" episodes on the DVR so will try to watch a few before heading to bed.  

One more day to go before New Year's.  Are you ready for 2023?

Thursday, December 29, 2022

7 Days of New Years --- Day 4: More Quilting, Still So Much To Do....

The plan today was to continue quilting the FQ Disappearing Nine Patch quilt.  However, before I could get started there was more bad COVID news:  my youngest son called to say he had tested positive.  The good news is that he is off for the holiday break from the school he works for.  He says he has had COVID before but this time it felt different, many more of the common symptoms.  Fortunately he says he had been boosted weeks ago so I'm hoping it doesn't get any worse than feeling like a bad case of the flu.  All I could do was counsel what I would if it was the regular flu: rest, fluids and Tylenol until it passes.  Needless to say, the New Year's Eve plans he had are now also cancelled.  

I did go back to work on the quilting and managed to finish the section of red straight line quilting on the "Holiday Words" print that I had started yesterday.  I found that a longer stitch length and slower stitching helped a bit.  Then I moved to another large red  section that I planned to crosshatch between the rows of red dots printed on it.  Cross hatching is another motif that seems easy to stitch but eventually feels incredibly time consuming to complete.

So in the end it took most of the day to get done and is, as in the other areas, not very smooth.  However, it also is the last of the red sections I will quilt using the walking foot.  I then switched to a cream thread but kept the walking foot to stitch the two next sections: the ones with strings of lights.   Those were easier to do as they are spaced and the undulations are relatively short and fluid.  So that's it for today and tomorrow I'll quilt the other two light sections in straight lines and then I'll move on to free-motion motifs.  At this point I'm hoping I can get this one done before the New Year rings in!       

Wednesday, December 28, 2022

7 Days of New Years --- Day 3: A Little Bit of Cross Stitch (Planning), A Little Bit of Quilting

The day started off with a trip to the post office to get the cookie boxes for my MIL and her sister off  in the mail.  Before I left I also got some bad news:  the neighbor I was supposed to connect with yesterday has now tested positive for COVID.  I don't know about you, but I feel that as far as we have advanced with dealing with this virus, it still seems to come out of nowhere and wreck havoc in people's day to day life.  So us connecting will now have to be pushed back by weeks, not days.  

On a lighter note, while having breakfast this morning, I had watched Pat Sloan's video as I like to do to start my (quilty) day.  One of the things she talked about was something she has mentioned before:

This is a cross stitch pattern designed by The Frosted Pumpkin that commemorates that 2023 is the "Year of the Rabbit" in the Chinese Calendar and which Pat had introduced in a previous video.  I had thought it cute then especially since I expect to leave my Red & White Christmas decorations up for a while.  I purchased the digital pattern thinking that it would be a cute accompaniment to the decorations while also representing the New Year.  

Pat talked about going through her floss stash to kit it up so I decided to do that too!  My stash is growing but small so I had to raid a few other project stashes before I came up with what I think will work.  Thank goodness I had purchased a few new project bags so had something to put it in.  Although Pat plans to start hers now, my plan is to start it on New Year's Day.  

A close look at the pattern picture made me realize that the effect of the "called for" hand dyed flosses for some of the colors used in the pattern gave a variegated effect when used.  If I am able, I might make a run to the local Michael's and see if I can find those colors in variegated DMC threads to mimic that.  I also still need to look through my cross stitch fabric stash which I'm pretty sure I have a piece big enough to use for the base for this.

Later in the day, I got back to quilting the Fat Quarter Disappearing Nine Patch quilt.  I will be doing a lot of the areas using the walking foot.  I had already had some issues when I did the stabilizing stitching which left some of the sections a little "puffy".  I'm not sure if that's from pulling the layers too tight while basting or if it's a by-product of working with a polyester batting rather than a cotton one.  It means I'll be looking to "quilt out" some of the excess.  

I was able to do pretty well with the ornaments corner section just following the wavy outlines of the ornaments.  However, I am now struggling with the "Holiday Words" section for which the plan was just to do straight line quilting across that section.  I'm getting a lot more bunching and the bobbin thread is catching.  I got about half way through but need to take a break and call it a night.  I may have to rethink my approach or even change machines when I resume work on this tomorrow.   

Tuesday, December 27, 2022

7 Days of New Years --- Day 2: A Slight Detour For a Gift

Today was a little busy.  I was supposed to meet with a neighbor to get some information on potential contractors.  Unfortunately my neighbor felt a cold or flu coming on so that meeting was postponed.  This freed some time to find a box and pack up the peanut butter cookies I baked yesterday for my MIL and her sister.  It is an annual tradition that I send them some to munch on during the holidays. 

Since I'd be shipping a package, I also needed to finish up something that needed to go along with it.  Back in March, DH and I had visited my MIL and while there I had helped her make a batik version of Pat Sloan's "String Beans" Block-a-Day design.  

My MIL's "String Bean" blocks

When it was done I picked up all the small aqua and cream scrappy bits and planned to make a commemorative mug rug for it.  

After that I was stumped for the longest on how to quilt it and what color threads to use (All Cream?  All Turquoise?  Change threads?).  Then as I went to bed last night, I had a brainstorm for it:  monofilament thread!  Taking cues from all the angles of the piecing, I stuck with straight-line quilting and got it done. 


Good thing the "West Wing" marathon was still on!  DH and I watched (well, I listened) while I stitched.  Stitching done, we broke to set up jerk chicken to marinate for dinner then it was on to prepping binding.  For that I got to use a new gadget:


Got to admit, this "Binding Eaze" by the Quilted Heartz ladies makes for easy pressing of the binding and keeps your fingers from the hot iron.  Once the binding was attached, everything was ready to be packed up for shipping to North Carolina. 


My MIL is doing the Fat Quarter Shop "Sewcialites 2" Quilt Along.  She normally doesn't like small blocks but is trying her hand at the 9" ones so I bought her a surprise gift of the logo charm to support her efforts.  

Then it was on to making dinner and then eating and watching the "Lord of the Rings: Fellowship of the Ring" we taped yesterday (neither of us have seen it before).  I had hoped to have finished the mug rug earlier so I could also get back to quilting the Fat Quarter Disappearing Nine Patch today.  It's late now so I think that will have to wait until tomorrow!  

Monday, December 26, 2022

And So Starts the "7 Days of New Years" and Rolling to the End 2022


Meme by Greedo09

For me, this one was appropriate for two reasons.   While I did get my tree up.....

For some reason, the red lights photograph pink....

.....despite the best of intentions,  this is the only one of all the quilts I planned for Christmas decorating this year that is completely finished.

Temecula Quilt Co. "12 Days of Christmas"

The glory of what is now the "post holiday" season is that Christmas is back for me.  With the pressure of preparing for events and the events themselves now past (or in my case, a few cancelled at the last minute), now I get to spend this week finishing up the rest (or trying to anyway)!  

At the end of my last post, I talked about how I needed one more quilt for my plans.  Well, I found a real easy one.  I had heard of the "Disappearing Quilt Blocks" technique before but never saw it applied to a whole quilt until now:

I happened to catch April's video demonstrating how to make a "Disappearing Nine Patch Quilt" where the "block" is made up of Fat Quarters and knew this was just what I needed!  If you watch the video, you will find out that she originally saw the technique demonstrated (originated too?) by Darlene Michaud on her You Tube channel.  After watching hers, another video by Matt that also referenced Darlene's method was great for picking up a bunch of tips for choosing fabrics for making this quilt and planning their ultimate placement in the quilt top.  As a result, I managed to get this top done that day:

I also got the backing made for it, layered it, did the stabilizing stitching around the sections and came up with a plan to quilt the sections.  That was as far as I got.  Now that I can take my time, I'm hoping to definitely get this one finished this week. 

It's beginning to feel a lot like Christmas --- again!  

Friday, December 16, 2022

Quiltville Chilhowie Mystery Part 4 and the Results of Steady String Block Work

It's Friday, so time for the next part of Bonnie Hunter's latest mystery to drop!

Also note:  there was a correction to the Part 3 that dropped last week so go back and download the updated and corrected instructions.  As for Part 4, the mystery quilters will be making HSTs and cutting QSTs this week.  

Remember, you can check out everyone's progress on the parts of the mystery on Instagram.  I love seeing the color variations that quilters are doing!  I will admit though, I miss when everyone linked up on Bonnie's blog on Monday's after the each part was published.  However, this way you can now get daily doses of Chilhowie goodness so that's a plus! 

I have been continuing with my plan to resume work on two of my own Quiltville mysteries.  One of those has been "Roll, Roll, Cotton Boll".  I needed to complete the part of the mystery where you had to make string block units.  Additionally, I am also working on Bonnie's "Cherry Crunch" quilt as another Red & White Christmas project which also needs string units.  

I've been able to do a little on both in between (or sometimes, instead of) other quilting I am doing for the season.  It is much easier to leader/ender the string blocks with each other since it means I can keep the small stitch length the same for both rather than having to change the stitch length if I push through a regular project along with the string blocks.  Doing so has meant making great progress on both!

I now have enough of the "Cotton Boll" foundation blocks that I'm down to the last third of the total needed for the project left to make.  Glad to finally be getting these done after starting on making them all the way back back in 2018.  For the "Crunch" project, so far I've managed to complete about half the units I need for that project.  Once I finish them, the next step will be to sub-cut them and add flip and sew corners to make the subunits for the finished blocks.

Hope your mystery quilting is progressing or your holiday sewing is finishing up.  It's time for the final holiday project push!!   

Tuesday, December 13, 2022

Still Working on Christmas Sewing Deadlines

I've been working steadily to try to get close to finishing projects for Christmas decorating.   As November came to an end, that meant finally getting the borders on the Fat Quarter Shop Jelly Snowflake top.   

This is a free mystery quilt first offered by them in 2020.

As noted when I started this one, because I needed a smaller quilt, my blocks are made from 2" cut strips rather than Jelly Roll (2-1/2" cut) strips. Once I adjusted all the pattern cutting measurements, the block construction was easy to do.  The center block is patterned as a plain background square but if you look at some of the quilts and tops made from this pattern (including the one I saw at the VA Quilt Museum), many of them have interesting pieced centers so of course I wanted in on that too!  It took me a while to come up with something simple that I liked but eventually I did.  

Top done, I then took some of the scrappy leftover bits and pieced them into blocks or strips, added in the extra color option and test blocks, made a label area and filled around all of it with what I had left of the background fabric to create my third scrappy backing this year!  

I also needed to get back to one of my other holiday quilt projects called "Christmas Ribbons".  I adapted Sally Schneider's  “Painless Borders” design so I could cut out most of it using my Accuquilt dies. 


 As you can see, I needed to make four different pieced blocks for it.  I started making my Log Cabin die version of the "Tree" blocks for the center of the top back in September.  

Then before making the other blocks, I wanted to cut and lay out the side setting triangles.  Because the fabric I'm using for those is somewhat directional, I needed to cut across both the horizontal and along the lengthwise grain to get the birds to "stand" the way I wanted around the quilt.

Once that was done, I made the the pieced "Ribbon" blocks that create the border around the top, finishing those up two weeks ago.  After that I made the remaining Sawtooth Star blocks using the same red fabrics I used to make the tree "branches".  I finished making those last week.  I didn't get to do much sewing over the weekend (and spent what little time I did working on string blocks) so yesterday and today was the final push on this and now the top is finally done!  

I will admit that as each layer of the design was added, I got more and more excited about the project!  However, at one point, I stepped back and realized it was looking different than the pattern I was working from.  Granted I had made some changes to the blocks as designed but it took awhile to realize what was different:  the tree blocks in the original pattern were pieced with a sashing around them which made them "float" when placed next to the Star blocks.  For some reason, I completely overlooked that when I redesigned the Tree blocks to make it more Go! die friendly.

For a minute I thought I was going to have to re-do all the tree blocks!  Needless to say, this late in the game I really didn't want to do that.  However, the longer I looked at it I thought yes, the blocks could use a little breathing room but that also hadn't bothered me in all the time I spent working up the adaptation in EQ8.  I went back and forth a few times and in the end decided that I didn't hate it so will leave it as is.  That settled, the good news is that I already have the backing, binding and batting too.

The two on the left are for the backing and are my favorite for winter quilt backs: flannels!  I'm going to do this backing like I did for last year's "Indigo Weave" quilt except this time the plaid WOF center will have the solid red on each side.  

I have two extra star blocks that I will piece into one of the side strips.  I will cut a strip of the background fabric used in the top and piece it in between the two stars and use that area for writing in the label.

If I am going to be able to start putting out the quilts for the season, I have to get it in gear!  A big part of that is to also think about how I will quilt all of these projects.


This little flimsie finished back in September also still needs to be quilted!

As noted last week, I had watched Holly Ann of String and Story present her  Quilt Plan Challenge workshops.  

This was just what I needed!  I got some good tips from the workshops and will use them to get me in the right frame of mind to work on the quilting.  Some of the motifs she used on her own quilts gave me some specific ideas on how to approach my own projects so I am for once excited to do this.  

I still have two more projects planned but we'll see if I am able to get them knocked out.  After all, Christmas is almost here!!

Friday, December 9, 2022

Quiltville Chilhowie Mystery Part 3 and Back To My Own Mystery Work

 The next part of Bonnie Hunter's latest mystery dropped right on schedule today:

For Part 3, the mystery quilters will be making Hourglass units with Quarter Square Triangles this week.  

As noted previously, my plan for this mystery season is to resume work on two of my own Quiltville mystery WISPs (that's "Works In Slow Progress").   However, I also needed to finish working on blocks for a Christmas project which got in the way of that for most of this week.  The good news is that today, I can get to back to working on the string blocks I had in progress.

In addition to the Christmas quilting, the Christmas quilt finishing has also been on my mind.  To that end, another diversion this week has been checking out the Quilt Plan Challenge offered by Holly Ann of String and Story.  


Holly Ann has been doing a daily video this week with tips on how to organize, preview and then navigate your plans for quilting your quilts.  If you are also interested in something like this, you can still go here to sign up so Holly Anne can send you the workbook for the course.  All of the videos from this week are also available on her You Tube channel  here.

It has been interesting to watch and has given me a few ideas for how to approach quilting both the Christmas projects as well as the many "To Be Quilted" flimsies I have around.  I even think it will give me the confidence to tackle quilting my "En Provence" mystery quilt once I put together the backing for it that I had planned to complete during this mystery season.  Dare I dream of getting all of the mystery quilts that are ready for quilting finished?!?  Yeah, I know, don't get ahead of myself!

What are you working on this week?  Are you up to date on "Chilhowie" or finishing up your holiday sewing?  Or maybe you are already working on a new project to be completed for the New Year?  Don't laugh, 2023 is almost here!


Friday, December 2, 2022

Quiltville Chilhowie Mystery Part 2 and My Mystery Doings

After spending all of this week working on Christmas quilt projects, it's time to take a break from that because....

.... the latest Quiltville mystery post has dropped!

This week, those participating in this year's mystery will be doing strip sets and "flip and sew" corners.  You can see their progress on Instagram here and here.

I have two mystery season projects I plan to work on:  one is "Roll, Roll Cotton Boll".  Having assessed where I am with that, I'll be resuming work on making the paper foundation pieced String Squares for the next two weeks.

I see I have a block I started (front center) that needs to be finished.  As you can see I have no shortage of neutral strings (in the bags on the right) as I have been putting them with this project stash whenever I do trim cuts or have project leftovers.  On the left are the various stages the blocks go through before they are ready to go into the quilt:  pieced foundation squares that have to be trimmed then they are cut in half and finished up into big quarter square blocks.  In the back center are the "APQ Scrap Happy" blocks I was still making as leader/enders for the Christmas sewing and in the upper right corner is the mockup of one of the blocks from one of the holiday projects. 

I had planned to start work on another Red & White Christmas decorating project now that December has started but when I pulled out the stash for it, I found I had another Bonnie pattern sitting with it.

Comparing the quilt I had planned to make to this one, I realized that since "Cherry Crunch" also calls for string blocks, it actually falls right in line with the string blocks I have to make for RRCB.  So change in plans, I'll make this one instead!  In order to make sure it's doable, I actually mapped out how many foundation string blocks I need to make each day for both projects in order to get everything done in a timely manner.  This way I'll know how much time to commit and just where or when I fall off the wagon if I don't meet those goals.   

My other mystery season project is to get my "En Provence" backing made up.  I can't do any of the actual composition work yet because the design wall is still in use for the moment.  I did pull out the fabric bin with the project scraps which is what I had planned to use to make the backing.   However when I pulled out the bag that had the quilt top in it, I found a pleasant surprise!

Reviewing my purchase notes, I had forgotten that back in 2018(!) I had caught a great deal on a light purple, pink and green print fabric (7 yards for $22!) so had switched course and had planned to use it for the backing (as of right now, the top measures a whopping 123" square**!!).  I still think I might want to piece in some scrappy bits here or there so in the coming days will let that idea marinate a bit in my mind before proceeding.

**Correction:  Back when I had measured the top using the side of my cutting mat, I had read the numbers on it the wrong way again!  The top is actually 87" square.

I'm really hoping I can stay on track and get these two to the "ready for layering and quilting stage" by the time the mystery ends in January.  Are you participating in the mystery season?  Sew along even if it's not on the actual mystery project!

Friday, November 25, 2022

The Quiltville Mystery Season Starts Now!

 ðŸŽ¶It's the Most wonderful time of the Year! 🎵

For this quilter that means, it's time for Bonnie Hunter's Quiltville Mystery to start!!

This year's mystery is called "Chilhowie Mystery" and she is once again highlighting a town in her area of Virginia.  The name has Native American origins and in the Cherokee language means "valley of many deer".  As always, Bonnie provides a color palette that you can follow for the mystery or vary from it as you choose.  She says that this year's palette is influenced by flowers, namely the variety of colors of the Fashion Queen bearded Iris.  

The introduction to the mystery can be viewed here and Part 1 dropped on her blog today and is here.  You will be able to download the individual parts each week for free until the mystery ends in January.  If you prefer to get them all at one time, you can wait until after the mystery is over.  Bonnie will take them down from her blog and compile them into a single pattern that can be purchased from her website shop. 

For me, this is another one that I will download but sit out from making until later.  What I am hoping to finish during this mystery period is working on "Roll, Roll, Cotton Boll", one of her mysteries that  I started piecing all the way back in 2018.  

I think I will also try to work on a pieced backing for "En Provence" too. 

The top with the border embellishments I added on. 

It's the last backing that I need to make for a finished Quiltville top.  Who knows, maybe by mystery end, I could also get at least one of the top and backing sets I have ready finally quilted too!  

Will you be participating in this year's mystery season?  If you've never participated before, I wrote a blog post about some of the tips that I have learned over the years about how to get involved without letting it overwhelm you.  In fact, one of the tips involves not even making the actual mystery quilt!  You can check them out here.

Nothing like the mystery season to get your Quiltville project dreams flowing!  Whether you work on this year's new project or an old one, come join this worldwide group activity and share your progress with other Quiltville fans!

Thursday, November 17, 2022

Shop Hop Tops!

It took longer than expected (as usual) but I finally finished up the tops for a few quilts using fabrics purchased on the recent Shop Hop:

Fall 3 Yard Quilt

Like many, I've loved the concept behind Donna Robertson's 3 Yard Quilt designs.  I also like watching their videos and seeing what fabrics they combine and how they use them in the quilt designs.  So one of my favorite stops in the All Carolinas Shop Hop over the last two years is the Quilt Lizzy store in Wake Forest, NC.  I've been able to score some really nice kits there and just like when you buy kits from Donna's Fabric Cafe, you also can pick a pattern for free to make it up in!

Prior to our trip, I had seen a pretty Fall quilt in one of the older Fabric Cafe videos and wondered if I might find a kit for one on the Hop.  Luckily that did happen so among the other goodies I found on the Hop, I scored one!  
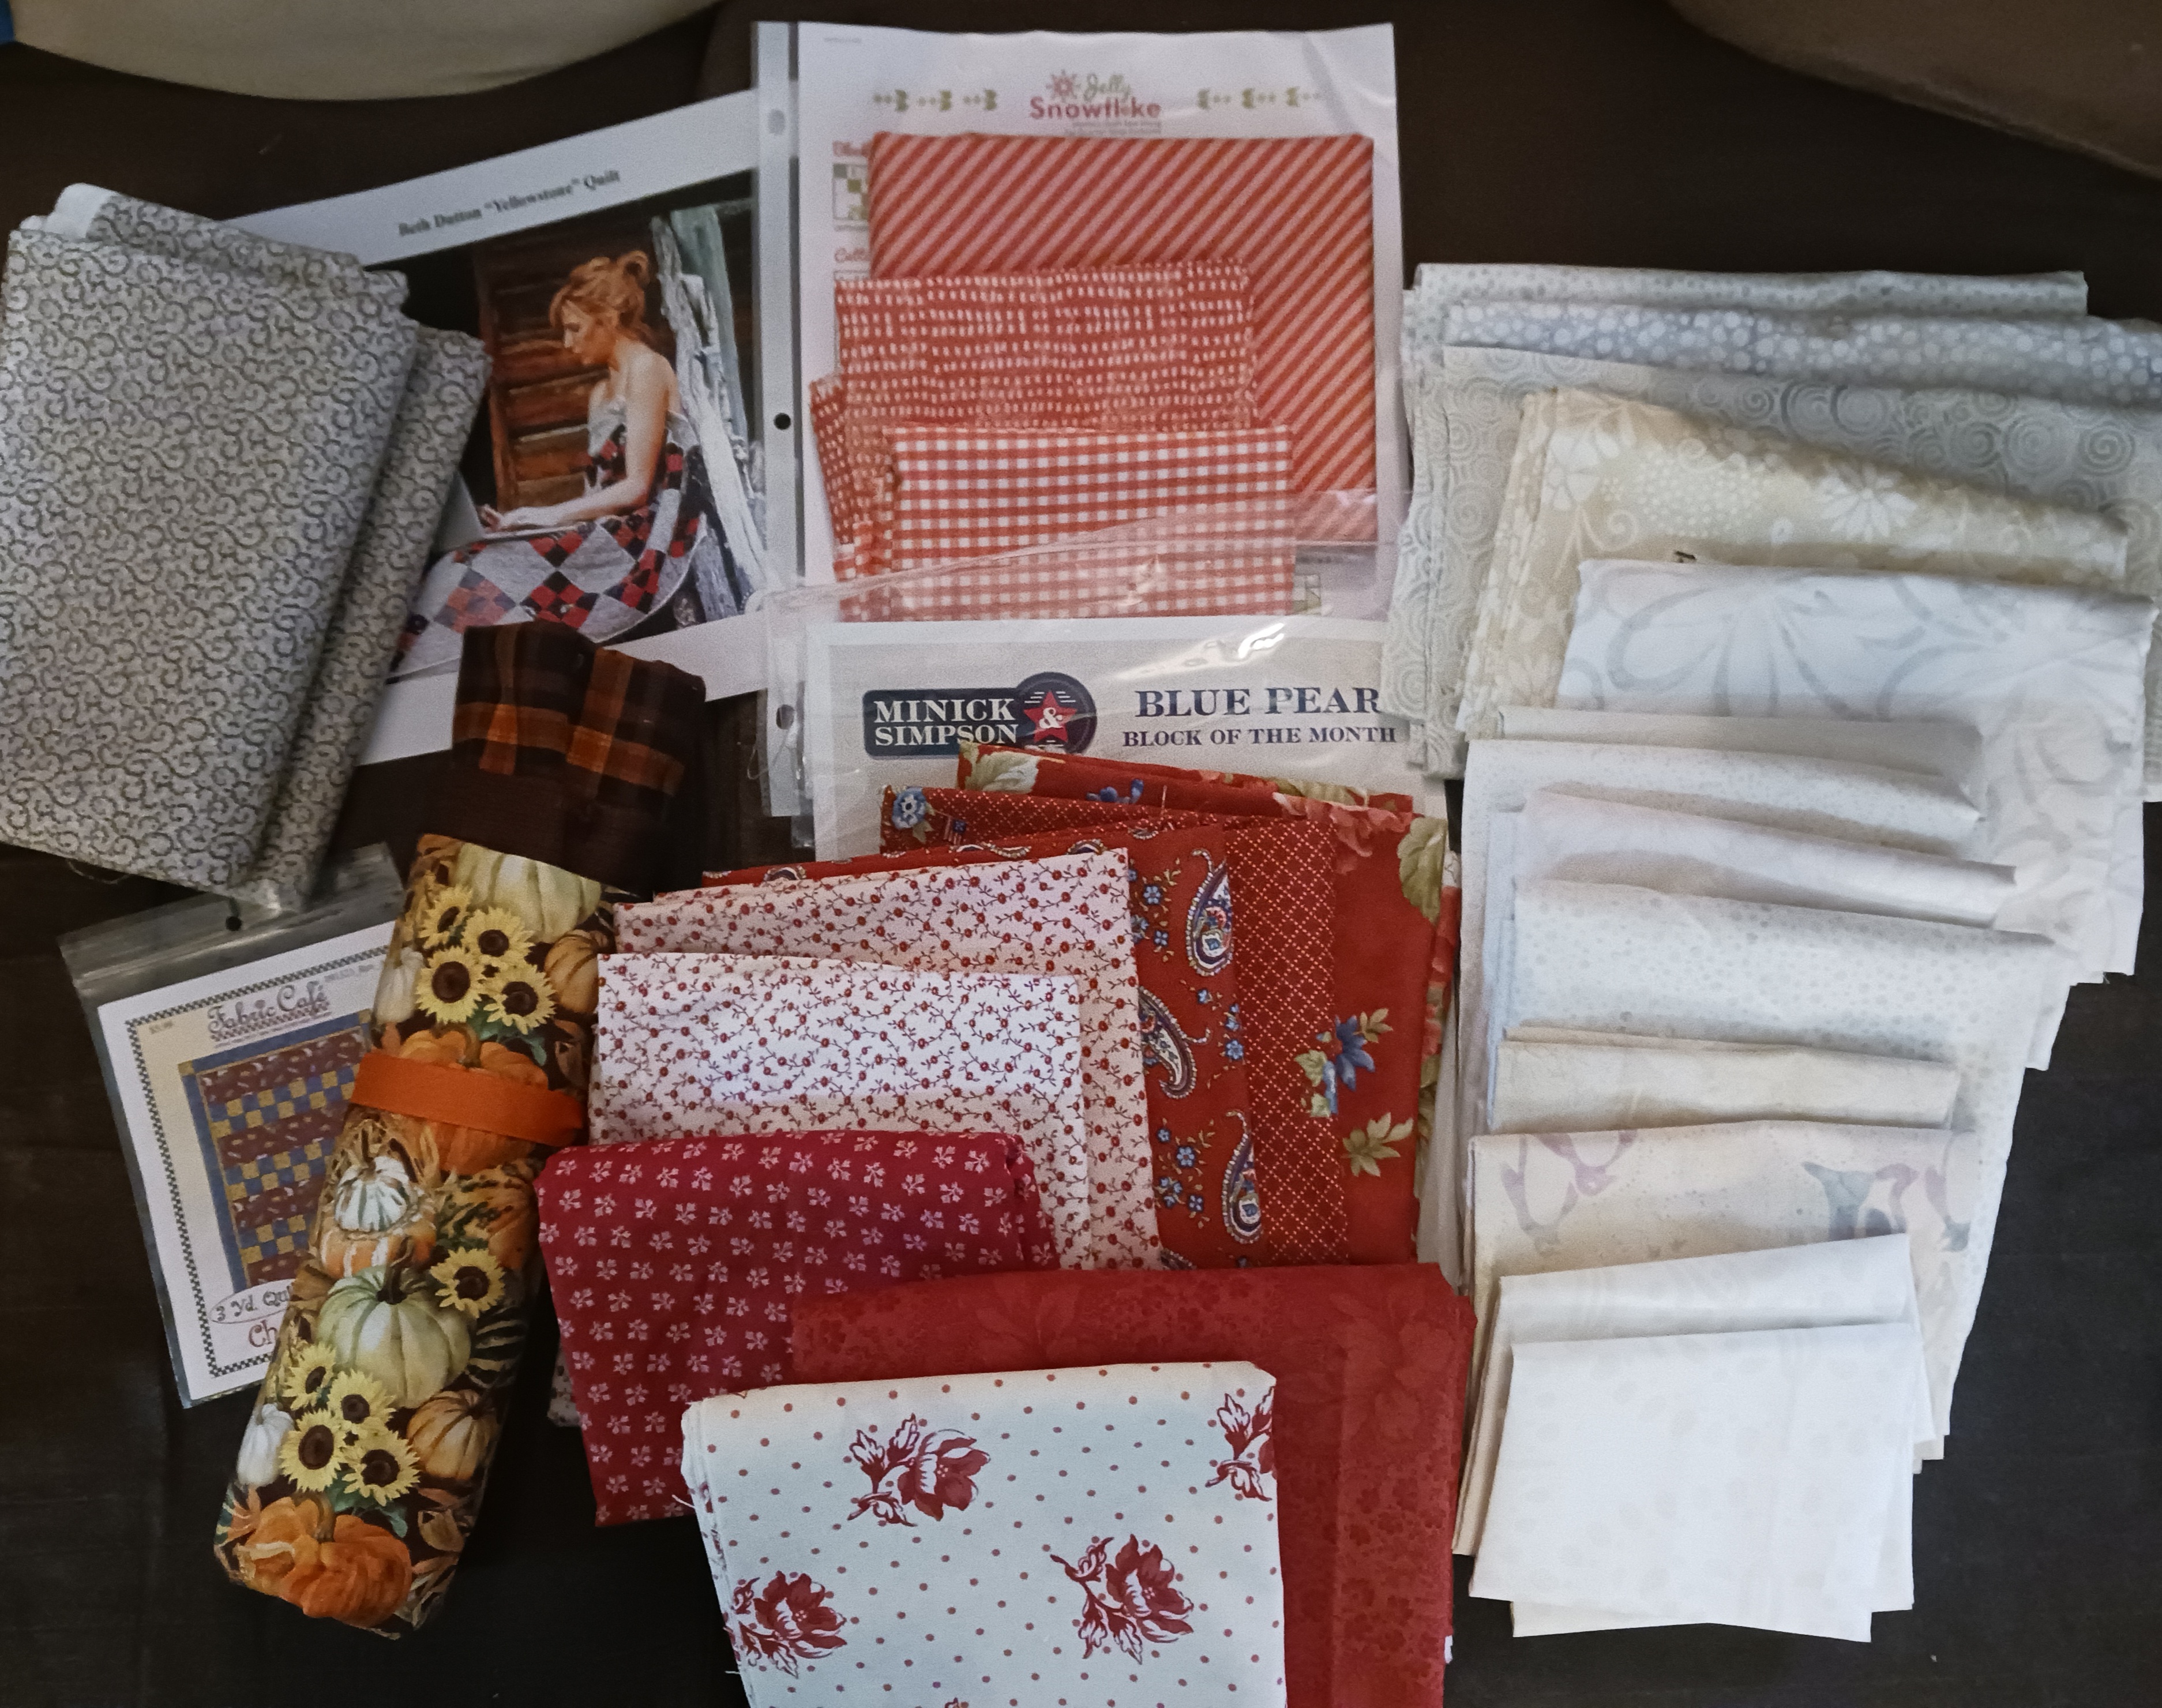
Kit is bottom left

Most of the 3 Yard Quilt designs are pretty simple so I hoped I'd get it made up quick.  Of course, leave it to me to complicate that plan by wanting to also make the other two "easy" quilts from the Hop right along with it!  Still haven't quite learned my lesson about how taking on multiple projects adds more time to the making of each project.  I admit though, I also find it fun to "leader/ender" projects so that each sewing session feels like I am "cheating" by getting something done on multiple projects in one sitting at the machine.  Eventually though, I did get it done!

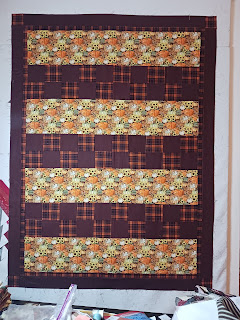
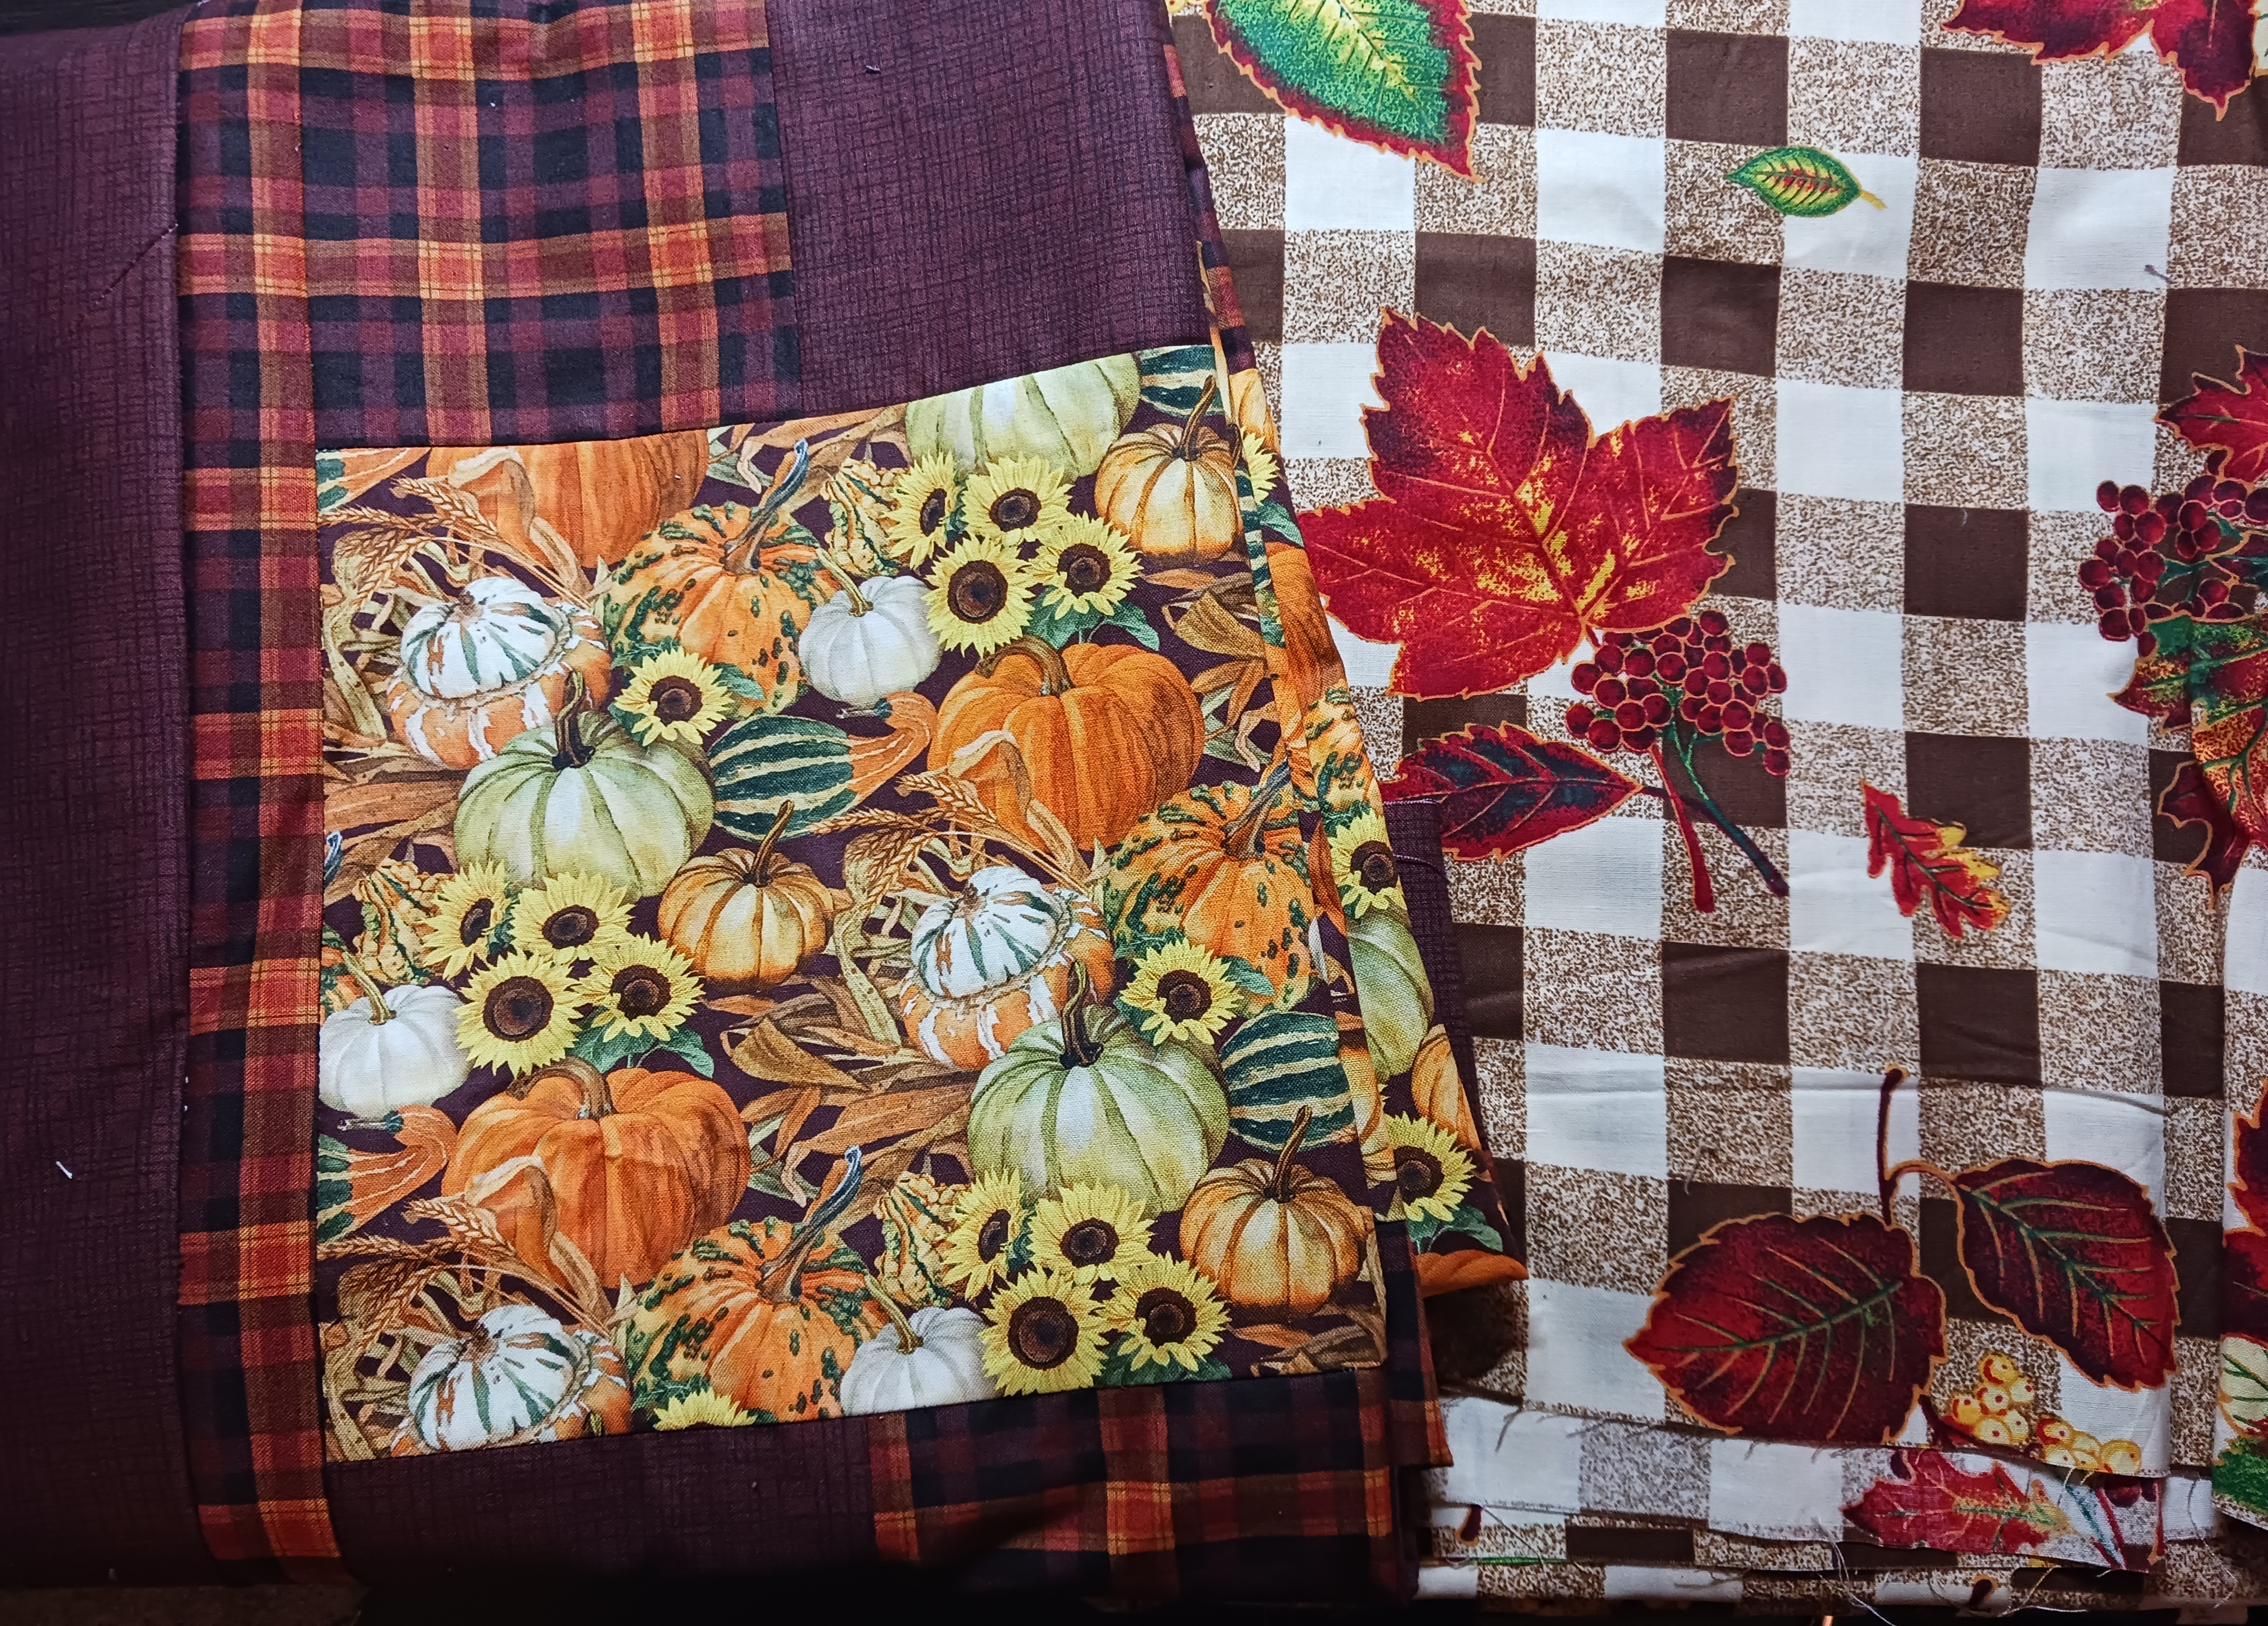
Fabrics are from the "Autumn Afternoon" line by Lynnea Washburn for Northcott

This is Fabric Cafe's "Checkmate" design (the link is to the printed pattern but it is also available as a digital).  I've seen it used many times in the Fabric Cafe videos (like hereherehere and here) although it was not one that I was particularly drawn to before.  However, I thought that for this fabric combination it was a perfect choice --- at least of all the patterns that were available from the store display.  This is a good one if you have a pretty "I don't want to cut it up" feature print.

What's also good news is that I already have the backing for it ready too!  While staying at my MIL's (our annual vacation mini quilt retreat) she asked me to go through her scraps and a bunch of fabrics she had picked up at fabric swaps at her guild meetings.  The plaid print was in that last bunch and it was perfect for this quilt!  There was also more than enough left for use in a future quilt.  

Edited To Add:  You can see the finished quilt in this post.

Dragons - The Ancients

As I said in my Shop Hop post, my DH and I had seen a quilt made up using Jason Yenter's "Dragons" fabric line and pattern for In the Beginning Fabrics.  We saw the gorgeous red version in person and having watched the first season of HBO's "House of the Dragons" loved the idea of having a dragon quilt to snuggle under when the next season comes out.  

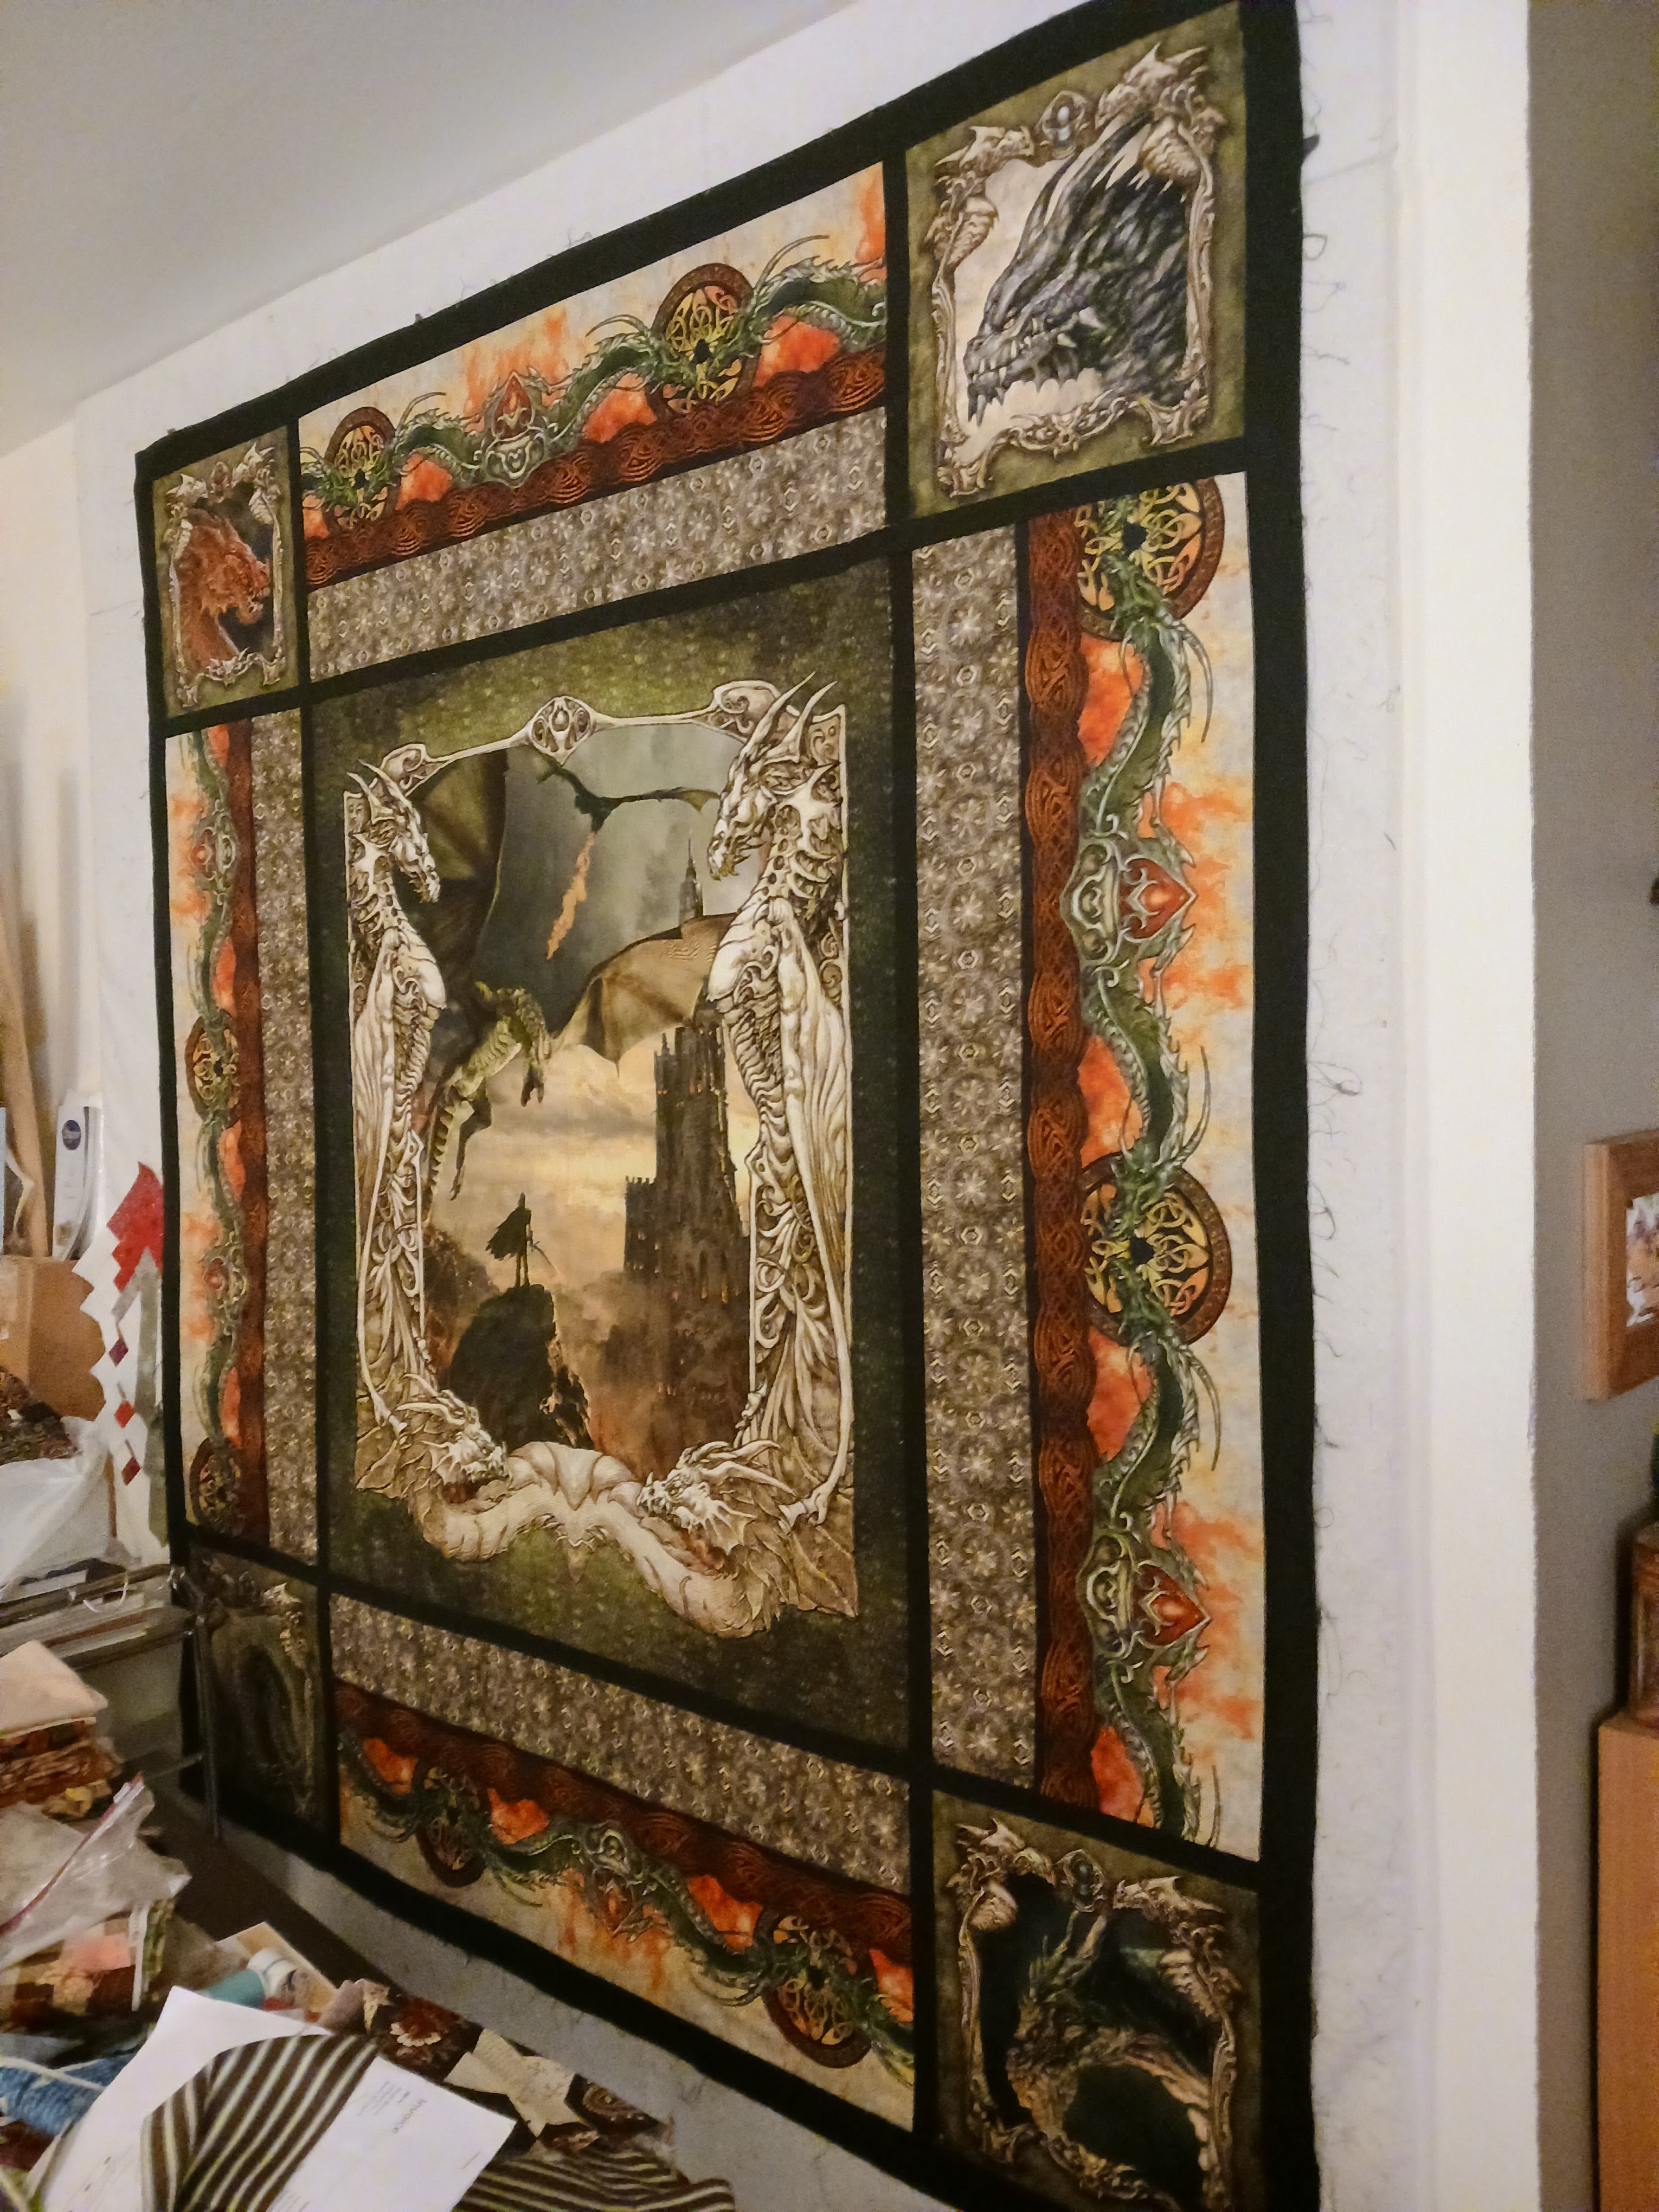
The original "Dragons" line came out in red and blue colorways but the store we had shopped at didn't have any more of those fabrics.  So when I searched around, I discovered that there was also a green colorway called "Dragons - The Ancients" that had a different set of panel prints as well.  I truly lucked up when on another stop on the Hop, I found one of the green center panels in the sale section at the Keepsake Quilting/Pineapple Fabrics Outlet store.  With that in hand, the hunt was on to find out if the other fabrics from that colorway were still available.

I did find the fabrics but I also found a free pattern at eQuilter that used them.  Their quilt design was smaller and much simpler than the one we saw which also meant a smaller commitment to the amount of fabric needed and the effort to make the quilt.  Since the simpler design still made a great looking quilt, I was more than happy to settle for a cheaper, easier quilt!  So an Etsy shopping spree followed to get the supplies I needed.  However, I will say that despite how much easier it was, it still took me longer to get it made up than I expected!  That said, here's my finished top:

Once the top was done, I began to think about what I'd back it with.  Ironically, what immediately occurred to me was to recreate the general outlines of the front on the back.  I had purchased some additional  fabrics from the line with the intention of making bowl cozies for us and a friend who is also a fan of the show.  Those fabrics helped inspire the backing idea and so it was back to Etsy for more of the line!  

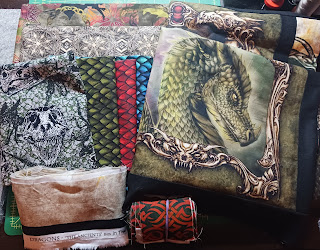
Backing fabrics on the left, finished top and binding on the right!

The backing fabrics just came in yesterday and right now I'm thinking of making the backing in a sort of "quilt-as-you-go (or is it "quilting in sections"?) manner in order to make sure that the front and back sections line up perfectly.  Work on that will commence when I'm ready to actually quilt this thing which may not happen until early next year.

Fat Quarter Shop Jelly Snowflake

This year my Christmas decorating scheme is Red and White and I've been lining up projects for that.  One that I came upon was the FQS's Jelly Snowflake free pattern series.  I saw this when I looked at the patterns they offered for Jelly Roll Day back in September.  When I looked at their blog post on the "Snowflake" sew along (which originally ran in 2020), it was amazing how varied were the color schemes used by each designer they had invited to participate.  Of course, I was particularly drawn to a red and gray version made by one of the FQS staff but I am already making a R&W quilt in that color scheme.  I was also pleased to get to see a blue and white version in person while returning from our trip and stopping in at the Virginia Quilt Museum.

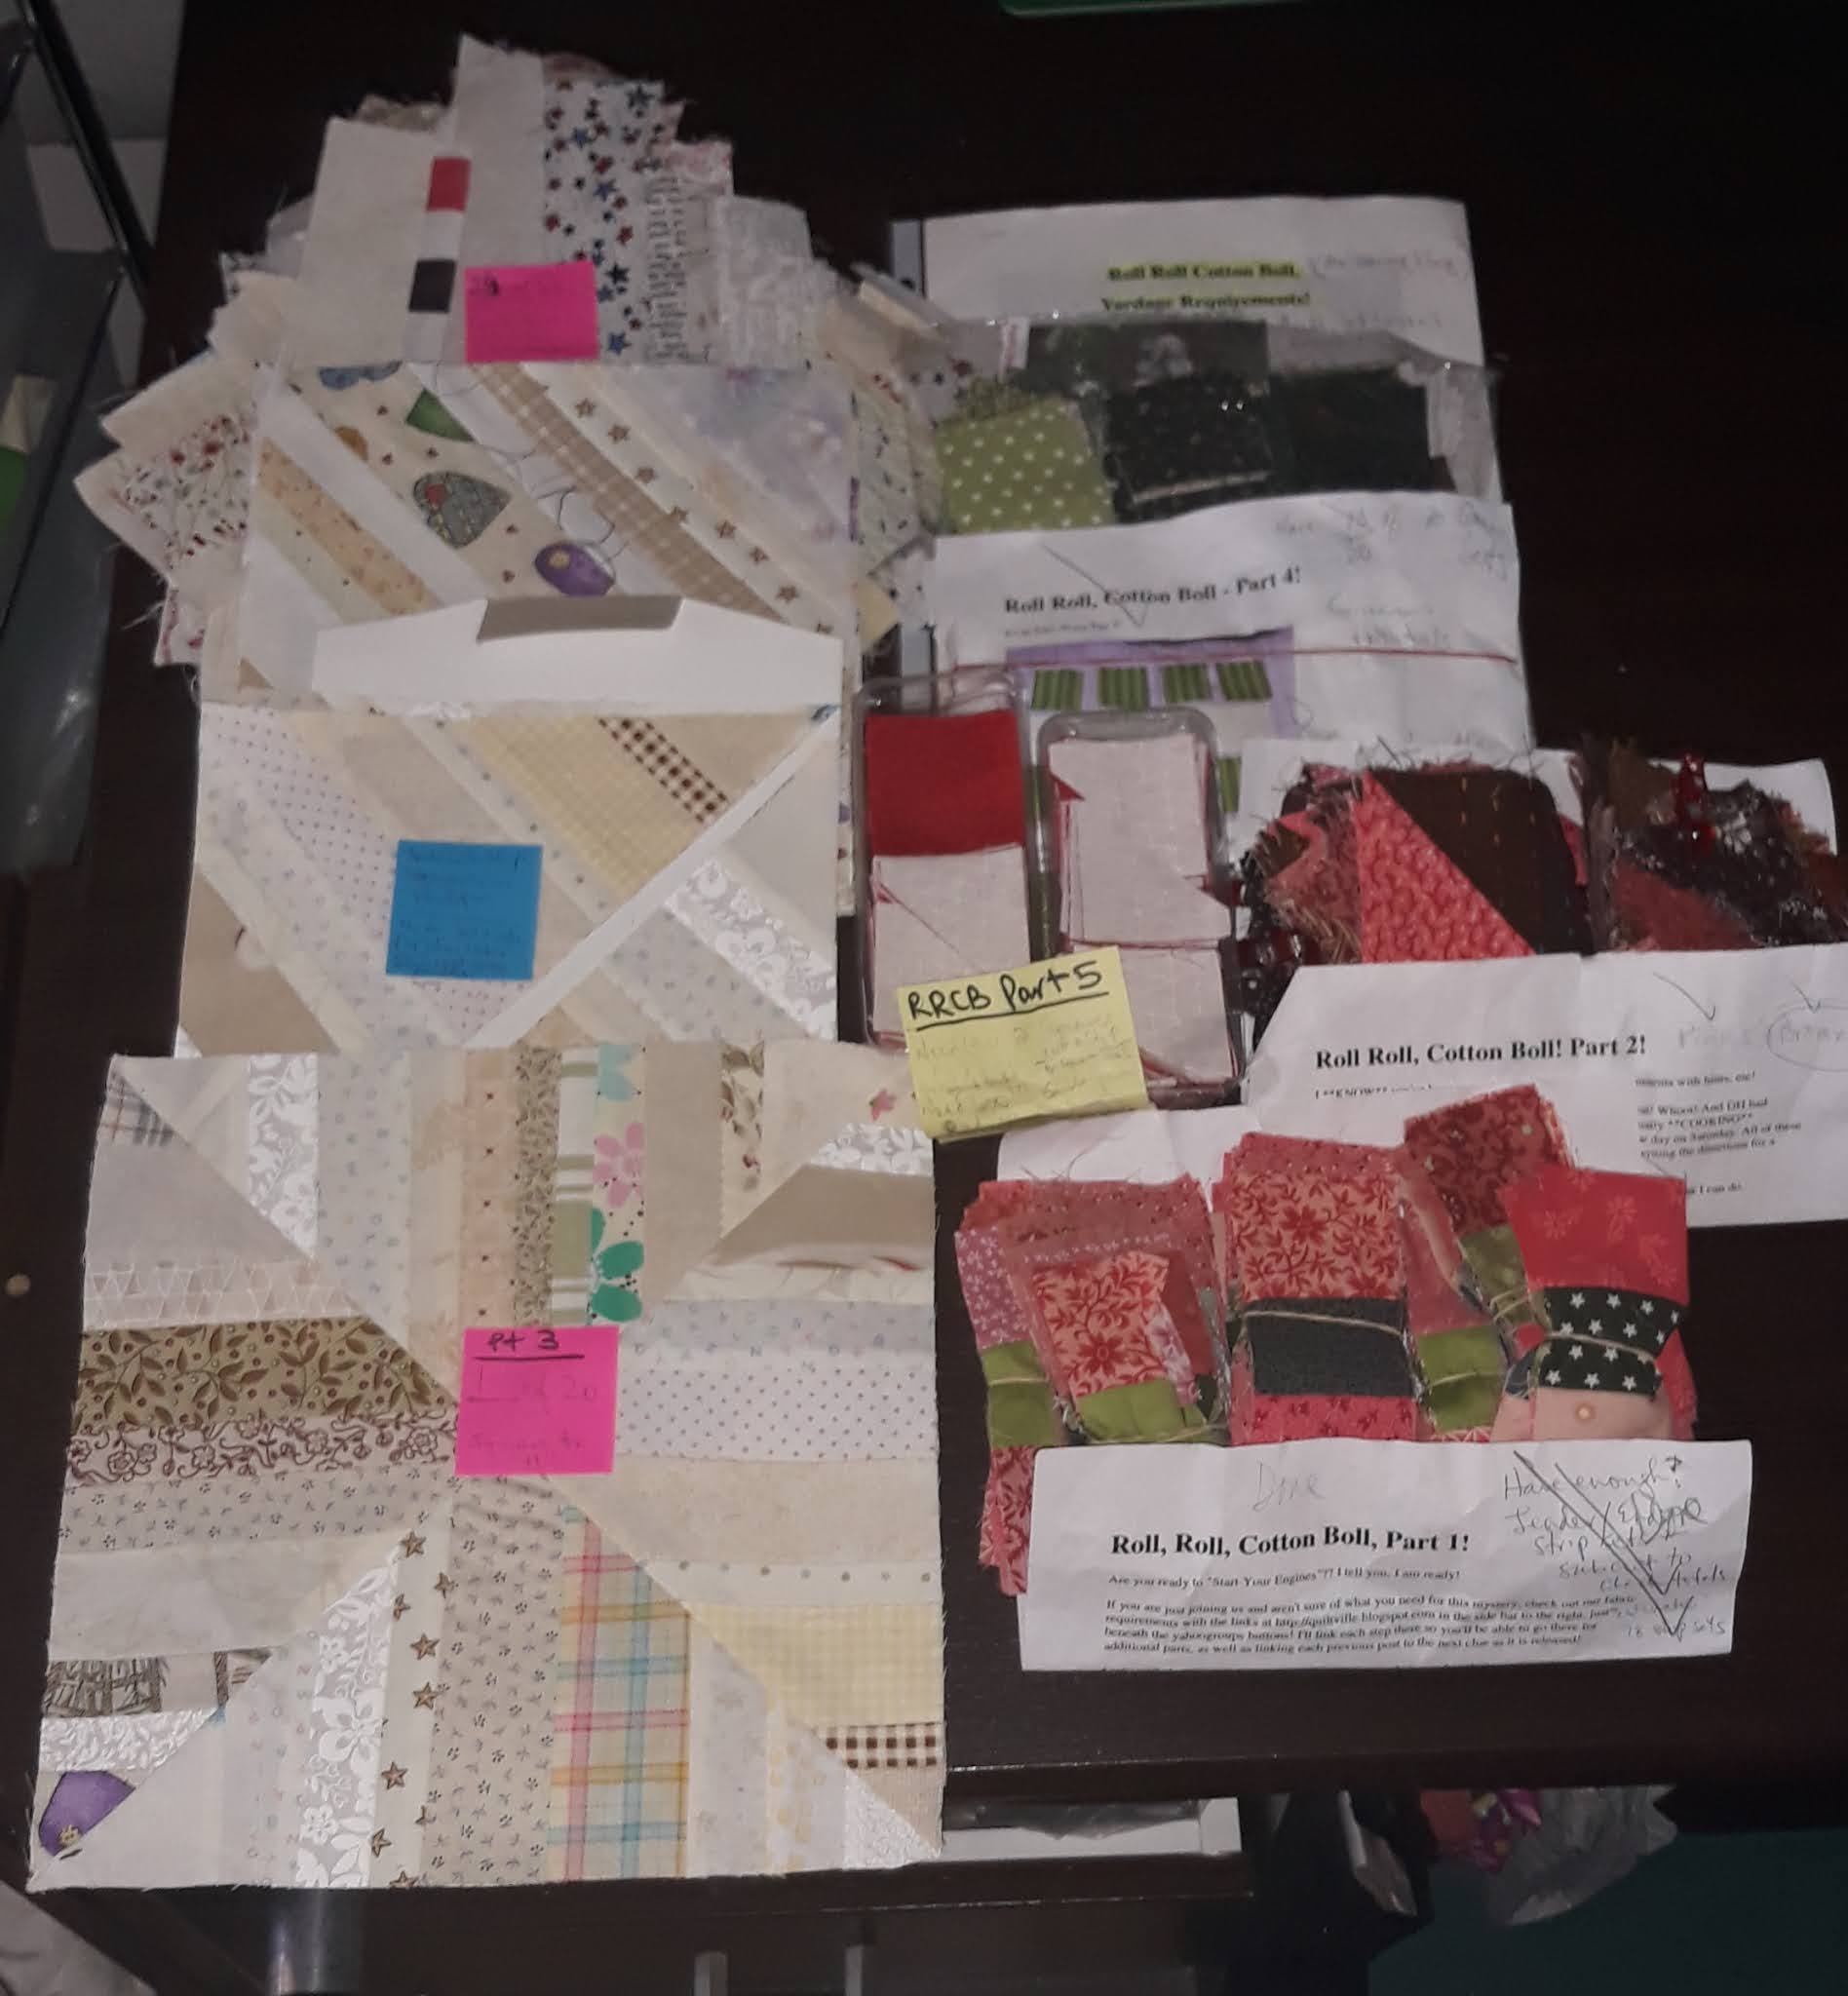
However, there was also one made by Nicol Sphor in red, grey and pink and I decided to definitely go that route.  When I went looking for pinks in my stash, I instead found a "Strawberry Red" gingham print that I really liked and thought maybe that could be another "twist" on pink for the design.  I managed to pick up another print in that color scheme before the Hop and put finding others on my list of things to look for during the Hop.  I came back with some great choices (which you can see in the picture at the top of the post), so many that I wound up with six prints to choose from when I only needed four.  

I had picked out four dark red and the grey prints (three here when I needed only two) to use from my stash.  I also decided to purchase more of a red-on-white micro dots print I had that I felt really worked for adding a subtle amount of red into the background.  I made my version of the FQS design with 2" cut strips (1-1/2" finished) instead of jelly roll strips because I need my quilt to be smaller than patterned to use as a wall hanging in a specific spot.  

Ultimately, I made up the blocks in all of the fabric prints I had gathered and then laid them out with the other blocks to determine what would be used in the final layout.  After much deliberation and switching around of the blocks, I think this is going to be it:

It's not completely sewn together yet and I still may decide to do some piecing in that center square.  I also need to decide on a backing for this.  With all the reds I've purchased for this year's decorating scheme, I may just take the extra blocks I made and piece them together with some scrappy red squares and call it a day.  

Edited To Add:  You can see the finished wall hanging in this post.

Shop Hop Bags

Well, the Shop Hop bags started back in October are still not done!  Once again, seemed like a simple project but it has been complicated by poor instructions.  I had picked up the page full of edits to the original instructions but even the clarifications are still a little confusing.  I've already had to change one of the side pockets from fabric to mesh so I won't lose seeing all the motifs from the panel print used to create the pieces for the bag.  I do hope to get this one done before the end of the year but at this point, I'm not hopeful!

All of this was yet another diversion from the sewing I had planned to do this month but once these are all out of the way (and off my mind), maybe I can go back to focusing on what I should be working on!