Sunday, November 24, 2024

Slow Sunday Stitching: Two Cross Stitch FFOs

It's been awhile since I've had something to share at Kathy's Quilts for the weekly "Slow Sunday Stitching" showcase!

In the last two weeks, I had two big cross stitch "Fully Finished" projects.  They were not big stitch designs in size per se, just big in my cross stitch heart!  First is that I made my first quilted project bag!

"Just Fudge It" Project Bag featuring Pat Sloan's "Sunday Drive"


While project bags are big in the quilt world, they are HUGE in the cross stitch world!  You can buy inexpensive vinyl bags for your projects but a lot of cross stitchers add to the fun by buying or making pretty fabric bags to hold their projects. 

Many CSers use bags where the fabrics used for it may coordinate to the theme of the piece they are stitching on: for example having a bag made up in Halloween fabric to hold a Halloween stitching project.  

I had resisted the urge to go there since I am trying (fairly unsuccessfully at this point) to keep my cross stitch projects to a minimum.  So I didn't mind the plain vinyl bags since I can reuse them for any project.  That said, I do admit to getting a variety of them, each with a different colored zipper and then have been known to coordinate THAT with the project in it, LOL!   

In this case though, making a bag was a chance to make and utilize a CS pattern I really liked.   As I have noted in previous posts about CS,  I am particularly fond of the "snarky" designs and had loved this one by Brenda Gervais of With Thy Needle and Thread.  I was then turbo charged to make it once I found one of Pat Sloan's older fabric lines while on a shop hop and realized that the fabric colors coordinated perfectly with the cross stitch piece.  Then I lucked up that the shop I had bookmarked as having the pattern had it on sale when I went to get it!  

At this point I couldn't "fudge" that "G" -- I had to "rip it"!!

Since this CS design spoke to an aspect of "the process" of doing cross stitch, I didn't mind creating a bag and putting it on it since it could be used for any project I might store in it.  An added bonus is that the theme of the fabric line will be really appropriate if I use this bag to carry projects in it while travelling. 

I have seen various tutorials for making project bags but in the end decided to make this one just like my favorite kinds of vinyl bags.  This one has two zippered sections because I like having a clear vinyl front pocket for storing the pattern and "in progress" piece and then a big top load pocket for all the project supplies and stitching notions.   The only thing I forgot to do was to add an additional divider inside the big pocket.  Oh well, something to consider for the next one!  

And now that I've opened that flood gate, I've since kitted up two more CS patterns to use to make two more bags!

This is one of them!

The other cross stitch "fully finish" is also another of my snarky projects:

Maker/Crafter/Badass

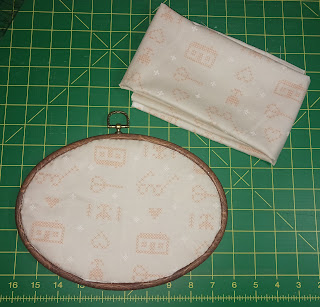
The pattern for this one was an impulse buy from back in September.  I fell in love with it when I saw a kit for it that included a frame.  However, when I realized I had most of the supplies for it and already knew a source for a frame that I've shopped with before, it immediately went on the "must make" list!  It was a pretty quick stitch and not too long after finishing it, I went on a Shop Hop and found the perfect fabric for a simple cross stitch backing finish.  


As I've done for other framed cross stitch pieces, I laced it around the frame before popping on the outer frame edge.  With it in place I then had to determine how much to draw up the backing fabric in order to hand stitch it in place so it fit snugly (if not terribly neatly) around the back.  

It remains how ironic it is to me that when I started quilting I swore I would do no hand work and yet every new thing I pick up related to quilting has pushed me in that direction!  Even better it is now hanging in place!

I have a few other stitched finishes that still need to be "fully finished" however at this point and I am not sure that will happen before the end of the year.  But two down still feels good!

Linking Up With Slow Sunday Stitching at Kathy's Quilts

Friday, November 22, 2024

Quiltville Mystery Season Starts TODAY!

It's that time of year again:  It's time for Bonnie Hunter's annual Quiltville mystery quilt!  This year's project is called "Old Town".

It is inspired by the sights and sounds of Krakow, Poland that Bonnie visited last year.   Even though the colors were inspired by her trip, as always you do not have to make your version in only those colors.  I always look forward to seeing how creative people get with their mystery color choices.  You can follow what other mystery quilters are doing on the Facebook page for the mystery here.

Bonnie will be leaving to travel to England on the Friday after Thanksgiving which is when the mystery season usually starts so she is posting the first part of it today.  If you haven't already done so, also pick up the Introduction post with the fabric requirements here.  

As Bonnie notes, be sure to pick up and download the mystery parts each week and save them to your computer or phone.  Once the mystery is completed in January, she will remove the instructions from her blog.  After the mystery is over, you can still get the full pattern by purchasing it in her Quiltville store when she releases it.  

As for me, my mystery season will be just like last year's:  I will be trying to finish up one of the tops I still have to quilt.  I've settled on finishing "En Provence".  I completed this top back in 2018.

Top

Prepped Backing

I had made up the backing back in January of last year so all that's left to do now is to layer it and do the "quilt whispering" to decide how to quilt it.  Not always an easy task for me, LOL!  However, I really want to be quilting my quilts more frequently in the coming year as I have a lot of accumulated tops and want to make space for all of the accumulated project kits I have set up.  Which brings to mind this hilarious "Bonnie-ism" I saw on Instagram:

Or at least I hope so!

I had originally planned to quilt up my "On Ringo Lake" mystery during this period because the colors of it are similar to what is being used for "Old Town".  

Top and Scrappy Backing

However, it has a scrappy back and I have some new quilt hangers that should arrive soon that I want to  try using.  I am trying to fix up my younger son's former bedroom into more of guest room rather than the junk depository storage space it's functioning as right now.  The hangers are made to be used with a hanging sleeve, something I don't typically add to my quilts.  It will be easier to blend a sleeve into the back of "En Provence" hence why it tops the finishing list this round!   

Are you participating in this year's mystery?  Have you done one of Bonnie's mysteries before?  They are a lot of fun and there is no pressure to get it done by the end of the mystery period.  Check it out as well as what everyone else is doing and consider joining in on the fun!  

Friday, November 1, 2024

Finished Or Not Friday: Spring Quilts and Gifts

This week I am once again joining in with those reporting their finishes along with our esteemed hostess Alycia for Finished or Not Friday!  

It's always interesting to me how projects get started or evolve.  This quilty finishing tale started back in 2014 when I made "Fabric Gal" to use to decorate my bed for Spring.  

In 2016, we gifted that quilt to my husband's convalescing aunt to brighten her hospital room.  Everyone that visited enjoyed the quilt and when she passed away we gave the quilt to her daughter.  Of course that meant I now needed another Spring quilt.  

In 2017, I purchased a "juicy" bright fabric bundle from the Turning Twenty online store.  Since this was not the usual kind of colorway I worked with, I did not immediately come up with a design to make with it.  In fact, that didn't happen until 2020 while we were stuck in our homes due to the COVID quarantine.  

We quilters were fortunate that so many quilt designers came up with new designs and quilt alongs to keep us busy while under lock down.  That year Gudrun Erla of GE Designs held a free quilt along for her new pattern "Elvira".  I was excited to participate as it also meant using my favorite Stripology ruler.  I added fabric to the bundle I had purchased to fill out the amount of fabric I needed for the project....

....then followed along and made up the top.

However with loads of other quarantine projects afoot, it sat while I debated on how to quilt it up.  

In 2023 and still without a Spring quilt for my bed,  I found in my stash what I thought was a yard of the Peach floral fabric I had used for the borders of the "Fabric Gal" quilt.  By now I was a big fan of the Fabric Cafe "3 Yard Quilts" and saw this as an opportunity to make one.  I purchased some coordinating fabrics to go with what I had and took it with me down to my MIL's in North Carolina for our annual Fall visit and mini Quilt Retreat (she is also a quilter).  

When I started cutting the fabric for the pattern I picked for it -- "Heartland" -- I realized I actually had a little more than two yards of that border fabric.  I decided that rather than make the lap size quilt that the 3 Yard patterns typically make, I could "upsize" it to a twin if I could get more of the coordinates.  I was able to find one while in NC but had to wait until I returned home to NY to get more of the second.  Before long I had doubled the basic design into a twin top!

Finished top and backing purchased on a Shop Hop while in NC.

When I didn't get around to quilting it by the end of that year,  I planned to bring it back down to my MIL's and try to quilt it on her new long arm.  We returned in May of this year for the funeral of another of her sisters.  While there I did load the quilt onto the longarm but for reasons I didn't understand at the time, I couldn't get the pattern I wanted to stitch out.  

While there, I was showing a friend of my MIL a picture of the "Elvira" top that "Heartland" was now replacing.  She really liked the bright colors of it and since she was in the process of finalizing a move to retire to my MIL's town, I decided that I would bring it back down when we returned to visit in the Fall and quilt it up as a surprise housewarming gift for her.  

In the meantime, after returning back home with the unquilted "Heartland" top, I lucked up on receiving information about a "Free Motion Quilting Summit" being held in August.  Adria Goode who was one of the presenters showed her "Big Flower" stitch pattern and I just knew it would work for "Heartland".  With many other projects on my plate, I didn't start quilting it until late September, getting it about half way done.  

I had to break from working on it because we were now scheduled to return to my MIL's in early October.  While there I finally got the "Elvira" quilting going.  I pieced together a backing that included a strip of scraps leftover from piecing the top and included a label.  I then picked out a large continuous line flower stitch pattern to use to quilt it.

I went with the simpler Blossom E2E pattern.

Luckily with a lot of new lessons learned on this trip about working with the longarm,  I was able to get it all stitched out!

And before you know it the quilt was finished!

Two days before we left I trimmed and bound it and it was ready for gifting along with another little gift that can be seen in this post!


On our return home it was now time to also get the "Heartland" quilt finished.  I worked on that this week and now it too is finished!  


As a throw back to the "Fabric Gal" quilt, I still had some of the panel fabric I used for the label of that quilt so made a similar label for the new "Heartland" one! 

Previous and New Labels!

I look forward to when I can use this one in the Spring!

I also look forward to checking out what everyone else has made up this week over at Alycia's for Finished or Not Friday!  There's always good stuff to see so be sure to check it out yourself!