
FINALLY, the Western Gift Quilt Is Finished!
(56" x 84)
(56" x 84)
 |
| Front |
 |
| Back with label area |
 |
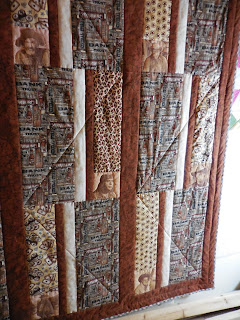
| A close up of some of the pictures in the quilt |
I put in the last stitches this morning after a too long weekend of working on it. This was my adaptation of the "Changing Lanes" quilt from Deanne Moore's book "Fabric Play - Change the Fabric, Change the Quilt". I made it for my mother-in-law's husband who is a big fan of westerns. I had started on it back in November (which you can read about here) but this post is all about the final throws of the finishing! If you're interested in some process posting then read on......
Did you ever have one of those projects that every time you get something done on it, it just never seems to be finished? This was one of those although when I started out I thought this was going to be an easy project! In its defense, I only have myself to blame for complicating it. The issues with the photo transfers (which are detailed in this post) started it all. Then the choices made for finishing it (or more correctly, the difficulty of MAKING those choices) added extra effort, time and intricacies.
In the end this was very simply quilted but it took me a while to decide to go that route. There are so many creative options for quilting a quilt now that sometimes it can be hard to just get out of your way on deciding how to do it. I decided to start out by ditch stitching all the seams and then see if I was inspired to do anything else. About that...
Reminder #1: Since I've been using my old Euro-Pro machine, I had forgotten how hard it is to package a quilt in a small harp space. It's fine if you are doing free motion or are using a walking foot for border to border straight stitching. When you have to turn the quilt to change direction in the middle of the quilt in order to stitch the little seams around the pictures -- it's time to choose another stitching design (or should have been)!
 |
| An "after the fact" simulation |
Reminder #2: After the New Year, I really need to take my Janome in for repair!


After spending Saturday morning and evening doing all the ditch stitching (DH didn't get in from work until late so we had to make a planned grocery shopping trip in the afternoon), I felt the quilt needed more quilting but wasn't sure, given the time crunch, just what to do. While I did plan to outline the figures in the photo transfer squares, what to do in the other areas? Stipple? Cross hatch? More vertical lines? Watch TV with DH and wait for inspiration to hit? Ok, I can tell you that last one is not a good choice when a deadline looms but it was all I could muster that night.
Very early Sunday morning, I went with DH and one of my sons to see the new Star Wars movie (my other son was invited to a free screening of the movie being hosted by his girlfriend's school later that same day). We enjoyed it and after we got back it was time to get back into "finish this quilt stat!" mode. In the end, I finally decided to do just a few long crosshatches across each "block" (each rectangular four piece strip set unit) from corner to corner opposite the photo transfers. I also decided to stitch down the center of the outer border sashings.

When done, while I still thought it a little too under quilted overall I very much liked the effect of the giant zig zags across the top and how that somewhat mirrored the similar layout of the offset dark brown and cream strips in adjacent blocks (the "Changing Lanes" of the pattern).
Of course deciding how to quilt it also prompted a lot of back and forth about what thread to use to do the quilting. I admit I prefer to avoid a lot of thread changes whenever possible. I was able to settle on a dark tan/olive Aurifil #2370 for the top (spool laying down in the photo below) after considering various browns, tans, creams and even monofilament. Fortunately #2370 also worked well in the bobbin for the print I was using across most of the back. I did debate about doing a different thread in the border but in the end, felt the stitching would look more balanced over all if I kept with the same thread across the whole top.

50wt Aurifil thread is so fine that even when it contrasts it doesn't scream for attention against the fabric.
I still needed to detail stitch the photo transfers but decided instead to first trim up the quilt and attach the binding. I had chosen a plaid for that and went the usual route of cutting it on the bias for that edging.

I also opted to glue baste the binding in the hopes of making the stitching go faster. It did but the need to press the edge to secure the glue means a very flat binding when done. Again not my preference but in the service of time, necessary.

I was tired by that point so left the outlining of the photo transfers until today. Again there was the thread issue. Again I auditioned a number of colors but decided on Smoke monofilament as the best option for all twelve of the pictures on the top. For the back, I did opt for thread changes this time around: for eight of the pictures, the bobbin thread would land on the light backing print so I stuck with using #2370 in the bobbin for those. For the three pictures when the bobbin thread would land on the brown barbed wire print, I wound part of a bobbin of brown thread for those (Connecting Threads Essential in "Cinnamon", 2nd from the left in the previous thread picture). I had one picture that was on top of the "show down" panel motif on the back. For that one, I chose to go with monofilament thread both top and bobbin so as not to have a very visible weird head outline on the stomach of the gunman in the panel image.
I have to say throughout all of this, I did have some issues working with using the monofilament. I've always set my monofilament thread off the machine, usually on a thread stand. My Janome has a thread stand attachment and I used to use one of those cast iron stands with my Euro-Pro. However the thread pole for the cast iron stand got lost or misplaced back when we moved in 2011 and I haven't been able to find it or a replacement for it yet.

However, my Euro-Pro also still had on it what I had used prior to getting a thread stand:

However, my Euro-Pro also still had on it what I had used prior to getting a thread stand:

I learned about using monofilament thread from Harriet Hargrave's book "Heirloom Machine Quilting" back when it was the "Bible of Machine Quilting".

Back then she taught that the circular base of a simple safety pin taped to the top of your machine could serve as a "make do" thread guide. Fortunately it worked!

Back then she taught that the circular base of a simple safety pin taped to the top of your machine could serve as a "make do" thread guide. Fortunately it worked!
Note: Lori Kennedy, a Craftsy machine quilting teacher and quilt book author recently hosted an interesting "Open Forum" on her blog "The Inbox Jaunt" about using monofilament thread. Read her thoughts on the subject and those of her readers (including yours truly) in the comments of the post.
However, the needle threader on my Euro-Pro is also out of alignment (hmmm, guess it needs to go in for service too!) so needless to say it was a tricky prospect to try to thread the machine needle by hand with the "invisible" thread. Uggh, so close to the end....the solution was my sewing table light placed low and behind the machine so it shone through the eye of the needle from the back making it easy to see right where to put the thread. Problem solved! I'm glad I took the time to outline the figures in the images -- they really popped in their respective squares once that was done.

The good news was that I managed to get all the pictures outlined before I had to leave to go to our community garden (I and a few other members are attempting some season extension projects).
As I said at the top of the post, the morning quilting session was FINALLY the last of it for this project! On my way back from the garden, I picked up some Priority Mail boxes from the post office so I can pack up this quilt and send it along with....

...the cookies I bake each Christmas for my MIL and her sister. These will go to the post office tomorrow morning and hopefully will make it to North Carolina by this weekend! Boy do I look forward to getting back to the mystery piecing now!!


1 comment:
I use a thread stand too. Thanks for the hint and link for the micro thread too....as I had a lot of trouble with that when I tried to use it on a quilt. :) :)
Post a Comment