Showing posts sorted by relevance for query three cheers. Sort by date Show all posts

Friday, July 12, 2019

Three Cheers For the Red, White & Blue! --- Part 2

In my last post I had been playing in my R/W/B stash to finally make up the last of three QOV tops that I hope to get quilted for distribution this year.  When you finish a project there are a couple of options open to you.  You can:
  1. Just put all the leftovers back in your "stash storage system" of choice.
  2. If  you use a Scrap Users System, you can start cutting up the scraps into the precut sizes you prefer depending on the amount of each fabric you have left.
  3. Or you can ask yourself:  is there enough of anything here that I can apply to another project?
As my sidebar will attest, I am guilty of acquiring many "Squirrel Projects" as I read through all the quilty blogs and websites that are around.  Pat Sloan's site is one of my favorites and she also does posts for other companies (although I was sorry to hear she'll no longer be doing the podcast for American Patchwork & Quilting).  One of the companies she does posts for is Aurifil Threads, hosting their "Designer of the Month Series".

For June, the featured designer was Annette Plog, one of the "19th Century Patchwork Divas".  I love reproduction quilts so know the work and books of this group of women well!  For Aurifil's DOM series, Pat interviews the designer about her interests and quilty journey and the featured designer will offer a block designed around the year's theme.  For 2019, the theme is "Traditions" and the block Annette offered was this one:


What's cool is that if you make the block and link it up (this month's deadline is July 15), you have a chance to win an  Aurifil thread prize.  This was one of those times when I saw the block and could visualize how I wanted to work it up (and you can see another time I did that here).  So I downloaded the instructions with plans to make up a block once I had finished my QOV top.

This was the block I made:


I did make one change and made the center square a "Square In A Square" unit instead.  Seems good right?  Except that when I went to link up and looked at some of the other blocks, something seemed amiss.  It didn't take long to realize what it was:  I had made my block following the picture in the instructions:


However, if you compare that to Annette's block earlier in the post you can see the difference, LOL!  I don't feel bad because if you look at the blocks submitted, you can tell who worked from the blog post and who worked from the pattern instructions!  It was funny, after I had my block made, I thought it had looked a little different than what I had visualized!  I was going to just upload it as it was but then I wanted to see what the block would look like in the original design so I made another one up.  Here's that one:


Just goes to show what happens when you play with color position in a design!  I think I'll upload both of them.  More entries, more chances to win, right?!?  I'm not done with this stash yet, there is still more R/W/B fun a comin'!  Stay tuned!

Three Cheers For the Red, White & Blue! --- Part 1

Well, I'm about half way through the month and for a change feel like I got a few things accomplished!  As the title notes, all the things are related to the color stash I'm working from:  Red, White & Blue fabrics.  I've been attracted to R/W/B quilts since I began quilting and have made a few quilts in that color scheme as well as a few tops still waiting to be quilted (and to see them, click on the "R/W/B Quilts" label on the sidebar).

When the QOV mission was founded, I just knew I had to join in both to contribute and for the chance to make more R/W/B blocks and quilts!  Years ago I donated blocks for MODA's "Just One Star" block drive and I already have one R/W/B QOV top waiting for quilting.  Well now I've got another:  "What Goes Around Comes Around" is a flimsy!


When I started this one (after seeing it on a post on the Katy Quilts blog), I didn't know its origin so I called it the "Garlic Knots QOV" because it looked like one of Bonnie Hunter's Addicted To Scraps blocks:


However, I eventually found out it was actually the pattern "Patriotic Patchwork" by Debra Finan from the Love of Quilting July/August 2012 issue.   I was pretty sure I had that one since I have a few other issues from that year (I had a LOQ subscription back then) and I saw another quilt in that issue that I recognized.  I couldn't for the life of me remember where I had put it until I finished the top and began looking around to see if I had any large backing pieces.  When I had started on this round of QOV work, I had actually gone through and organized all the  R/W/B stash.  I remembered from that inventory of the stash that I had a few large cuts of fabric and had also put aside some fabric bundles for potential projects.  So of course what's the first thing I find?  This bundle:


....with this on top!  This is the quilt I remember seeing when I had done a web search for the issue.  And sure enough, here's the original "Patriotic Patchwork" pattern in it!


So it turns out the design was right under my QOV nose the whole time and hence the quilt name!  I also had a whole lot of that stripe print in the bundle so some of it will become the backing for this quilt.  So now I have the three QOVs I wanted.


They all are now (approriately enough) stored in this bag:


It's one of the C&T Publishing Eco Totes that I got a few years back when they were promoting the Island Batik "Quilted In Honor" fabric line with quilts designed by C & T authors.  These bags are great for storage or carrying around at quilt shows.  They are eco-friendy too since according to the C & T site, they are made from recycled water bottles.

So now that I have a stash of tops and backings, I need to plan to get them quilted by September so I can offer them to the local VFW for distribution in November for Veteran's Day.  However, that was not the end of the R/W/B fun.  More to follow in the next post!

Three Cheers For the Red, White & Blue! --- Part 3

When I started working on a QOV top from my R/W/B stash, I had also hoped to make some more projects from the stash when it was done.  The good news is that I had a good reason to do so and another good cause to apply it to.  I learned about Kat Drinkwater's Covered In Love charity quilt drive back in February and donated String blocks to her January/February drive and Star Flower blocks to her March/April drive.  Kat spends May and June catching up on finishing up the quilts from earlier block drives.  When she announced that the next drive was to be in July, I figured I'd be ready to participate by then.  I want to do all the drives this year and since she has traditionally asked for the July blocks to be made from R/W/B fabrics, you know I was in!

This year's drive is called "Oh My Stars".  Kat's looking for 12-1/2" (12" finished) Star Blocks this time around.  Given the "Star" prompt, this also seemed like a good time to play with some new block designs or block making techniques I want to try out.  A themed drive like this is also a chance to make some blocks with some of the quilty piecing gadgets you don't get to use often.  Here were the ones I chose:

One of the first patterns I found was for a star block that was part of a quilt along project.  An ombre fabric had been used to achieve the gradient effect in the Double Sawtooth Star blocks in the quilt from Bernina's "Summer Sparkle Quilt Along". 


I tried to acheive the same effect with my fabric choices.  I'm not sure I was as successful but it was fun to try anyway.  The block as designed was only 10" fnished so I added a border around mine to bring it up to the size Kat needs.


Another block I wanted to make was the Split Ohio Star blocks from Judy Laquidara's "Road to Brownwood" quilt.  This quilt has long been on my "I Want To Make That" list.


However, I had also looked for stars to make in other places.  In my "QOV Ideas" file, I had this McCall's booklet:


There were quite a few interesting star blocks in this one --- including the Split Ohio Star (for Massachusetts).  I also decided to make the Mississippi block too.


Speaking of getting to use those quilty tools:  for the middle units in the Mississippi blocks, I was able to make those quicker by cutting the shape with the Accuquilt Go! Signature block die:


When combined with 3" finished HST triangles (also cut with the Go!), the units finish at 4-1/2" (5" unfinished) so after sewing them up, I trimmed them down with the 4-1/2" square on the Value die.  So with that, I've now got four blocks to mail out to Kat!

Seeing as how I originally found out about "Covered In Love" from a post linked up at "Finished or Not Fridays" on Myra's Busy Hands Quilts blog, it's only fitting that I link up my latest blocks there as well!  I'm joining Cynthia over at Quilting Is More Fun Than Housework who also posted her July CiL blocks and bring some more attention to Kat's great cause!
Finished or Not Friday at Busy Hands Quilts

Saturday, July 27, 2019

Three Cheers For the Red, White & Blue! --- Part 4

I had noted in a previous post that I purchased a used straight stitch machine.  I wanted it primarily for quilting my quilts and need to get comfortable using it.  I've made one mug rug with it and pieced the last QOV top with it but want a chance to quilt another project a little bigger than a mug rug before moving onto working on some of the layered or flimsie lap quilt projects I have outstanding.  So what better step up from a mug rug than a table runner!

I have a sideboard in my dining room (really an old dresser) that right now is still sporting a Christmas runner (gasp!).  I had planned to make a Spring runner for it but got way laid so why not a summer runner to honor Memorial Day and July 4 --- even if they have already passed!  Ok, so it'll be ready for Labor Day.  The good news was that the fabrics came from what still remains from the stash collected for the QOV top.  As of now the top and backing for the runner are finished:


It's the "Star Spangled Banner" (free) pattern from American Patchwork and Quilting (and not to be confused with the "Star Spangled" runner I made for our terrace table back in 2013 -- has it been that long?!?).  This was another Accuquilt Go! project for me since I was able to cut the block strips with their Log Cabin die.


Accuquilt has enough of a variety of dies that it's possible to cut just about any project out with one.  While I often examine a potential project to see if I can use the die cutter to make most of the cuts for it, there are times when hauling out the cutter and dies for a project isn't worth the effort.  However, for log cabin block strips it is so worth it!  I cut all of the blue strips with the die from the leftovers from the recent QOV project.  I also cut some of the light strips from that stash too but was also able to use a few light strips already in my Log Cabin Strip Storage Box.


This was an idea I got from Mary Johnson over at Making Scrap Quilts From Stash (and unfortunately, I can't link to the exact post --- she changed her blogging platform in 2018 and the 2016 post I got the tip from is not on her current site).  Ingenious, huh?!?   Mary makes a lot of charity quilts for Heartstrings and always has a ton of projects in the works so obviously knows a lot about keeping things organized.

APQ's original runner design featured white wool stars appliqued on but I did mine in a gold cotton print.  For some reason, whenever I am looking at QOV designs, I always want to add either a touch of gold or gold stars to the design.  And while this project isn't for a QOV, I'm still in that mode right now so that's where my mind went.  The stars were also cut with the GO! with fusible attached although I still have to fuse them down to be stitched in place.  The central panel in the backing will be the label area and written on when the runner is finished.  I've always said that the easiest way for me to ensure that a quilt gets labeled is to make sure the label (or a space for it) gets put into the backing. If I have to add it later, it might never get done!

So next step is to get this quilted!   To that end, the shininess you see on the top is the plastic preview paper I have over it as I audition stitch designs:


I have a few more books to look at for ideas specifically related to log cabin blocks/quilts before I choose the final design.

It should also be noted that I'm also collecting the parts for another table mat:


This is another APQ free pattern.  I'm making it smaller than patterned to go on a table in our living room.  Can't use up too many of these RWB scraps though, have to save some for future QOV projects!

Linking up on Pat's Sloan's latest UFO check in.  Go see what everyone else is working on too!

Saturday, August 31, 2019

Three Cheers For the Red, White & Blue! --- Part 6 and The Finale!

As August comes to a close, so does my Summer of Red, White and Blue Projects!  This is the third RWB project to make it to the "Finshed Or Not Fridays" Link Up, now hosted by Alycia over at her Alycia Quilts/Quilty Girl blog.


After spending so much time on my last project, the "Star Spangled Runner", it was a relief to get a quicker one completed.  I had hoped to get this done to post yesterday but I still had some quilting to do on it today along with all the finishing stuff.  So the "Salute To Stars" Table Mat made it just under the wire for the end of August!


Like the runner, this is another free pattern from American Patchwork and Quilting magazine.  As the pattern notes, it is easy to make the original design larger or smaller by adding or subtracting blocks.  The free pattern is actually the "color option" of a larger lap quilt that appeared in the magazine.  I made mine with even fewer blocks in order to fit the 18" square table I want to use it on:


I also recently saw a pattern  made up of the same basic blocks but in a larger size and laying them out in a way that creates a long runner.  A very versatile design indeed!

I opted to make a slight change to the design.  The original quilt used Flying Geese blocks to create an outer border around the center of the top.  I opted to go for a 3-D substitute and use a Continuous Band of Nesting Prairie Points instead!   I've only used this technique once before as the "binding" finish for a Feathered Star wall hanging way back in 2003 in my early quilting days.


I learned about the technique from a pamphlet --- one of those "Free with Subscription" gifts I got back when I started my Quilters Newsletter subscription.  I still miss that magazine!!


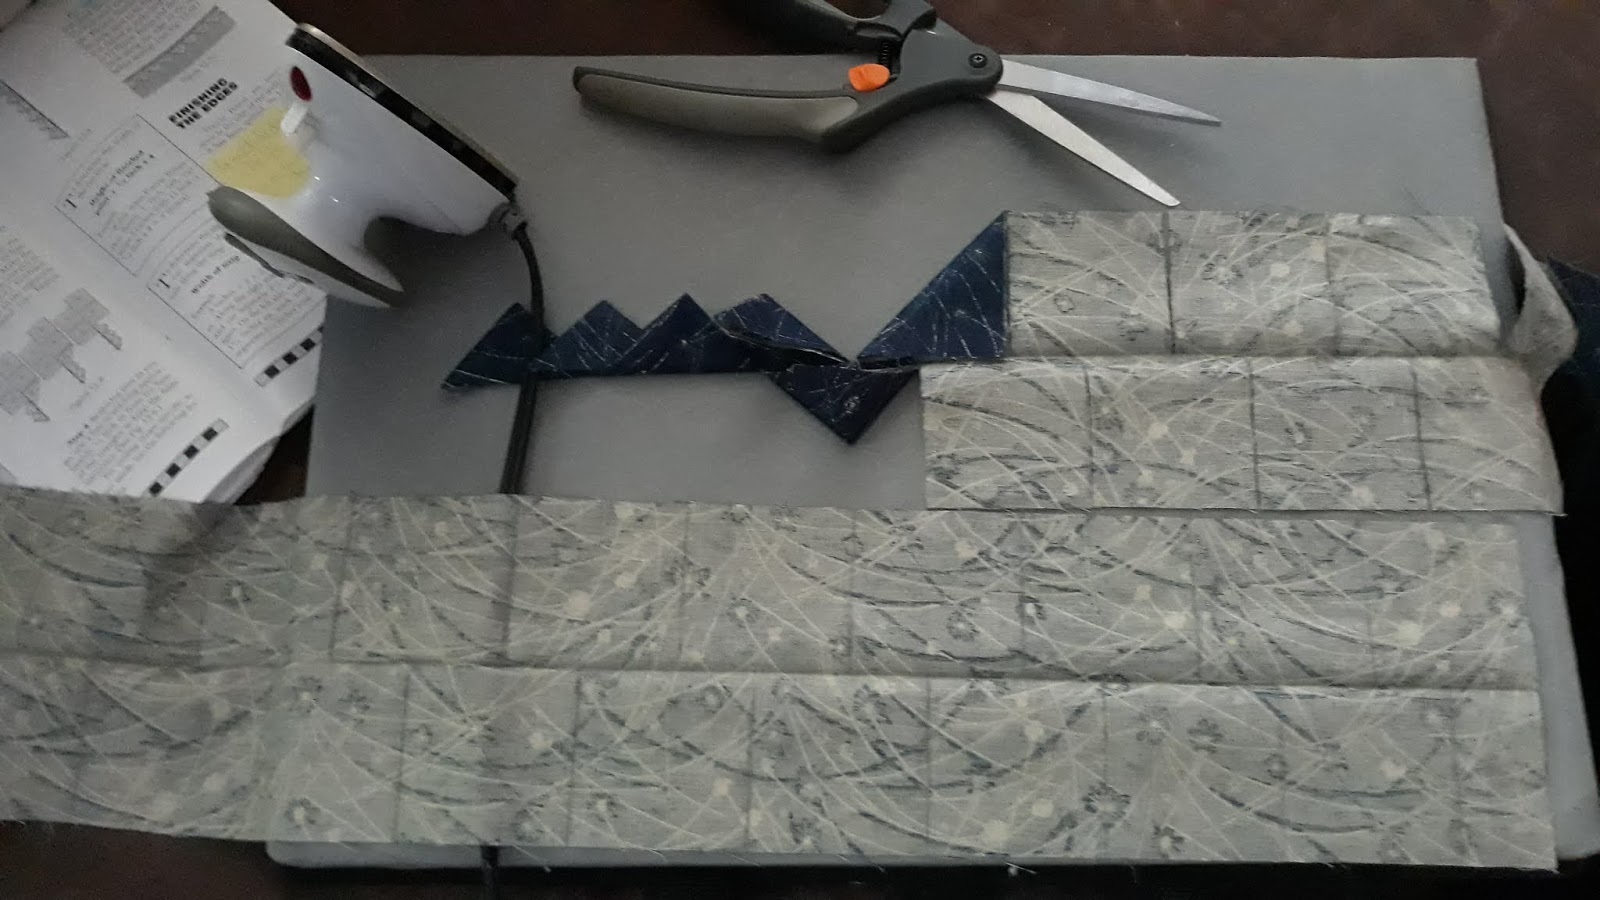
Even though Flying Geese are my absolute favorite block, I liked the idea of being able to make the triangles float above the striped outer border.  They are easy to make too -- only requiring a strip for each set of points, some marking and cutting (with scissors for a change!), folding and pressing.


There are a number of videos around the web showing how to do the technique.  I also found a PDF from the Utah State University Cooperative Extension (!!) showing how to do two-color and piped variations.  The two sides of the finished band get folded together and the band gets sewn in between the turned under edges of the top and backing.  In my case, I sandwiched it between the center of the top and an outer under-border.  

I had to "Frankenstein" some batting scraps for this and then decided to quilt it with some simple, straight forward grid quilting.  It was easy to do since I just had to follow the lines or edges of the piecing and the striped border print and it could all be done with a walking foot.

When it came time to finish the quilt edges, I was going to bind it with a traditional binding but then this week, Bernina's "We All Sew" blog put out a bunch of tutorials on various binding techniques.  One of them was for an "invisible faced binding", a technique I've seen but haven't tried before.  In addition, the way they did it, it provided a convenient label area and hanging sleeves (in the form of triangle corners) as part of the process so I was definitely in for that!


This was one of those RARE times, I was willing to hand sew down a binding!  If I want to hang this up in the future, I only sewed down the center edge of the triangles --- I left them open at each corner so I could slide in a dowel rod for support to hang it.  Of course, this won't be completely done until I write in the label information on the triangles!

I've been playing in my RWB stash all summer so all of the fabrics for this have been sitting on my cutting table while I worked on each project.  Needless to say repeats abound in the fabrics I used for all of my last few projects.  I had cut the squares for the star fabrics from the some of the same fabrics used for my last QOV top and the blue Prairie Point fabric and the striped print underneath it were also used for the corner squares and borders on it too.


And speaking of QOVs, now that my RWB Summer is done, it's time to focus on the other things I was supposed to be working on this summer --- namely, getting them quilted!  Well, I have that and another small (not RWB) desk mat to finish for a gift.  I admit I also have a new project that I want to embark on this weekend.  Thank goodness it's a long weekend!!

But before all of that, I'm heading back over to Alycia's to finish checking out what others are working on or celebrating finishing this week.  Link up and show us what you got (that we will want to make too)!!

Friday, August 23, 2019

Three Cheers For the Red, White & Blue! --- Part 5

First off, it's appropo that I get to post this finish this week because Alycia of the Alycia Quilts - Quiltygirl blog is picking up the reins for "Finished Or Not Fridays" today from Myra over at Busy Hands Quilts!


If you have not visited Alycia's blog before, I encourage you to do so --- especially if you are interested in Quilts of Valor.

Alycia is a longarm quilter who also serves as the Colorado Coordinator for the QOV foundation.  On her blog you will see so many great QOV quilts.  Heartwarming pictures (taken by Alycia who is also a photographer!) of the ceremonies when the quilts are awarded are always in her blogging queue.  You are also just in time to start picking up the instructions for Alycia's latest QOV mystery quilt series called "The Lone Rider"!  The fabric requirements are posted here and the first clue will be posted on her blog on September 4th.  Thanks to Alycia for picking up the link-up mantel for all of us!!

As for me:  Woo hoo!  My "Star Spangled Runner" is finally finished!!

s


Backing and Label Area

This is the "Star Spangled Banner", a free pattern from American Patchwork and Quilting magazine.  I made it with four blocks instead of the five used in the pattern because that was all I needed to fit our diningroom sideboard (really an old dresser).  The logs were cut with the Accuquilt Go! Log Cabin die.  As I like to do, the backing has an area pieced into it for me to write in the label information.  The stars appliqued on the front and on the label area were also die cut with fusible web attached using an Accuquilt die.

I should have been finished with this one a couple of weeks ago but it was held up by the quilting --- or more correctly, the decisions that went into choosing how to quilt this.  In my previous post about this I had previewed some quilting designs and was set to look through a few more books for ideas.  That led me to scrap all of my previous ideas and come up with a new one.  The log cabin blocks are so linear and I really wanted to "quilt against type" and try to either incorporate or just use designs with curves.  My finished stitch plan for the blocks and borders ended up to be this:


Up to now I had been sketching on the preview paper with a dry erase marker I keep in the kitchen with a board I use to make grocery lists.  The great thing about the Back-To-School period is that everyone has great sales on office/school supplies.  I was able to pick up some new dry erase markers at Dollar Tree that can now be dedicated for use with my preview paper and be kept stored with it.  Sweet!

With the stitching plan done, it was time to layer it.  The batting choice was simple:  about this time last year, Jinny Beyer had a sale on Quilter's Dream Select batting, precut 18" wide and on sold by the yard.  This is one of my favorite battings and my preferred loft (although she also carries it in the thinner Request loft).  At the time, I was comtemplating making a bunch of runners for the sideboard and since they need to finish 17" wide, this was a perfect fit for my plans!


So with batting already in house, it was a quick layering especially since as a smaller quilt, I could spray baste it.  Next up was to decide on which threads to stitch it with.  I started with stablilizing and additional rounds of decorative stitching in gold around the stars, ditch stitching with red around the borders and with blue between the blocks.  All of that was done with white in the bobbin.  However, when it came time to decide on what to use across the top, I was stumped.  I generally don't like to change thread color if I can help it, especially if I'm quilting a continuous design.  With every color I looked at, I felt that the contrasting thread along with the contrasting curved stitch design would overshadow the log cabins too much.  It took way longer than it should have to remember that I had another option: (invisible) monofilament thread!


I keep a supply of monofilament thread primarily for use to attach bindings but I have used it for the general quilting in cases like this where you need to stitch over a lot of different colors.  There was a time when experts like Harriet Hargrave and Diane Gaudynski promoted the use of monofilament as your primary quilting thread (although now,  Diane primarily uses silk thread).  I had purchased cones of  Superior's Monopoly in both clear and smoke a while back during a sale because I heard it was a great "low sheen" brand of monofilament.  I have another project that I had been considering using it for so was glad to get a chance to try it out on this extensively.  Nova the Nouvelle, which is a fairly new-to-me machine, stitched really smooth this round and had no trouble with the monofilament thread.  I'm pleased with her performance!

Close-up on the quilting


Edited To Add:


Close-up on how I stitched the Stars

Once the quilting was done, I already had the binding picked out -- the same red print used on the short side borders.  This was also another chance to put a new quilty gadget to use!


I had purchased this little ditty a couple of months ago when Green Fairy Quilts had it on sale.  After I press my bindings, I usually would wind them around empty toilet paper rolls.  I could then hang them on the lever that raises the seat on my quilt chair and feed the binding from there to the quilt while I applied it.  The challenge was to not pull the binding too fast otherwise the roll would slide off the lever.


This handy gadget helps wind it up when I make the binding and then can be attached to my sewing table and feeds it way more smoothly than the chair system did as I apply it to the quilt.  I also bought couple of extra winding rolls in the event I want to make up a few bindings in advance.

Glad to have cleared this project bottleneck and now can get the quilt traffic flowing smoothly again!  So with this one done, I want to get going on the other RWB Table Mat I have fabrics picked out for and a gift quilt that's already in progress and that I promised to finish by month's end next week.  I hope I can keep things moving!

Head over to Alycia's to see what else everyone has brought to the finish line this week as August soon comes to a close!  Even better, post your finished or not-nearly-finished-project and let us see what's occupying your quilt studio right now!

8/24/19 Edited to Add:  Also linking up with Amy Ellis through email for her "One Thing Challenge" Follow-up.  I had started using her weekly prompts to help keep me on track when making my most recent QOV top.  When that was finished this project was reported on (almost a month ago to the day) when I had finished this runner's top.  So now I can check in and say that it's competely done and in the can!

Friday, November 7, 2025

Finished or Not Friday: A Recap of September and October Finishes

Whew!  September and October were quite busy life-wise and as a result my blog became a victim of neglect.  Fortunately that was not the case with my quilting and in fact a lot of the busyness was related to it!  The good news is that having those projects helped during yet another time when having things either in the works or with deadlines helped to keep my mind focused during times of stress.

Equally helpful is to have hosts like the lovely Quilty Girl Alycia to provide a place for us to "jot this all down for posterity" through her weekly "Finished Or Not Friday" linkups!

So here are the things I worked on these past two months and that I am pleased to say also made it to the finish line (and this is your official "Long Post Ahead" warning!!!):

Finish #1:  A Fall Flannel Raffle Quilt (try saying that three times fast!)

One of the potential stressors was that I thought I would need a raffle quilt on short notice for an Art Show my community garden had announced in mid-August was being planned.  When word of it was shared at our monthly meeting, my expectation was for a late September or October show as we have held in the past.  I quickly came up with an idea for a display of my quilts with the theme being -- appropriately enough -- "Fall Quilts" and made a pile of the ones I planned to display.

Having successfully made a quilt to raffle off at our last show two years ago ,  I knew I would be expected to do the same again.  As such I went with the same simple design for it:  I decided to make another 9 Fat Quarter Disappearing Nine Patch quilt.  The good news there was that I already had a great bundle of Fall colored flannels purchased during a shop hop last year.  Eight of the fabrics in the bundle were from Holly Taylor's "Endangered Sanctuary" line for MODA and the cardinal print was from her “Cardinal Reflections” line.   

This was it laid out on my design wall.

When I opened the bundle, I had been surprised to find that one of the fat quarters in it was a border print that featured images of woodland animals (you can see what it looks like as yardage in the fabric line link above).  Not what I had expected but great for the purposes of this FQ design!  It did require a bit of fussy cutting and then cutting and sewing up the FQs a little differently than in the normal "disappearing block" process in order to get them placed properly in the final layout.  I liked the way it all worked out in the end!  

For the backing, I was fortunate to find and purchase another print from the "Endangered Sanctuary" line which I used to fill out the center of the back and for the binding.  I filled out the rest of the back with a brown tone-on-tone flannel print I had leftover from making this quilt from a good while back.  Just proof that leftovers and scraps can be helpful stash too!  

I got it done right before we went on our last camping trip for the season during the last weekend of September.  The campground provided a great place to get a nice picture of the finished quilt in an apropos location!

Unfortunately, a date for the Art Show still hadn't been announced by the time of our trip and the following weekend we were scheduled to travel down down to North Carolina for our annual Fall trip to visit my MIL.  So the good news is that if they do the event next year, I already have everything I need to participate!

Finish #2:  My First Quilt of Valor Donation! 

Speaking of North Carolina, we last visited there back in February.  Since my MIL is also a quilter, our visit is usually also a mini quilt retreat for the two of us.  On that trip,  I joined her quilt guild since I have attended both general and "bee group" guild meetings and workshops as a guest with her over the last couple of years.  Her guild is the Tar River Quilters Guild and they have many subgroup "bees" and many Community Outreach projects that members can participate in and contribute to.  When I joined, I picked up two outreach quilt kits one of which was for a Quilt of Valor which included fabric for the top and binding and a label.  

The guild holds a QOV presentation ceremony every November and the QOV tops have to be submitted by the end of September to the quild member that longarms them.  At the time I joined the guild, the rule was that you submitted a backing with your finished top so I had purchased fabric for my kit before we left NC (it's the blue fabric with stars at the top in the picture above).  I had the usual "quilter's expectations" to get both of the kits done before we returned for our Fall visit.  Of course, it took my MIL reminding me about the QOV submission deadline to finally get it started in August, LOL!!  

By that time, the donation rules had changed:  the guild had received a funding source for their QOV efforts so now, you just submitted the top, prepared binding and $20 and the member doing the longarming (who is also co-chair of the "Patriotic Bee") would provide the backing, batting and the quilting.  The pattern for the kit was a simple one but it turned out that the fabric balance in the kit left a little to be desired and the fabric provided for the borders was a little short too!  

The good news was that now that I no longer needed to submit it, I was able to use some of the backing fabric I had purchased to help me come up with a color distribution that was pleasing to me for the layout in the center.  That then left some extra bits of the remaining fabrics provided in the kit to craft pieced borders that helped stretch the white solid that had been provided for that purpose.

I did have to do some more work on that
lower right border before sending it though!

I managed to get the top done and the binding prepped by the end of August.  The top,  binding and a label that was included in the kit and now with my name written in as the maker was put in the mail back to NC so it could be submitted for quilting in early September.  

As noted earlier, we were scheduled to return to NC the first weekend of October and would be there for two weeks.  I expected that the quilt would have been quilted by the time we arrived and that my task in the first few days of our arrival would be to attach the binding and sew on the label by hand.  Well imagine my surprise when we attended the bee meeting and I learned that my quilt was not only quilted but had already been bound and the label attached!

The quilt displayed at the monthly guild meeting.

One of the guild angels had already handled the binding and label application for me!!  So I am happy to say that my very first QOV donation will be presented to a veteran at the guild's November meeting tomorrow!  Unfortunately, I won't be there for the ceremony but hopefully will be able to get pictures of the presentation from the guild newsletter or my MIL.  

The Patriotic Bee has decided to push for members to submit QOV tops all year round to take the stress off of getting them prepped for the ceremony as it would seem that I was not the only one that waited until close to the deadline to submit their top.  I am already looking forward to making another top for the guild that I can have ready for our return in February (and check out my sidebar to see what else I will be attending in NC that month!).  I am also once again encouraged to push forward in getting the four (!) QOV tops I've already made quilted and find out how to donate them in my own community at their annual Veteran's Day ceremony.  

Finished Quilts #3, #4 and #5:  Results of a 3 Yard Quilt Retreat

As I said, when we visit my MIL, she and I usually have a mini quilt retreat.  When we go down in the Fall, it is also during the time that there is a Shop Hop in her state.  So we also spend a few days visiting the quilt shops that are within a couple of hours drive from where she lives.  As a result, I try to take projects that are either simple to piece or don't require alot of mental focus since whatever work I do on them in the limited time we have together will be interrupted by shopping, guild meetings or other community events or activities that she wants us to attend with her.

For this trip, I decided to make my focus the many kits I have compiled to make "3 Yard Quilts" by the Fabric Cafe.  We both love the designs they come out with which are often great inspiration for our shop hopping or for stash busting.  I will admit that I now have too many kit bundles already put together so it actually kept me from shopping for more on this trip!  My hope was to piece up some of the ones that I already had and even better, quilt them using my MIL's longarm.  

On that end I was somewhat successful as I did get these three at least cut out, pieced and quilted before we left after that two week stay:

While all of these got pieced and quilted,  only one also got bound.  Once we returned home, one of the remaining two still needed to be trimmed.  So the story of those quilts are:   

#3: The Barbie Quilt!

Top made with the "Allure" pattern from "The Magic of 3 Yard Quilts" book


Back with a label area pieced in and using a cheater print
which was also used as one of the fabrics for the top.


Fabrics and quilting detail.

The inspiration for making this quilt was our trip to NC last year for the funeral of my MIL's sister.  My DH and I had traveled down for it with one of her two remaining sisters and that sister's daughter and granddaughter.  At the time, the "Barbie" movie had recently come out and despite the sad occasion, we managed to have a lot of fun talking and joking about "the world of Barbie" with the granddaughter during that trip.  

When my DH and I returned to NC earlier this year, I had come across some "Barbie" related fabric on a trip to Hobby Lobby and just knew I had to make a quilt for that little girl with it.  The pinks in the two prints I found coordinated perfectly with a patchwork cheater print that was also on sale so I immediately made plans to work on a 3YQ to give to her.  With it all done, it looks like it can now definitely be a Christmas gift for her this year!  

#4:  Another S'Gnomies Quilt!

Front made with the "Sew Fast" pattern.


The back is fleece.

This too is another quilt with a prior trip provenance:  right before our trip in February, I had pieced another 9FQDNP quilt as a birthday gift for a long-time friend of mine.  She's a big fan of Gnomes and I had found a FQ bundle using Shelly Comisky's "I Love S'Gnomies" flannel fabric line for Henry Glass Fabrics.  In the process of stashing for that project, I wound up buying a lot of extra fabric due to the timing of the arrival of a print I had originally planned to use in the backing of that quilt and needing to buy more of a directional print in order for it to work in that design the way I wanted.   

So when that project was finished, I still had quite a bit of stash left over that I thought would be enough to make another quilt.  Then when Joann's went out of business earlier this year,  I saw some fleece fabric that was the perfect color to go with the leftovers.  I had used fleece as backing for a quilt some years back and loved how the quilting looked on it.  When I finished quilting this one, I had trimmed it in prep for binding which is what you saw in the picture at the start of this reporting section.  Unfortunately, I was just short of having enough of the Aqua Snowflake print I preferred for the binding so had to get a little more of it.  When it came in last week, I was then able to complete that last task.

And it looks like I'm not done with this fabric line!  I often receive sales promotion notices from the Annie's Attic catalog site and even though I was not planning on buying anything,  I figured I'd just take a look to see what they were offering --- I know, never a good idea!  Well what did I see but a kit on sale to make one (or possibly two) rag pillows made in this same fabric line!  I had purchased the starting FQ bundle and a panel for the quilt I had made back in February from Annie's so was not surprised they might have more of the fabric still in stock.  

I actually like making pillow covers and have never tried making a "rag quilt" style project before so I admit I was intrigued.  What was not totally clear from the kit description was if the kit did supply fabric for just one pillow or for two.  Even so, I was not sure I had a need for two pillows since I really don't even have a personal need or person in mind for this quilt right now.  However, it was a tempting (and cheap) enough idea that I decided to look around both to see what the process of this technique involves and to see if there were any other rag pillow designs out there of interest that I might even be able to make from the fabric I already had left.  Sure enough, look and ye shall find!

I found this even less expensive kit on another website and liked that it was definitely for one pillow and was bigger than the one (or ones) made in the Annie's kit.  That kit has since arrived and now is on the list of projects to tackle in November!     

#5:  The "Cheers" Quilt

The "Fandango" pattern from the "Make It Modern with 3 Yard Quilts" book.

More flannel fabric for the backing!

Fabric and Quilting Detail

This one was also the result of a prior trip but it was the camping one in September!  Well actually, this also started with the Joann's GOOB sales as I found the licensed "Cheers" prints there.  At our prior garden Art Shows, everyone always asked if I sell my quilts.  I am leary of doing so only because while we quilters know how much fabric and more importantly time costs in making a quilt (and if you've never thought about that check out this post or this one),  I believe most people seem to put the value of a handmade quilt at what they can pay for a mass-produced one in a store.  

However, I do believe you can convince people to accept a rate closer to what it actually costs if you can make a quilt personal enough to them.  I think wedding, baby and t-shirt quilts fall into this category but I also think "themed" quilts around movies and TV shows could do the same.  So when I saw the discounted licensed prints,  I thought they would be good prospects along with the fairly quick to make 3YQ designs for some potential "for sale" quilts.  

And that was my plan for the two sets of fabrics I coordinated together (I have another fabric that features framed B&W pictures of the show's characters) and the plaid flannel that I bought for backing and binding both.  That is until we went on that last camping trip for the season at the end of September!  We have been camping with a co-worker of my DH who has organized trips for a group of family, friends and co-workers for the last five years and we have gone with them the last two years.  

This last trip we took was to scout out a potential campground for next year's Memorial Day weekend trip.  We camped at Lake Taghkanic state park which is actually the very first one my DH and I camped at over 30 years ago!  


So we were excited at the chance to check it out with her as well as a chance to take a trip down memory lane.  While there were a few things that were the same as we remembered like the lake with the beachfront swimming area:  


However, by and large we believe the actual campsites and campground set-up is way different now than it was all those years (no, decades!) ago.  

Our campsite and setup this trip.

While there are still some ground tent sites, we don't remember there being any platform sites back in the day!  

During one of our stints around the campfire, his co-worker mentioned a fondness for the "Cheers" TV show!  Well, you know what immediately went off in my head:  Gift Quilt!!  She knows that I quilt and has seen the quilt we use that has now become a permanent part of our camping kit (which can be seen here).  We had also talked a few years ago about her commissioning a quilt from me.  While this isn't the design we talked about,  I was really excited to make and give her another one in the meantime in appreciation for all the work she does in planning and organizing the camping gatherings we have attended.  

 A Short Aside about Longarming

I want to again note that these last three were all quilted on the longarm my MIL purchased back in 2023.  Ever since, every trip down has been a chance for us both to learn more about using it.  She has a Handiquilter Moxie that came with a tablet to run the Prostitcher stitch patterns software.  However back in June,  the battery on the tablet malfunctioned (the term she was told is "exploded") and caused the back to pull away from the front of the tablet.  She has been waiting on a replacement so this was the perfect time to learn some lessons and get some practice on how to quilt free-hand or free-motion on her machine.  We had actually tried to do a bit of that on our last trip earlier this year but now were forced by circumstance to really dive deep into the process.  As is with doing free-motion on a domestic machine, it takes time and more importantly practice to get comfortable doing the stitching without the machine guiding it.   

We also once again started off dealing with tension problems and so once again learned more lessons about how longrams work.  This time it was realizing that when you thread the machine -- and unlike when you thread a domestic machine -- it is not enough to just guide the thread around the upper tension disk area.  

In the case of the longarm, you actually have to be sure that the thread is "popped" between the disks.  We started off experiencing lots of looping on the back of the test pieces we stitched only to find out that the simple problem was that the thread wasn't actually seated between the disks!  Once we resolved that, the tension balanced itself and we could move on to improving our free-motion skills.  

I've done more free-motion on my domestic than my MIL has on hers so I was a little more comfortable with it than she was.  However, we both got some stitching on actual quilts done and both can see where more practice in the future will definitely help us improve!  That doesn't mean we don't also look forward to getting the tablet and pre-programmed stitches back though, LOL!  We have also discussed that on the next trip down we are going to go halvesies and invest in a ruler base and she is going to purchase a ruler foot.  She already has a couple of rulers and I will bring down the ones I have that are made for longarms and that will be our next scheduled longarm lesson!  

Whew!  If you've stuck around this long, thank you!  I know it's a lot but this is what happens when you don't blog for a couple of months!  I should note that there was also quite a bit of cross stitching going on during this period but I'll save that for another post!  So head back over with me to check out what everyone else has to share this crafty week at Quilty Girl Alycia's for Finished Or Not Friday!