Friday, December 22, 2023

Quiltville Mystery Season: Indigo Way Part 5

This week the number FIVE plays prominently in Bonnie's Part 5 post for the Indigo Way mystery!  We are also treated to more of the sights of Bonnie's Vietnam trip -- specifically a look at some of the beautiful textiles seen while she was there.   There is also a video of a woman working a loom (with hands and feet!) to weave a base cloth.

For the mystery, the blocks this week are Square-In-A-Square blocks.  For the centers, Bonnie plans to cut them from a piece of printed hemp fabric she brought from Vietnam but mystery quilters can use what they like to fill the center squares.  In the instructions, Bonnie shows you five ways to make them:  
  • Rotary cutting of both center squares and corner triangles with regular rulers
  • Rotary cutting of center squares using the Essential Triangle Tool for the corners
  • Doing "Stitch  & Flip" corners by either drawing lines or using the laser lines on your machine if you have one
  • Trimming the center square corners using the Simple Folded Corners ruler (so cut first, sew second)
  • Paper piecing
Whenever I get around to making this mystery, I have two more techniques at my disposal and of course they involve gadgets:  my go to for SIS blocks is to use Deb Tucker's "Square Squared" two ruler set.


Deb also has a technique sheet that tells you how you can use the ruler to make what she calls "Stacked Squares" but you may know them as "Economy blocks" which are basically "Multiple Squares-Within-A-Square" blocks.

I have not gotten to use this ruler much so I look forward to when I try this mystery.  If I'm pressed for time, the other option for me will be to die cut all the units.  Accuquilt has dies to cut the center squares (what they call "Squares On Point") to the exact odd sizes needed and the packaging will tell you what size  coordinating triangle die you need for the corners.  Fortunately, I already have the ones for the size of block being made for this round.   

As to my own mystery season journey, I am getting close to the end of quilting "Roll, Roll, Cotton Boll"!  Last night I finished the last of the free-motion stitching on the blocks in the center of the quilt.  


I definitely got a little wild and wooly stitching out the motifs on the quarter square string blocks.  In hindsight, I am reminded that when doing FMQ on a DSM  it's better to stick with small motifs for better control.  There are definitely places where I overshot the design and could have marked points to hit with a wash away marker for more even looking motifs.  

But you know what?  It's done and that's all that matters to me right now!  The thread isn't high contrast and once the quilt is washed and acquires "that crinkly look", a lot of stitching sins will be hidden, LOL!  And boy is this quilt heavy now!!  It will be very warm to have on the bed during these winter nights.   

What's left to do is to stitch up the border setting triangles, the inner border and the outer border.  I changed plans and am now going to do the same stitch pattern in the setting triangles that I did in the full string blocks just halved.  The good news is I think I can do the design I wanted to do on the inner border with the same ruler I had planned to use for stitching on the outer border.  

Although this is actually a long arm ruler, I think (hope?) it will still work with my DSM ruler foot.  When I finally finish it all, I want to take it over to our community garden and get a picture of the quilt in the outside light.  

I'm excited that this journey is almost to a close as I still haven't started on basting "Old Tobacco Road".  Thank goodness the mystery season runs into the first week or two of January so I may still get that one done before the season (if not this year) ends! 

Monday, December 18, 2023

Moving It Forward Monday: Another Step Further Along....


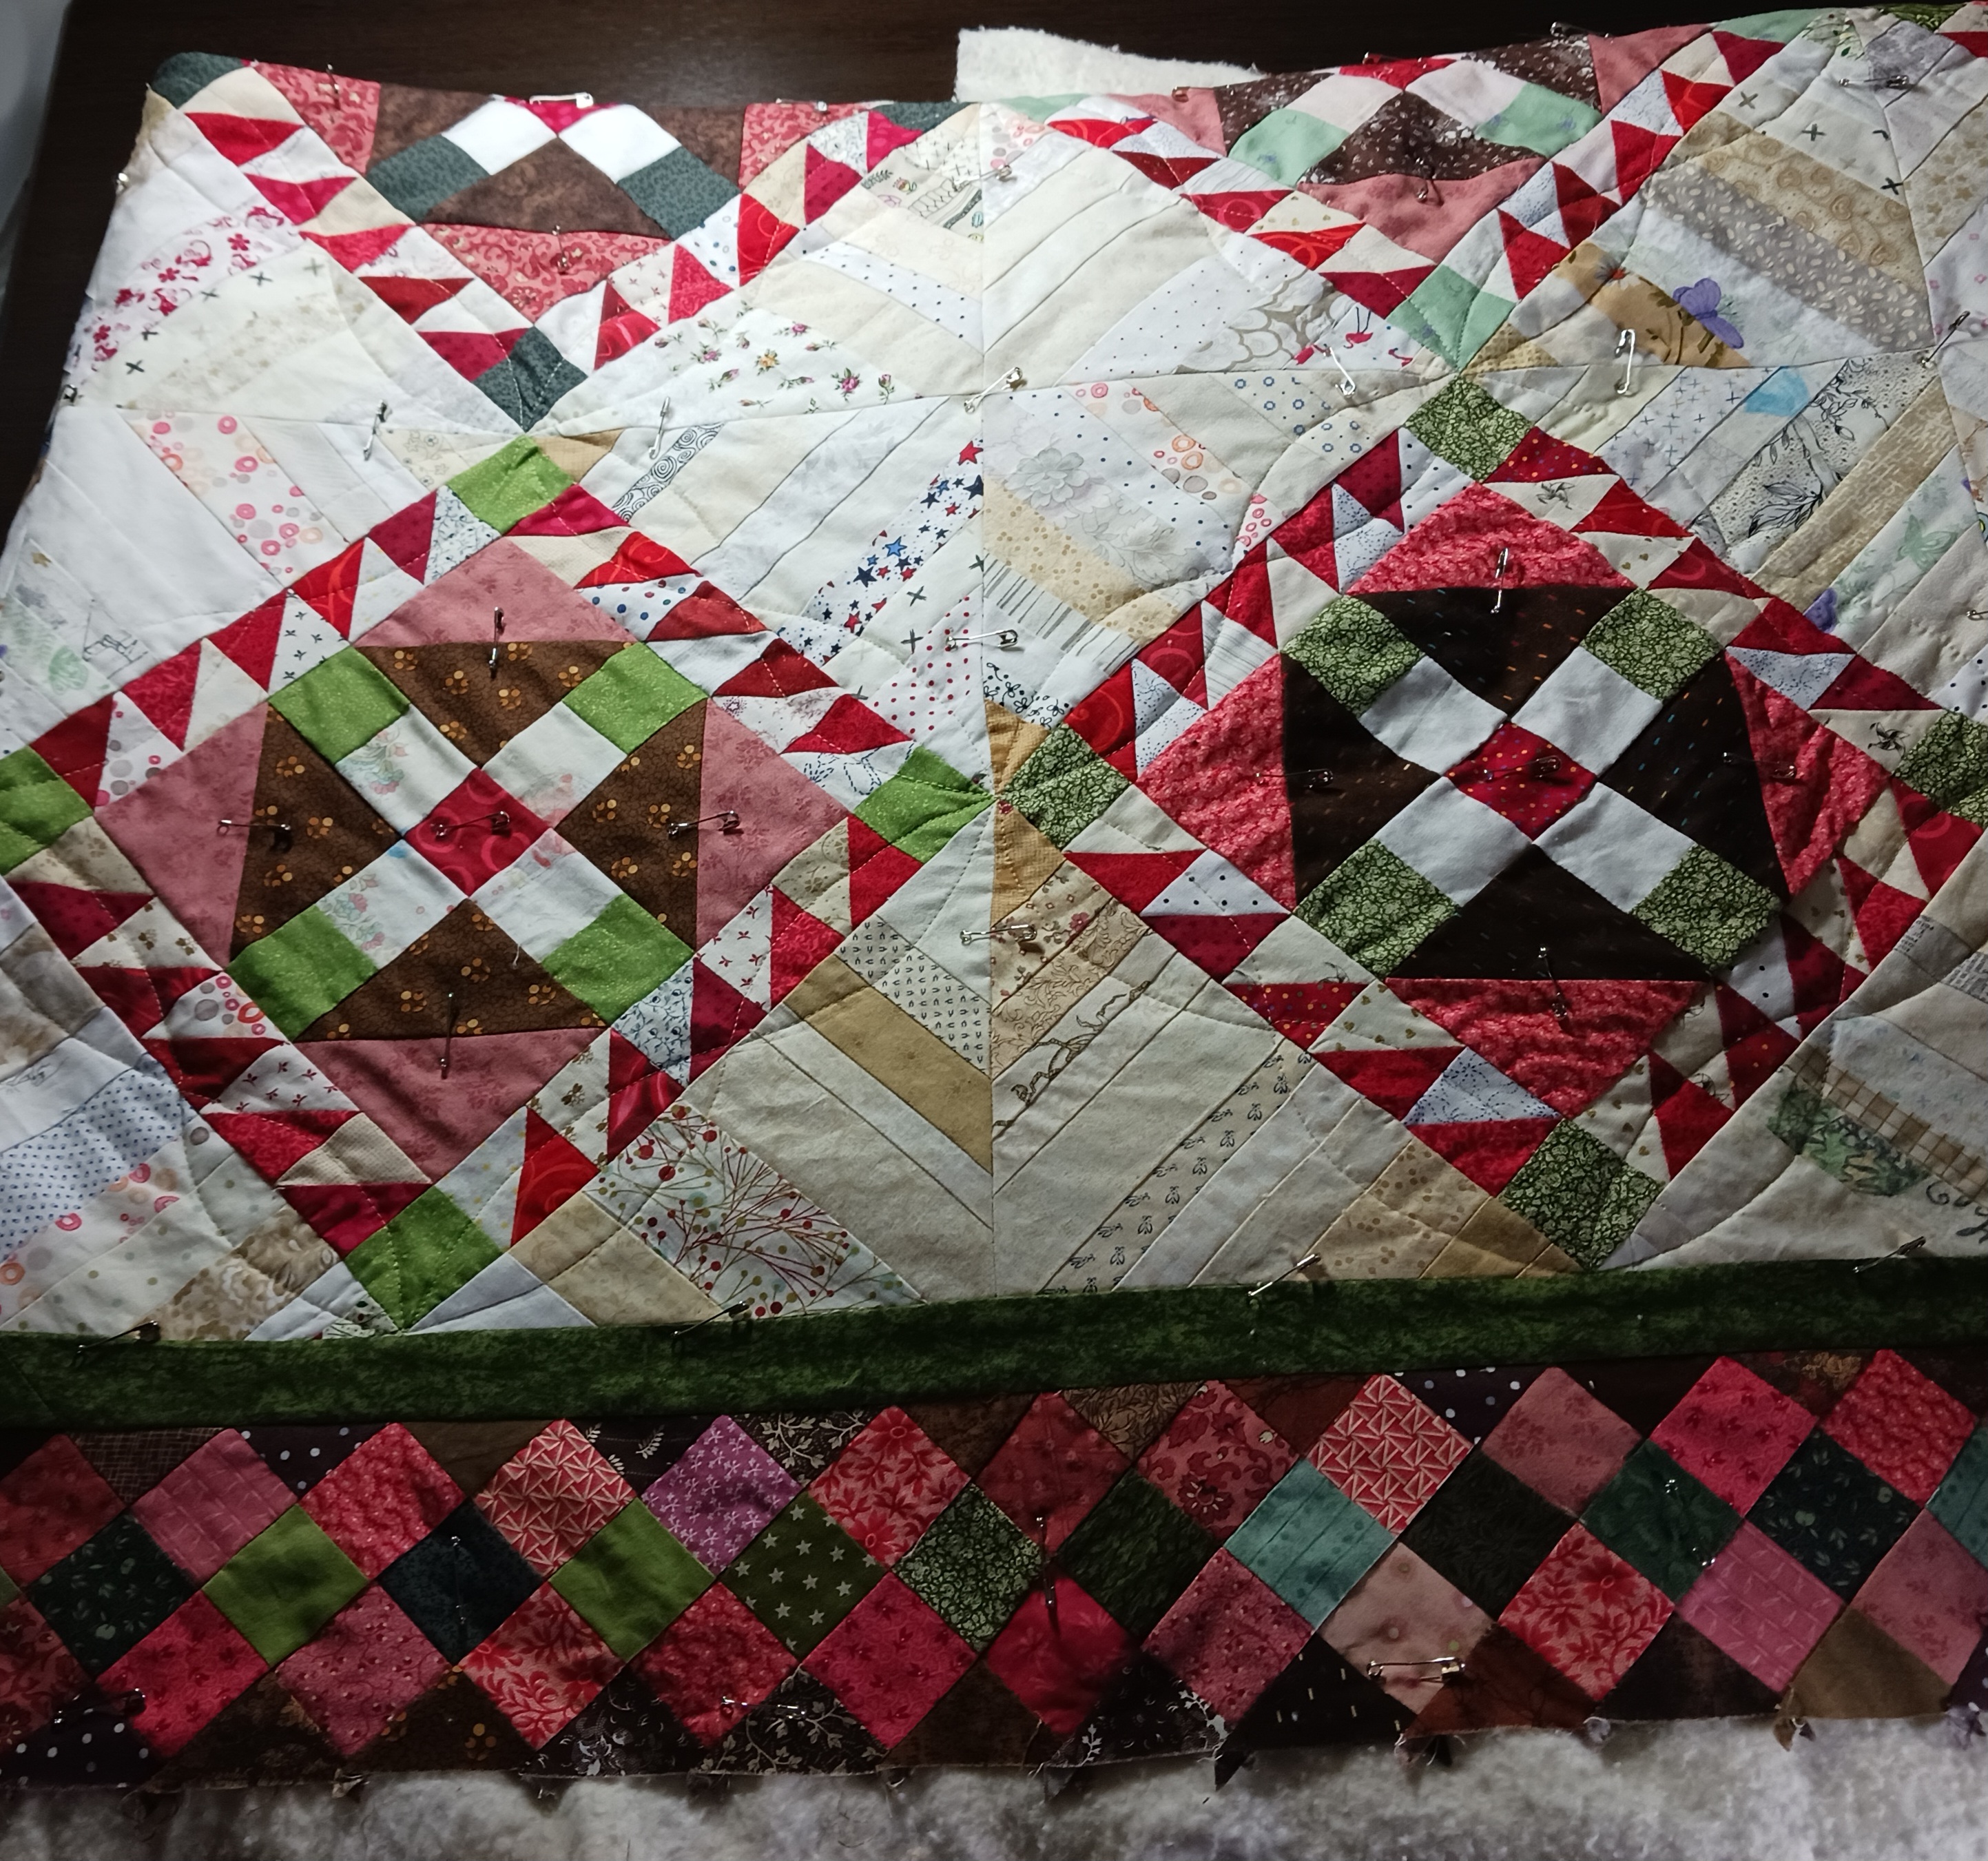
 Okay, the stabilizing stitching is finally done!! 

Once again, hard to get a good picture of it.  Actually, correction:  the stitching in the center is done, I still need to stitch on the outside edges of the String setting triangles along the inner border.  That however should be easy since unlike when I was stitching the center, I will not have to deal with pushing the bulk of the quilt sandwich through the harp space.

I was able to remove all the basting pins in the blocks since they are all surrounded so won't be moving anywhere.  So now I really have enough pins to start the basting on "Tobacco Road"!

However, progress maybe slow over the next few days because it's holiday cookie production time!  I have two more people than usual on my list this year so that is going to add to the time it takes to get that done.   However, the further along I get on these projects, the closer their finish feels.  I'm sure any of you still working on Christmas gifts right now can relate!  

Friday, December 15, 2023

Quiltville Mystery Season: Indigo Way Part 4


It's another week on Bonnie Hunter's Magical Mystery Quilt Tour of  sightseeing in Vietnam!  Part Four can be picked up here.  She also makes a good point about downloading the instructions:  you aren't required to print out all of the pages of instructions.  You can print just the pages you need or copy and paste just the text into a word processing document and print only that.  Of course you can also just follow the instructions on your computer, tablet or phone and completely save on the printer ink!  Just be sure to save it to your device in case you need to refer back to it after the mystery is done and removed from her blog.  

This week, mystery quilters are making what Bonnie calls "Multi-Triangles" in Blue, White and Red.  I wondered if there is another name for this basic block so I consulted Barbara Brackman's "BlockBase".  She only has it categorized as a "Two Patch Block with Equal Diagonal Division".

It's the block circled by the blue square.

Doesn't exactly roll off the tongue so I'll stick with Bonnie's name for it!  These are basically Half Square Triangles where one half is made up of two Quarter Square Triangles pieced together.  Bonnie gives instructions for rotary cutting these as well as provides templates for paper-piecing them.     

As for me, I am still on the "Roll, Roll, Cotton Boll" quilting expedition.  I have finished up the continuous stitching along the string block seam allowances and am now doing the same for the "Boll" blocks.  That got held up as I hit a snag with the threads I had planned to use.  Because of the high contrast between the more neutral string Quarter Square blocks and the Red, Brown and Pink "Boll" blocks,  my plan was to use two different threads on each section.  I had picked Aurfil #5011 for the light blocks and #2370 for the dark blocks and thought the two would balance out after everything was stitched.  I had done a similar thing when I made a desk mat for a friend a few years ago.


In that instance I found that the two grays used balanced out the stitching on the light and dark areas to create an overall even, balanced look.  However, it didn't work this time probably because there was too much contrast in the two threads I used.

I'm not sure how well the differences show up here... 

After stitching the first seam (on the right in the picture), I felt there was TOO much contrast between the threads.  I tried switching back to the same light thread used for the initial stitching along another seam (on the bottom of the block).  That actually looked better than I expected.  

When I've used the Dark Tan #2370 in my Civil War repro projects,  I have sometimes used #2324 with it as the "light thread" so I tried that one (top seam).  Hmmm, I think I like that!  It reads a lot like #5011 but doesn't contrast as much on the "Boll" blocks.  I think I may even stick with this thread when I'm ready to switch to the free-motion stitching and use it to stitch the centers of both blocks.

Since I'm free today to continue work on the stitching along the block seams, I'll probably start on basting "Old Tobacco Road" over the weekend with the pins I've freed up.  I have also been continuing on my Thanksgiving project cross stitching in the evenings.  I am thrilled that I am almost halfway done:

Last reported on here.

It has certainly taken longer than I expected but I like that I am able to stitch in the evening while listening to the late night news shows.  Takes some of the sting off of what they report on!  So I'm hoping that maybe next week I can report on two finishes?!?  Stay tuned!

Wednesday, December 13, 2023

Updating the Record....

As the year winds down, I started doing a review of the projects I have worked on and realized I was missing a few things here on the blog.  Back in this post, I had talked about preparing for our garden's (now) annual "Art Show".  We have a lot of creative garden members and for my part, I show my quilts.  I did a display of "Red and White Quilts" mostly featuring the ones I made for my holiday decorating plans last year.

Front Display: Christmas Ribbons, The Last Dash and Cherry Crunch


Click to read a little of the history I found out about Red and White quilts.

I also had my "Infinite Variety" book on display at the show in the event I could interest anyone in a discussion of how popular Red and White quilts have been among quilters throughout history. 

There are two finishes that I haven't reported on previously that were related to my participation in that show.  The first was that I finally made good on a promise to the garden's Steering Committee and provided a quilt to raffle off.  

This was the second "Nine Fat Quarter Disappearing Nine Patch" quilt I finished this year!  The fabrics I used were inspired by the lavender-themed cross stitch workshop I led for the garden in August.  I had originally planned on having two quilts to raffle but was only able to get one done in time.  So I decided to include the largest sachet I had made as a sample for the cross stitch class to give with the quilt as part of the prize.  

Ironically, the quilt was won by one of the Steering Committee members!  This helps me as I have been toying with the idea of making each of them a quilt for all the hard work they have done both in the founding of our garden nine years ago and continue to do to keep it a going concern.  Now that one of them already has a quilt, I'd only need to make three more, LOL!  We'll see however, if I manage to get that done.  

What it also confirms for me is that, as the first quilt design I've made more than once, this is going to be a "go to" design for making up quick quilts for gifting.  It was also great to be able to show both of those quilts in the show at the same time and once again demonstrate how versatile quilt designs are.

And speaking of cross stitch: since that is now another creative obsession interest of mine, I decided to make a piece to include in the "Red and White" display.  As usual the Craft Muses came through and at some point I saw this design in a Flosstube video:

Seen here with some of the floss already in my stash that I was considering using.

Perfect!  Small (so quick to stitch), Red and White and Christmas related so once made not only could be displayed in the show but can be part of future Christmas decorating.  I hung it with the smaller quilts displayed on the back of the larger R&W quilts, under my "Jelly-ish Snowflake" wall hanging in the center:

FQS Stitches From the HeartFQS Jelly-ish Snowflake and TQC 12 Days of Christmas

Hmmm, it's a little hard to see in that picture so here's the close-ups:

I finished it as an ornament and will hang it up on our Christmas tree this year.  Now the record is complete!

Monday, December 11, 2023

Moving It Forward Monday: "Cotton Boll" Quilting Is Under Way!


Once again channeling Bonnie Hunter, I finally got started on the quilting of "Roll, Roll, Cotton Boll" this weekend.  Before the layering, I had auditioned a few stitch patterns for this:


Initially, with such a busy design and large quilt, my first thought was to go with an all-over pattern.  However, even though it meant doing semi-custom quilting, I really liked the last one because it emphasized what I felt stood out visually in the quilt top:  the two different blocks and the strong vertical, horizontal and diagonal lines of the design.  Interestingly, all the motifs I will be using for this come from this one pattern:


It's not surprising since this APQ quilt design has the same visual elements as "Cotton Boll".  I will also use the same inner border motif as the APQ quilt but will be doing something different on the "Cotton Boll" outer border.

I started with the continuous curve stitching along the block seam allowances.  Doing this first is a way of doing "stabilizing stitching" across the center of the quilt.  So far, I'm about halfway through stitching along the seams of the rows of light string blocks.  When I started, I debated on whether to do them free-motion or with a walking foot.  I wasn't confident about doing them evenly with free-motion since the blocks are large (10-1/2").  However, doing them with a walking foot meant marking them in order for them to look even.  I found two interesting tools in the studio for that:


This "Leaves Galore" template is normally used for making rotary cut curved applique shapes (and there are two other sizes of these templates available).  However in this instance, it provided the perfect size curve to fit my blocks.  Teamed with a Hera marker (the other end of this version is also a "point turner"), it allowed me to mark the quilt as I went along in a way that will not require removing the markings later.   

At this point, I'm about half way done with the light string block seam allowances.  I will be using a slightly different color thread on the red "Boll" blocks.  Once all the stabilizing stitching is done, I can move on to doing free-motion for the motifs to be stitched in the blocks.

As promised, as I stitch the seam allowances I had pin basted, I'm removing the pins in order to use them to baste "Tobacco Road"!  

Friday....

Today!  It's a start....

The only down side is that at the rate I'm going, I may only get through these two quilts by the end of this mystery season.  Well, better two than none!

Friday, December 8, 2023

Quiltville Mystery Season: Indigo Way Part 3


And the mystery continues!  If you are following along on Bonnie Hunter's latest mystery "Indigo Way",  you can pick up the latest clue here.  Remember, these links will only be on her blog while the mystery is current.  If you are interested in working on this later on, download the clues now.  Once the mystery is over, Bonnie will "retire" them as a pattern in her online store.  Also take an opportunity to check out the sights and sounds of Vietnam that Bonnie shares from her trip there that inspired this year's mystery design.  

Those that are working on Part 3 will now be making what Bonnie calls "Split Half-Square Triangles" and gives instructions for making them using rotary cutting methods and her "Essential Triangle Tool".  I know this block as the "Shaded Four Patch" because that's what Deb Tucker calls them and I use the methods from one of her technique sheets to make them.  

I've also seen this block called "Cat's Cradle" and there is a Creative Grids ruler to make them which I know about because I had purchased one as a Christmas gift for my MIL a few years back.  Lastly, if you follow the great You Tube videos of Karen Brown of Just Get It Done Quilts, she calls them "Mary's Triangles" and has a PDF tutorial on her website explaining her technique for piecing them.  It's great that there are so many ways to accomplish this task so use the one that works best for you!  

As for me, my mystery season is moving along --- just not as efficiently as I had hoped!  My plan for the season has been to finish up the mystery tops I've already made.  The first of those that I have worked on has been "Roll, Roll, Cotton Boll".  The plan for this week was to get it layered and basted and start on the quilting.  While the basting is now done....


.....but it was a bit of a trial to get it there!  Last week I noted that I didn't have a lot of basting pins free at the moment because I have other basted quilt sandwiches sitting around in various stages of being or waiting to be quilted.  I was able to get the center of "Cotton Boll" basted with the pins I had free and ordered another set while doing some Cyber Monday shopping.  Unfortunately, when that set arrived, it turned out that they were not quite enough to complete the task!   

I had ordered a pack 50 pins -- yeah right, that only got me through basting one corner of this quilt!!  Needless to say I then had to run out and purchase another set.  I figured that if 50 pins got me through one corner, I'd need 150 to complete the other three.  The Joann's I went to only had packs of 100 or 300 so of course I got the latter.  Guess how many I had left when I finished the basting:


Yeah, used them ALL up, LOL!!  I will also say that when I finally got it all basted and turned the quilt sandwich over to check the back, I had some significant pleats pinned in on one side (how'd that happen?!?).  A similar thing had happened when I made my "Civil War Strippie" back in 2021 although not for the same reason.  So just like back then,  I had to put in straight pins from the back to isolate the area, turn the sandwich over, remove the basting pins in that section in the front and re-pin that area, making sure that the backing was pulled taunt.  Sigh!  Oh what we have to do to "birth" a quilt!!

However, now that it's ready for quilting, I am not resting on my laurels.  Since the cutting table will be empty while I work on quilting "Cotton Boll",  I've already pulled out the next mystery top I want to work on.  That will be "Old Tobacco Road" that was finished up back in 2021.  


Surveying the supplies I have for this one, I saw that I had a Twin Size batting sitting with the top and backing.  However, I had not written down the measurements of the top.  Taking them now, I see that it is a little larger than Twin Size.  The good news there is that the Queen-size batting I had used for "Cotton Boll" had been a little larger than I needed and I had cut a significant strip off of it during the layering process.  Luckily enough, that strip is wide and long enough to provide the extensions I need for the "Tobacco Road" batting!  So after I press the top and backing, I will be doing a little "Frankenbatting" work before I get the layering for that quilt under way.   


This will also help keep me on task for the "Cotton Boll" quilting since I will need the pins I remove from that one to use to layer the next one!!  Here's hoping that everyone is enjoying a little "mystery season magic" along with their Holiday Cheer!  

Friday, December 1, 2023

Quiltville Mystery Season: Indigo Way Part 2


It's another busy week for Quiltville fans!  In the Facebook group and on Instagram (here, here or here) you can see how far people have gotten with Part 1 from last week.  You can pick up the latest clue for the "Indigo Way" mystery here.  

Those that are working on Part 2 will now be making Red and White "Triangles In a Square" units.  Bonnie gives instructions for using rulers (which are on sale right now in her online shop) as well as provides paper piecing templates in the instructions so you can choose which way you would prefer to make them.

For me, this year's season is all about finishing up all the mystery tops I've already made.  I've started off the season by continuing to work on finishing my version of Bonnie's "Roll, Roll, Cotton Boll" (now in her book "String Fling" also on sale in her shop right now).  After five years of work on it, I have finally finished the top, back and label area (which I pieced into the back) so now I'm working on layering it.

One issue right now is that this is a big quilt but I don't have a lot of basting pins freed up.  I have at least three (ok, maybe four?) partially quilted quilts that I might have to consider finishing just to free up pins!

The last two I worked on are sitting on the back of the sewing table.

Well, I did order more curved pins as part of a Cyber Monday purchase but who knows how long they will take to get here.  Hmmm, looks like the next few weeks may be all about quilting not just the mystery quilts!  Well, I could use the practice.....

There's another good thing about tackling these this season.  Bonnie has always said she designs her quilts to be large.  That is perfect for me as it is an opportunity to clear out all of the Queen size batts I've stocked over the years.  

It's been a while since I've made a bed-sized quilt (the last one was here) so finishing up all the mystery tops will be a chance to clear out my stock.  I always hate to cut up a Queen batt for lap quilts or wall hangings so will usually run out and buy a smaller batting when I need one.  No need to do that for these projects!

While I am pinning, I will also be ruminating on how I will quilt this.  Given the busyness of this design and the size of the quilt, my first thought is to do an all over design. This would be the quickest way to go and the easiest way to maneuver this big quilt through my DSM.  To that end, I've considered "Stippling" but also came across notes for a "Feather and Swirl Meander" that is similar to what I did on a long ago quilt and originally learned about in this book.  

However, I admit that when I look at the top, I keep seeing the two alternating blocks and how visually they are oriented on strong vertical and horizontal axis.  I admit I've also found a few designs that tempt me to do two different custom designs, one in each block.  I've also considered stitching along the visual axis lines.  Okay, I will need to preview all of these to help decide which way I will go.

The great thing about the mystery season is that whatever you are working on, know that there are thousands world-wide sewing along with you.  Don't forget to download the instructions now while they are free.  Bonnie will remove them from her blog once the mystery season is done at which point she'll be selling it as a pattern in her online shop.  Happy weekend quilting!