Monday, August 31, 2020

August Recap: What A Whirlwind!

In July I made my way back to the sewing machine and then in August, I amped it up a notch.  Well, maybe two notches, Lol!  So much tackled, a few things started and an important finish.  I'm hoping to approach September just a little less frenzied.

First off, my priority for the month had been to finish work on some zigzag machine applique while I still had Rhubye, my Singer 401 in the sewing machine cabinet.  I had hesitated working on the applique at the end of July because for some reason, I was under the impression that I had never done that on this machine before.  I wanted to check the stitch width and how stitched units that are layered underneath other units looked.  So  I did a scrappy test block first.... 


....and when that went fine then did the center applique for "Esther's Garden Box", a Kim Diehl "What Nots Club" pattern. 


I had purchased the "What Nots" kit to provide some extra fabrics for yet another Quarantine project I have brewing.  The good news was that I was able to get what I needed and will still be able to make up the whole kit project as well.  

With that successfully done, I then FINALLY stitched down the stars and word appliques for the "Hope" Quilt Along QOV top I finished back in June.


It was only after that I was reminded that I had actually done machine applique on this machine before!  Back in January of last year, I made a baby quilt for my DH's cousin and appliqued the child's name on it.  Yeesh!  My quilting memory must be shot because of this pandemic!  Or maybe it's just a side effect of project overload.

I was also hoping to get back on track with my BOM projects.  I  managed to bring the blocks for the Joann BOM up to date.  The Joann's were the easiest to do because they are pre-cut so made great leader/enders for other projects worked on this month.  They are now up to date through August.


I only got two of the four AQS BOM blocks I wanted to work on done.  


 In order to catch up on the AQS blocks, I need to make four blocks each for August - November to bring me back up to date.  I'm going to try to get the other two August blocks done by the end of this week and then attempt to stay on track for the rest of September. 

Die cutting the fabric scraps after making the AQS blocks, I also got a few more Spider web units for the tree skirt made up too.

But wait, there's still more!  Having done Edyta Sitar's Mystery 2020 QAL back in May, I am now officially in a Laundry Basket Quilts obsessive phase!  I am loving everything LBQ I see to the point that I have not one, not two but three projects planned using the scraps from all the blue fabrics I  purchased for the AQS project!  It would have only been two except that I saw another of her quilts that is in her book "Handful of Scraps" and wanted to add it to the Bucket List.  Just my luck,  I found someone selling a copy of that book on eBay along with Edyta's "Patches of Blue" book at a "couldn't pass it up" price.  I shouldn't have been surprised when the books arrived, to fall in love with some of the Blue and White projects in the second book.  A real problem when it's the color theme for this year's Christmas decorating and the AQS project.  So the third project got added from that book.

But it didn't stop there!  The plan is to work on all the blue and white projects through the Fall and finish up before the holidays.  However, the LBQ obsession could not be quenched and called for more immediate fulfillment.  What to make?  How about something small?  Well, I've also been dying to make a log cabin quilt.  That fire was stoked after using my Log Cabin die to cut the strips for the borders of Edyta's mystery quilt.  Then one day I came across her video for her little "Lidia" quilt.  Perfect! 


Even better,  I've been establishing a new mini quilt display space so making this would help fill it.  However, the pieces for it were so small I didn't need to use my stash of log cabin strips,  I could pull and cut what I needed from my overflowing "Crumbs" bins.  Another bonus!  


After joyously rooting around in the "Crumbs" for "Lidia", what should I see on the web but a Carrie Nelson "Schnibbles" pattern named "Gertie".  Who can resist a Schnibble?  It's  designed to use Charm packs (5" squares) for a lap quilt but I realized if I downsized it and used even more "Crumb" bits to make it, I'd get another little mini for the display space.  So this happened:


The blocks for Lidia are pieced and the border print is picked out.  My border will be smaller than Edyta's in order for it to fit the space where I want to display it.  All the HST Gertie bits are pieced and background squares cut so now I just have to sew it all together.

Edited to Add:  And you can see these two finished here.

It was at this point that  I could FINALLY swap out the 401 for a long deserved rest and swap in "Nova" the Brother 1500 mid-arm.  I thought it was going to be for trying to FINALLY  quilt one of my own projects but nope!  The pandemic curve has flattened greatly here in NY and things are opening up more and more.  So it shouldn't have been a surprise to get a call from the troop leader of the Girl Scout troop we had worked with back in December and January.  They were setting up a meeting and she wanted the quilt made from the finished blocks.  Yikes!  I had gotten the top, backing and label prepared back in March right  before we went into quarantine.  As a result, I held off doing the quilting -- or more honestly, switched my focus to mask making and all the quarantine quilt alongs and personal project inspiration that came in.

However, I was more than happy to have a motivation to move something to a finish and out of my quilt space.  So I decided on the final binding choice (picked from an assortment of fabrics that had been purchased for the EPP workshop I did in February) and got to work on that.


The backing fabric is actually 4-H fabric.

I quilted it much simpler than I originally planned.  I limited it to stitching in the ditch around the blocks and the only free-motion done was around the hearts in the fussy-cut sashing squares.  There was a lot of hand work to be done though:  Although I attached the binding completely by machine (sewn to the front and stitched in the ditch to tack it down in the back), I needed to hand stitch two 3-D applique motifs that were applied on top of the sashing and also tack down some of the motifs and trims that had been attached to the blocks so that they stay secured as the quilt is handled.  I also sewed on a hanging sleeve on the back since part of the original plans for the quilt was to make it so the troop could carry it as a banner in a parade.  

So the good news is that the straight stitch only machine now in the cabinet means I can quilt big quilts but still be able to piece things.  I'm hoping there can be a few more quilted finishes for September even as I continue to work on catching up on the BOMs and piecing some more quarantine projects.  Add to all of that two national political conventions and a couple of hurricanes and it really was a whirlwind of a month!

Saturday, July 25, 2020

And Now For Something Completely Different: My First Three Quilts

Last year, quilt designer Pat Sloan participated in a quilt along series with the Fat Quarter Shop called "The Ultimate Beginner Quilt".  To  kick things off,  Pat and the other designers showed their first quilts --- check out her post here if you'd like to see hers and access links to all the designer's first quilts.  Today, in Pat's YouTube Quilt Challenge/Topics video she is again asking her viewers to share their first quilt.  I don't have all of my early quilts posted here on the blog --- up to now I had only posted a few things as far back as 2007.  I figured I might as well start correcting that by adding my own first quilt story.

While I made my first rotary cut in 2002, my relationship with quilting had actually started decades before.  In 1979, an Aunt let me "borrow" a booklet she had recently purchased.


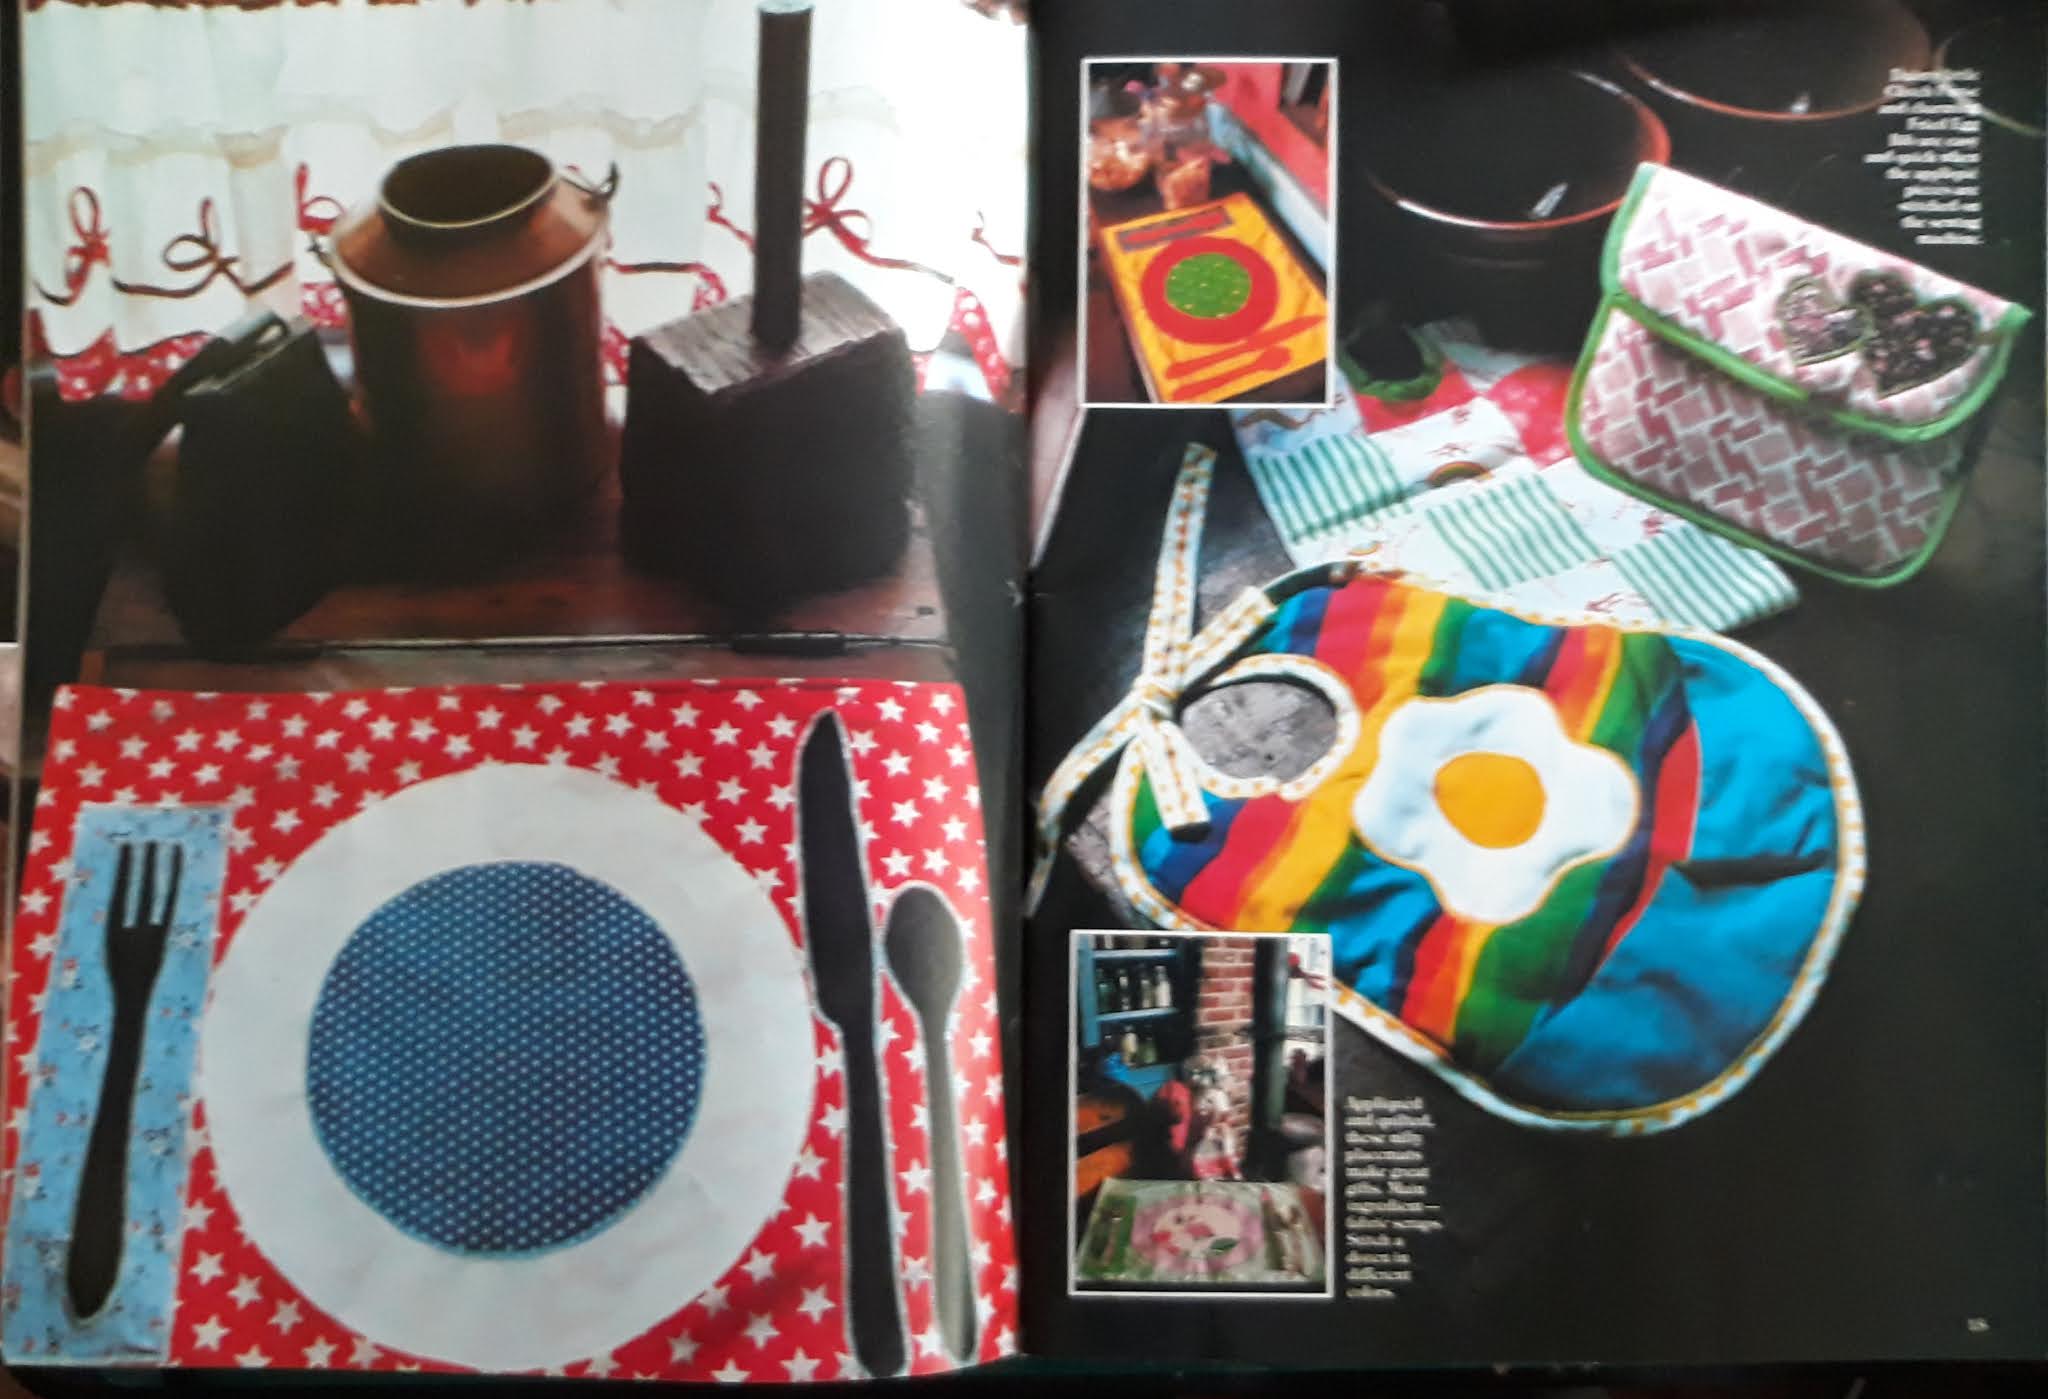
I don't remember what it was about that booklet that appealed to me so much but it did.  At that time, I was graduating high school and was primarily a clothing sewer with occasional other craft projects in crochet, knitting, embroidery or macrame.  However, I remember sitting in her kitchen and pouring over it, completely drawn to the images in it.  Back then, I thought Quilts were only made for beds.  So I guess the first appeal of the booklet was that it contradicted that idea --- it showed that you could make other quilted items, like pillow covers, hanger covers, bibs, table mats and even a skirt!  


My aunt said I could take the book home since she didn't see herself making anything in it any time soon.  We lived near each other so if she wanted it back at any point, it would have been easy for me to return it to her.  Well, I guess she forgot about it because she never asked for it back!  Over the years (no, decades!), I kept it with my sewing books and magazines where it stayed through two later moves.  I would occasionally pull it out and look through it but didn't make any specific plans to make anything out of it.

Then in 2001, the year I left my job to be home full-time with my two sons, I happened on the TV show "Simply Quilts" on HGTV.  


This new encounter with quilts really blew my mind because not only did it reiterate the fact that "Quilt" did not only mean making a "Bed Covering" but that even a quilt made for a bed could be hung on the wall like art!  Since I had never read the project instructions in the Simplicity booklet closely, I had never noticed that it also said that the fabric for the projects could be purchased (What? Quilts aren't only made from scraps?!?) or made completely on a sewing machine.  Simply Quilts taught me all of that and that rotary cutters (in contrast to the scissors I used for clothing making), specialty rulers and piecing shortcuts were the "tools of the day" to make traditional blocks simple or easier to make.  

The whole process was immediately fascinating!  I watched the show every weekday (and back then it aired twice a day) for a whole summer before seeking out my first quilt books.....


.... and a couple of months later, I went to my first quilt exhibit.....


However, it took until the start of the next year to work up the confidence to make my first quilt!   

My first project came from -- where else -- the Simply Quilts show.  The episode was #605 titled "Quilting 101".  While I still have (and occasionally watch) the loads of videos (on VHS!!!) that I recorded of the show, that is one of the few episodes I don't have on tape, darn it!  Marianne Fons showed viewers how to make a four block quilt called "Ribbons" (and I didn't know then just how famous she was until much, much later) .  It was constructed of Friendship Star blocks and pieced to make the blocks tesselate.  At the time it seemed like a simple (all HSTs) yet visually complex design which I thought was the perfect challenge for a first project. 


Since I didn't know if I was going to like this "quilting thing", I didn't want to buy fabric for it if I could help it --- although even then, as a fabriholic from way back, I was very tempted!  So I dug through my clothing fabric stash to see if I had any cottons.  I found three that just happened to coordinate even though they hadn't been purchased to do so.  The colors were a little out of the ordinary (turquoise, orange, light blue and beige/tan) and I needed a fourth fabric to complete the design.  I found that in a strange place!

I had learned from Simply Quilts that in addition to hundreds of quilting books there were also many quilt related websites.  On one of those I saw a tip that said if you were new to quilting, on a budget and lived in a city with a garment center (check, check and check!), you might be able to source free fabric from cutting room discards.  

Fortunately for me, my husband was at that time a package driver for UPS and was often assigned to the garment district in Manhattan.  I asked if he had ever seen them throw out fabric and if so, could he get some.  When he asked me what to get, I told him to just bring me anything that didn't look like suit fabric, since I knew he could distinguish what that was.  I figured I could sort through whatever he bought home and see what I could find that would be useful.  A few days later a huge black garbage bag of stuff was deposited into my then very small quilt space!  While 90% of what was in it was of no use to me, I found a bunch of things that were and that I have put to use over the years.  Best of all, the perfect fabric to coordinate with my own fabric stash pull was in the bag!  The polyester floral print that came from that bag was the last puzzle piece I needed to create the quilt.


The only fabric I purchased was the batting and the binding/backing which was a Jinny Beyer print.  I got it from the City Quilter store (no longer a brick and mortar store but they are still selling online) which was my first foray into a dedicated quilt shop.  I was very proud of that little quilt and thrilled that one of the lessons I learned from the Reader's Digest book --- about varying print scale within a quilt design --- got successfully put to use in this project.  I hung this one over my night stand.

Well since I made one to hang over mine, of course I had to make one to hang over my husband's night stand.  That was my third quilt:


This one was the product from Lesson One of Gai Perry's book "Color From the Heart" (1999).  It was a lesson in random color selection.  Those little squares were from fabric sample mailings I used to get from a mail order fabric supplier in the clothing sewing days.  That quilt was updated in 2016 to become the background for a (hand) embroidery project and currently hangs in our downstairs bathroom.


Note that the backing/binding for this quilt is more of the same tan solid fabric I used in the first "Ribbons" quilt --- see, from the beginning I learned to use up my leftovers and scraps!  The plaid border for that quilt came from (what I now know were) a full set of plaid fabric samples from the Garment Center Discards bag.  The rest of those plaids were later used to make  this quilt in 2008:


It's the "Point of No Return" design by the Country Threads ladies.  It was in the very first issue of American Patchwork and Quilting magazine which I had purchased as a back issue on eBay.  I still love Connie Tesene and Mary Etherington's designs and have since purchased more of their patterns and books.  I also used just a bit of the leftovers of one of the plaids from that project to make the tackle box applique on a gift quilt in 2014 for my neighbors who like to go fishing


To complete the record, since I've shown you my first and third quilt, let me present my second:


This little mini was also made that first year for an aunt who collects dolls.  When I started quilting,I had vowed to only be a machine quilter.  As noted earlier, one of the big things that had attracted me about quilting as I watched Simply Quilts was that although people still did do hand stitching, it was possible to make quilts totally by machine.  

My favorite clothing making story was when I learned that you could hem pants and skirts (which back in the day was half of what I made) completely by machine.  I was taught that task had to be done by hand so finding out you could hem by machine was the greatest day of my clothing sewing life!  For me, hemming was like what hand binding is for quilters --- the one thing that could cause an almost completely finished project to come to a compete halt and sit unfinished for weeks!  

So when I learned about quilting, I swore I would never 1) Hand Applique, 2) Hand Piece and 3) Hand Quilt.  However, I saw and appreciated the beauty, versatility and skill of applique so was excited when I found this book:


I wanted desperately to try it and then as now, it helped to have a project with a definite purpose to push me to start something.  In this case it was realizing that since my Mom would travel to visit another Aunt of mine (who is my mother's sister-in-law and best friend from childhood) every Fall in Virginia, I could make something for her to take to her.  Well, I didn't finish it in time for it to be ferried by my Mom as courier but I did mail it to my Aunt when it was done.  This was not the last doll quilt I made for her either:  I made two more in 2010 which can be seen here and I was just thinking this year that it may be time to make her another one.  Of course I also had to eat my words that year when I did finally succumb to all the hand worked beauty I saw around the web and learned to Hand Applique and Hand Quilt.  I climbed over the last hand work mountain when I was forced (because of ailing sewing machines) to Hand Piece a project in 2015!

Lastly it should be noted that I did finally make one of the quilt projects from that early Simplicity booklet.   It was a quilt for the second grandchild of the Aunt that gave me the book!  

The booklet version:


What I made:


You can read more about that quilt in this post.  So that's it for the earliest of my early quilts.  Hopefully over time I will get a few more early projects posted and extend the story of my "quilt journey"!

Friday, July 10, 2020

Back In the Saddle....


....and holding onto the reins for dear life!  Actually I am grateful that COVID has meant that family, friends and neighbors (those that were informed about my surgery) were even more available and supportive than might have been possible if a pandemic hadn't upended all of our lives.  Much better and sooner than I expected, I was able to sit up (and so commenced the hand work project pictured above), then walk around, then take short and then longer walks all within the week after the procedure.  

As part of the recovery, I've also made a few visits to our community garden and used those trips so my DH and I could harvest our garlic.

Here's some of the garlic curing.

Unfortunately all of this on top of the quarantine has cut into starting seeds for transplants for summer planting.  I've direct sown some pepper plant seeds and we had a few "volunteer" tomato starts that had popped up so we'll see if we wind up getting anything out of our garden bed as the summer progresses.

At the start of the second post-surgery week, I was able to sit up at our house desk top computer and now in week three I'm preparing for a return to working at the sewing machine.  Woo hoo!!  First tasks will be to stitch down the applique on the "Hope QOV" and for a little mini quilt kit that provided some fabric for yet another larger Quarantine project I started that I hope I'll get to work on and share later.


Another downside in the past few weeks was that my laptop (my day-to-day working computer) decided it had "had enough" and stopped booting up the week before the surgery so recovery time was also spent figuring out what I wanted in a new machine.  Fortunately that's been resolved as I type this on the new one I picked up this week.  I have a commission project for a friend that will push me to finally, really learn to use the EQ8 software I purchased last year in order to begin the design work on it.  So that need should put some fire in my belly to get a move on to get comfortable using this new computer equipment and moving the files over from my old one.

Thank you again to all that sent well wishes!  This all is a reminder for all of us to take each day as it comes and cherish it!  I am eternally grateful for being a quilter when it came time to be "down for the count".  A stack of "Haven't Started Yet" hand work projects, the ability to read Bloglovin' posts on my phone and a (maybe too generous) collection of quilt books and magazines (both the latest issue of American Patchwork and Quilting and the release of  the new Fons & Porter Quick & Easy Quilts digital edition arrived just in time!) meant illness wouldn't keep a dedicated quilter down!

So with that, I now continue the forward momentum of both healing and (Semi-)Quarantine Quilting!  Happy to be back quilting with all of you!

Monday, June 15, 2020

Taking A Break

Unfortunately, all the recent hyper-productivity I've been fortunate to get to do lately and my plans to focus on machine quilting will be on hiatus for a while.  A health condition I had been monitoring recently took a turn which requires surgery which also means an extended recovery period.  So if the blog is quiet, know that I am not among the missing, just need to take a step back to focus on my health and strength for a while.  I may also not be able to reply to comments for awhile so again, if I do not respond know that I appreciate your comments none the less. 

Prior to the procedure, I had set up some hand work projects since I don't expect to have the stamina to sit at the machine for a bit.  With any luck, I'll be able to post about those in the interim.  I also set up all of my machine projects so they are ready to be returned to when I have the strength to do so.  Looking forward to putting this to good use when I do:

15 Minutes of sewing at a time may be all I can eventually handle!
I'm hoping this won't be too long a break.  The good news is that a recovery period will mean more time to blog surf so I look forward to checking out the posts of all my favorite bloggers while recuperating.  This means I get to comment more frequently than I have while I have been in my "Quarantine Quilting" haze.   Recuperation does have its blessings!

Thursday, June 11, 2020

Quarantine Quilting Update on Flimsie #3

Last design update on my GE Designs "Hope" Quilt Along project:


The main reason I decided to add borders to the top was to bring it to the minimum size needed for a Quilt of Valor.  My finished block layout had been a few inches short of the minimum width for a QOV.  However, to keep it balanced, I added the same borders to both the sides and the top and bottom.

I think in the end it also helps to corral the busy center and bring more focus to the words in the center medallion as compared to the layout without borders.  Additionally, it offered another opportunity to add more of the star appliques which I think brings out the ones in the center even more too.

Some recent developments have upended my quilting plans for June.  Will have to see going forward how everything pans out.  I will say that my Quarantine Quilting frenzy has been nice while it lasted!

Monday, June 1, 2020

Quarantine Flimsie #3: I Should Have Seen This Coming.....

Oops, I did it again!  Introducing "Hope" - Quilts of Valor edition:


On her last "Tipsy Tuesday" for April, Gudrun Erla of GE Designs announced that she was doing a another quilt along as a follow up to her very popular "Elvira" Quilt Along that happened at the end of March.  Naming the new quilt design for this round "Hope", this time she charged a nominal fee for the pattern with the proceeds of the pattern sales going to three local charities in her area that are serving the needs of people affected by the pandemic.  To date, $35K was raised -- way to go Quarantine Quilters!

As with the previous QAL, the final pattern was issued on a Saturday and Gudrun hosted a series of live video tutorials on Sunday that included interviews with quilters from the quilting industry such as Pat Sloan, Doug Leko and Lissa Alexander.  Details of the Hope QAL2 are here.

I really hadn't planned to participate in another QAL -- having already made "Elvira", at the time I was still in the midst of working on Edyta Sitar's Mystery QAL, had two other projects inspired by quarantine posts waiting to be started and was also involved in mask making.  Not to mention there was all the other projects I had going on before the quarantine!  I figured my plate was already full.  However, all it took was the sight of it in the video:


...and realizing I had a ready source of stash for it on hand:


......and an idea was hatched:  this would make another great Quilt of Valor top!  This is the time of year I think about making RWB quilts and have been compiling a bunch of QOV quilt tops and project ideas.  So of course, the idea that this could be another one immediately appealed to me!  Add that this looked like another quickie top to make and used the Stripology ruler (I have the original ruler, the link is to the updated Stripology XL) meant that this Gadget Fanatic was ready to go!  Made up of two simple blocks,  I started the cutting on the Sunday of the event and finished it up Monday:


Once cut, the piecing was quick to do Monday night and it could play "follow the leader/ender" with the Sitar mystery blocks as they were being put together as a top.


Tuesday morning, I was ready to square up the blocks.


This actually made me kind of happy since I always hope I can get to do some RWB sewing during what I call the "patriotic months" (between Memorial Day and Fourth of July).  With the pandemic,  I'm not sure if or what kind of Veteran's Day ceremonies may be scheduled come November but I can add this one to the "To Be Quilted" pile for whenever I am able to donate these in the future.

Once the blocks were done, I had to go back to finishing up the Sitar Mystery because it took up the whole design wall which I also needed for this project.  Once the Sitar top was finished, I could move on to laying out this one.  Gudrun provided a choice of layouts in the pattern.  It was also inspiring to look at other layouts done by other people participating in the QAL.


In the end, I chose the last one which Gudrun called the "Medallion" setting because I could envision it with embellishments to add to the QOV theme.


Accuquilt Classic Letter Die


As Gudrun promised in her pattern and video tutorials,  sewing the blocks together is a breeze because of the way the blocks are designed:  the cut strips for the two different blocks are not the same size which means that along the sides of the blocks, there are almost no seams that come together.  At the few points where they do, they are already pressed in opposite directions so easily butt together.   I decided to try using Bonnie Hunter's “webbing” technique for the first time to sew the blocks together.  That calls for lapping each consecutive column of blocks on the previous row and sewing those seams continuously which will keep the rows “webbed” together by the connecting threads (no pun intended!) down the columns until you sew the rows of blocks together.

Rows of blocks "webbed" together.
One thing I learned as I went along is that when you reach the end of the sewn columns, you do need to be able to pull them completely out of the machine in order to pin together the next column of blocks.  This is another place where having some “leader/ender” piecing units comes in handy.  With all of the top put together, I fused on the appliques to await them being stitched down.  Once that's done, this top will be ready for quilting!

I now really look forward to following along with Pat Sloan's June quilting prompts.  After some warm ups I'll quilt during this month, I hope (no pun intended!) to have the confidence to finally tackle the (now) pile of QOV tops I have as machine quilting projects for July.  Fingers crossed!